# Trials Overview
This chapter describes all of the functionality that is accessible from the Trials Overview tab in INVISION.
# Understanding the INVISION Overview Page
#### **Guide to Understanding the Overview Page**
The Overview Page of INVISION is designed to offer users a comprehensive and intuitive view of their field trials. This document will guide you through the key components of the Overview Page, helping you navigate and utilize the platform effectively for optimal trial management.
#### **Components of the Overview Page**
1. **Menu & Roles**
- **Location**: Top of the page.
- **Function**: Displays the name of the client associated with the current session. Adjacent to this, the user’s role is shown, indicating the level of access and permissions within the platform. [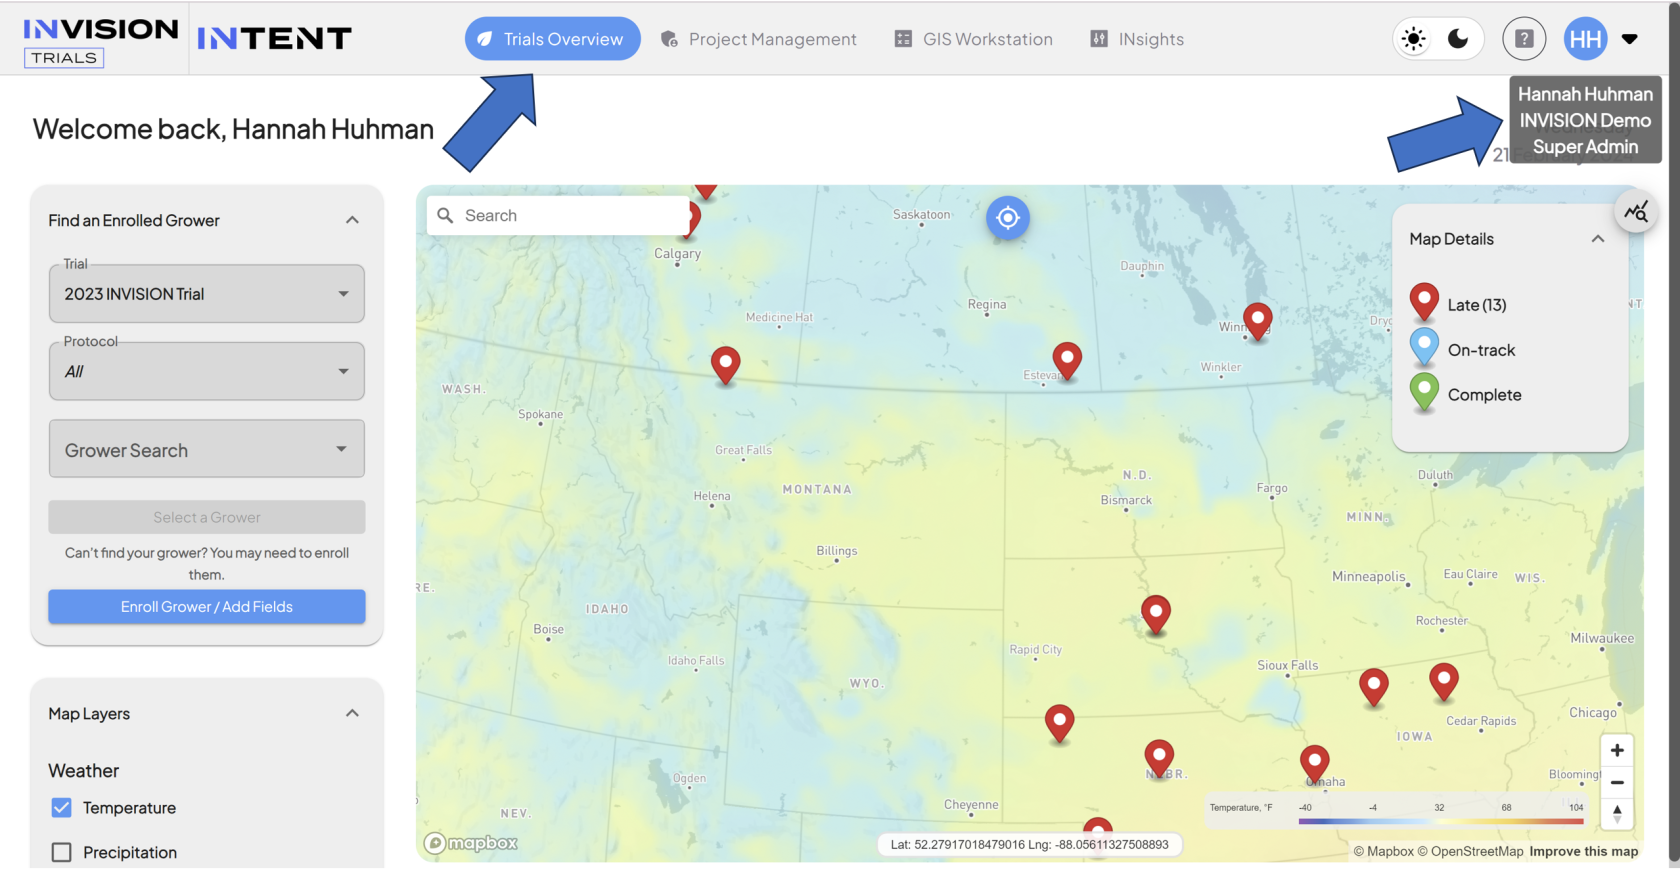](https://docs.prod.intent.ag/uploads/images/gallery/2024-02/screenshot-2024-02-21-154311.png)
2. **Map Component**
- **Location**: Central section of the Overview Page.
- **Function**: Offers a dynamic map view of your field trials. Key features include:
- **Field Location Markers**: Represented by dots, indicating the geographic location of each field.
- **Color Coding**: Helps identify the status of each field (e.g., on track, needs attention).
- **Interactive Elements**: Allows users to click on specific fields for more detailed information.[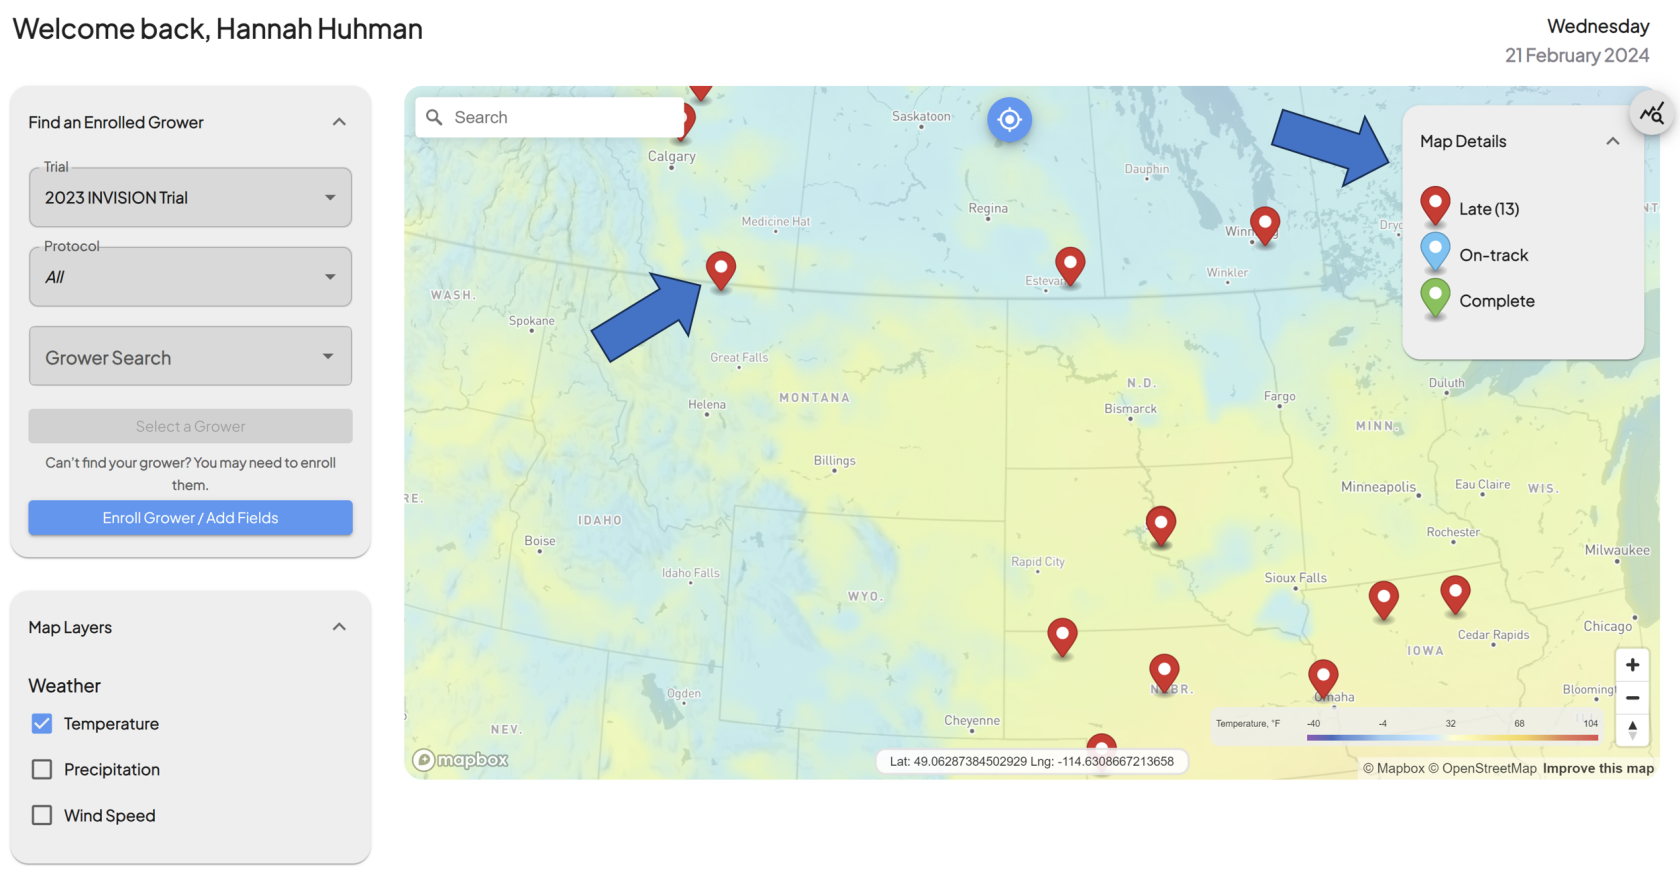](https://docs.prod.intent.ag/uploads/images/gallery/2024-02/screenshot-2024-02-21-155047.png)
3. **Find an Enrolled Grower**
- **Location**: A dedicated search or selection component on the page.
- **Function**: Facilitates the search for enrolled growers. Users can quickly access growers' data, enhancing the efficiency of information retrieval.[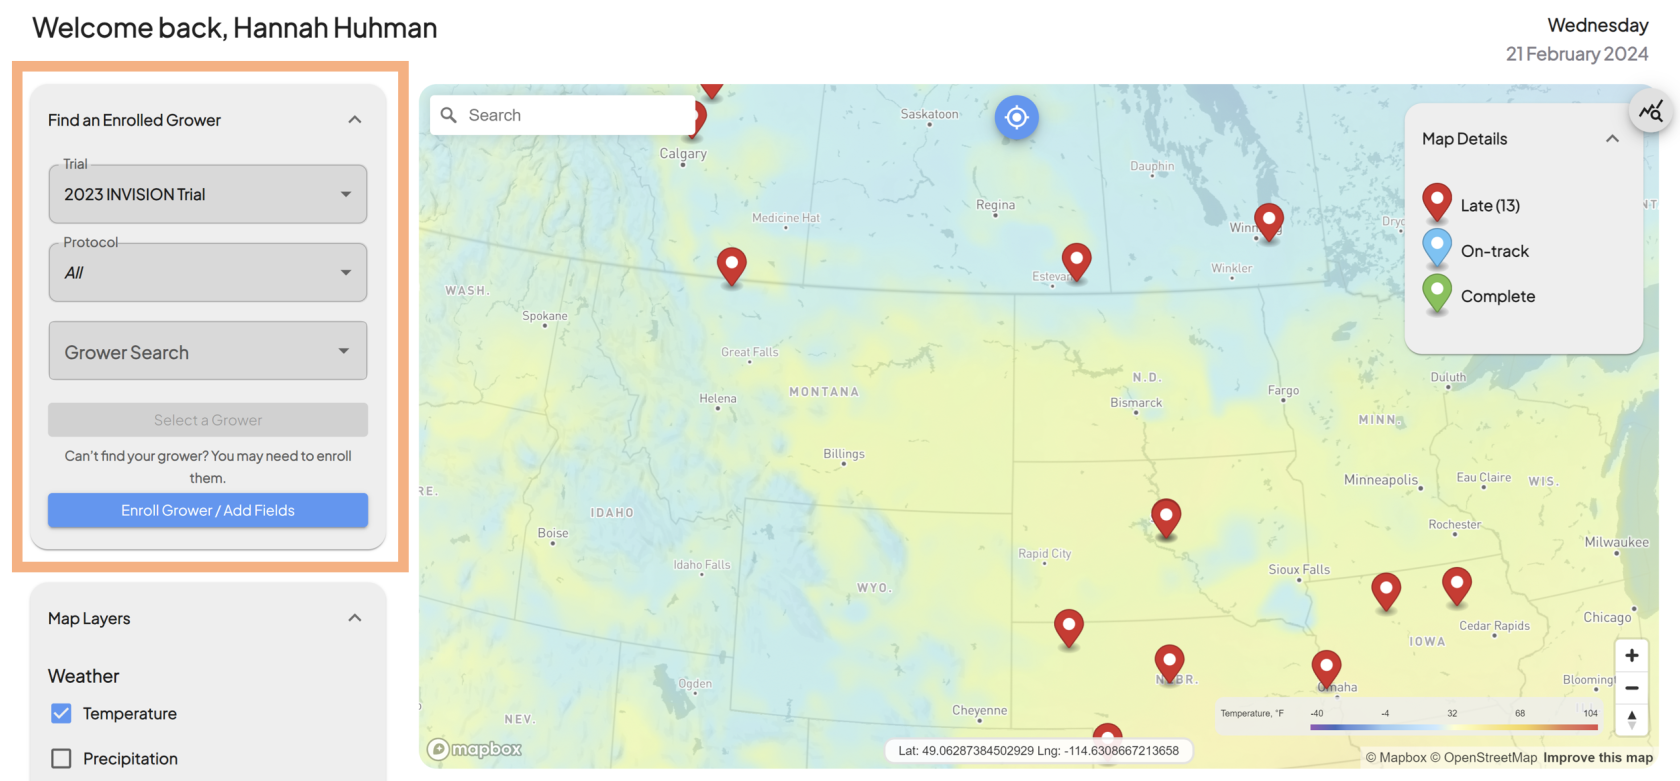](https://docs.prod.intent.ag/uploads/images/gallery/2024-02/screenshot-2024-02-21-155330.png)
4. **Enroll Grower / Add Fields**
- **Location:** A dedicated button within the **Find an Enrolled Grower** Panel [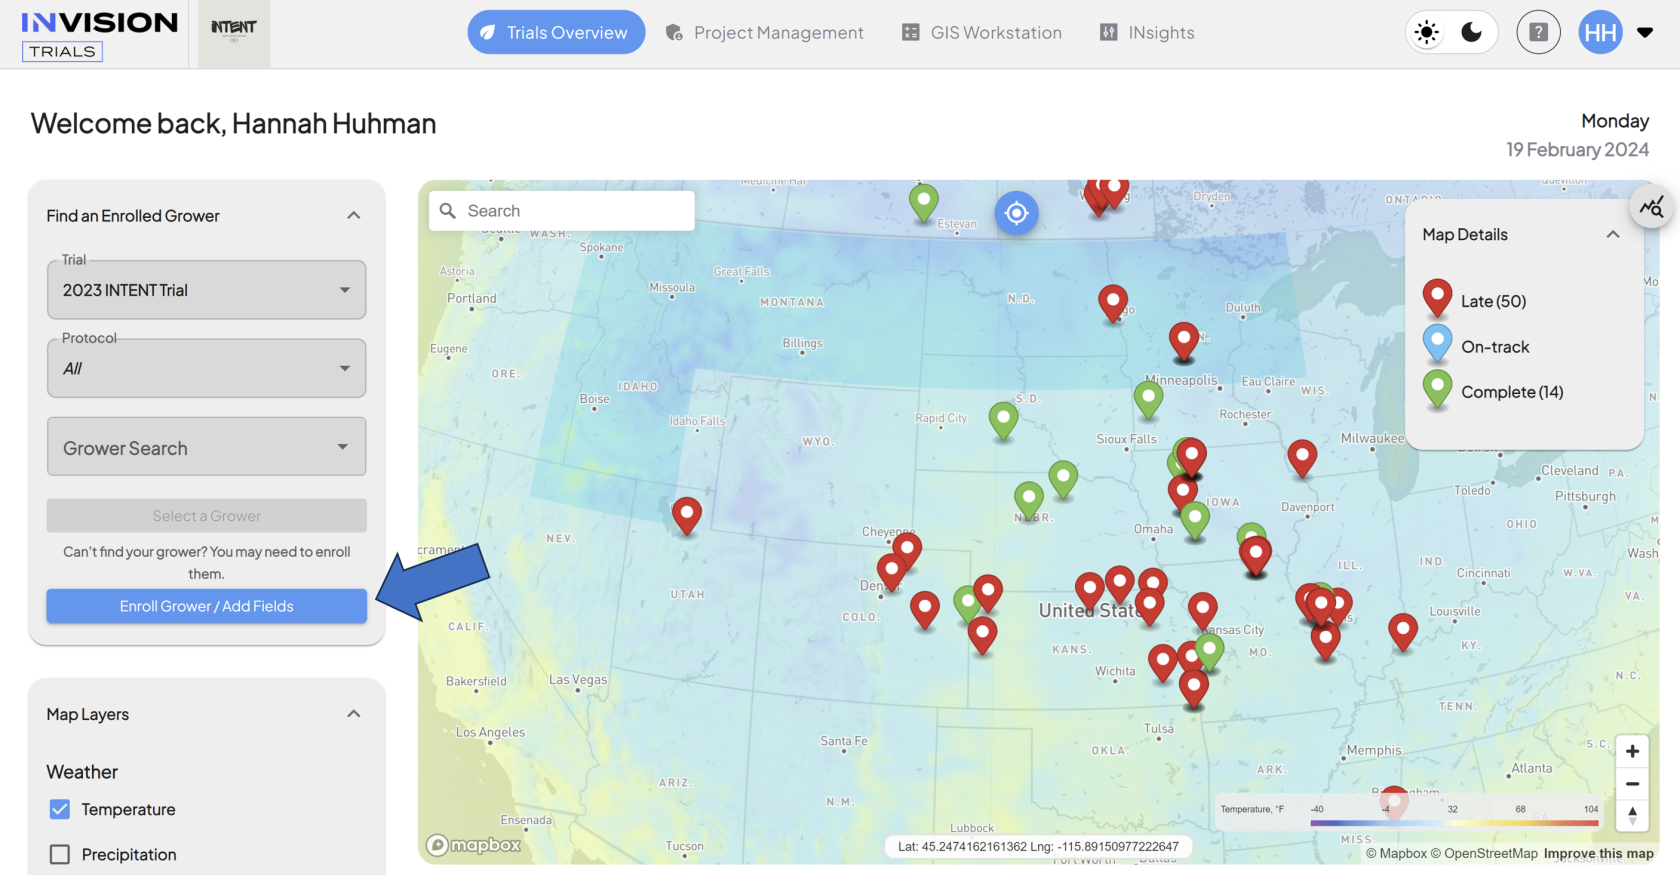](https://docs.prod.intent.ag/uploads/images/gallery/2024-02/screenshot-2024-02-19-102429.png)
- **Function:** Activates the **Enroll Grower / Find Fields** Panel. Users can check the current status of enrollment for growers/fields or enroll a new grower and/or field.[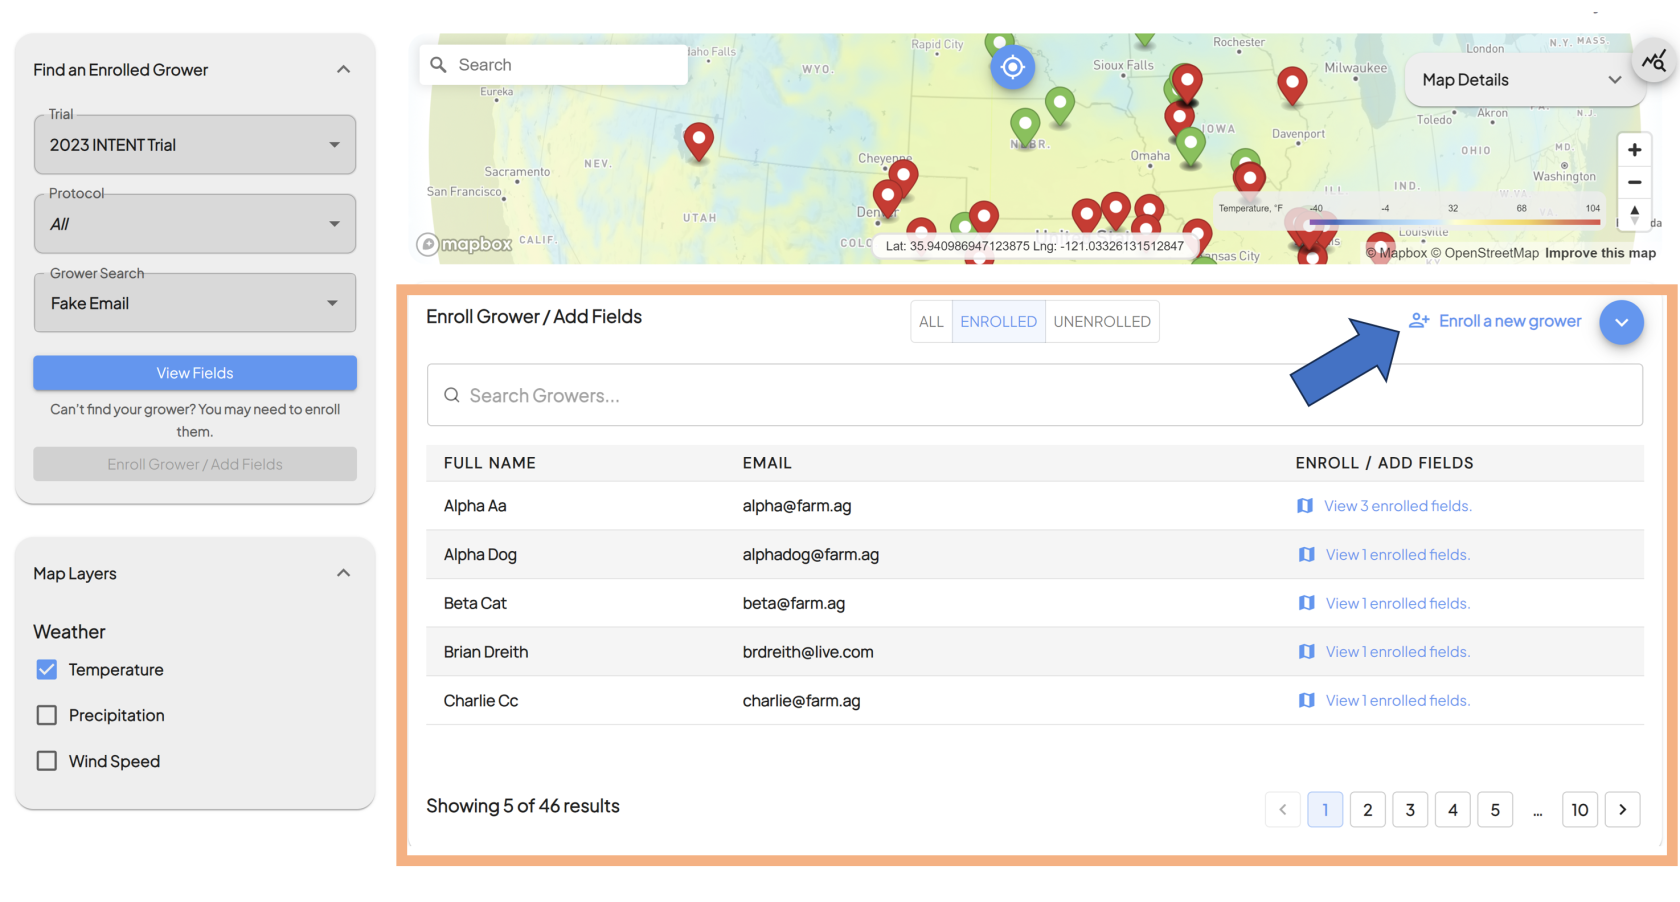](https://docs.prod.intent.ag/uploads/images/gallery/2024-02/screenshot-2024-02-19-160527.png)
5. **Map Layers**
- **Location**: Accessible through a toggle or menu on the map.
- **Function**: Provides layers of information over the map, including:
- **Precipitation**: Visualizes rainfall patterns.
- **Temperature**: Displays current temperature data.
- **Wind Speed**: Shows wind conditions.
- These layers assist in understanding environmental factors affecting the fields.[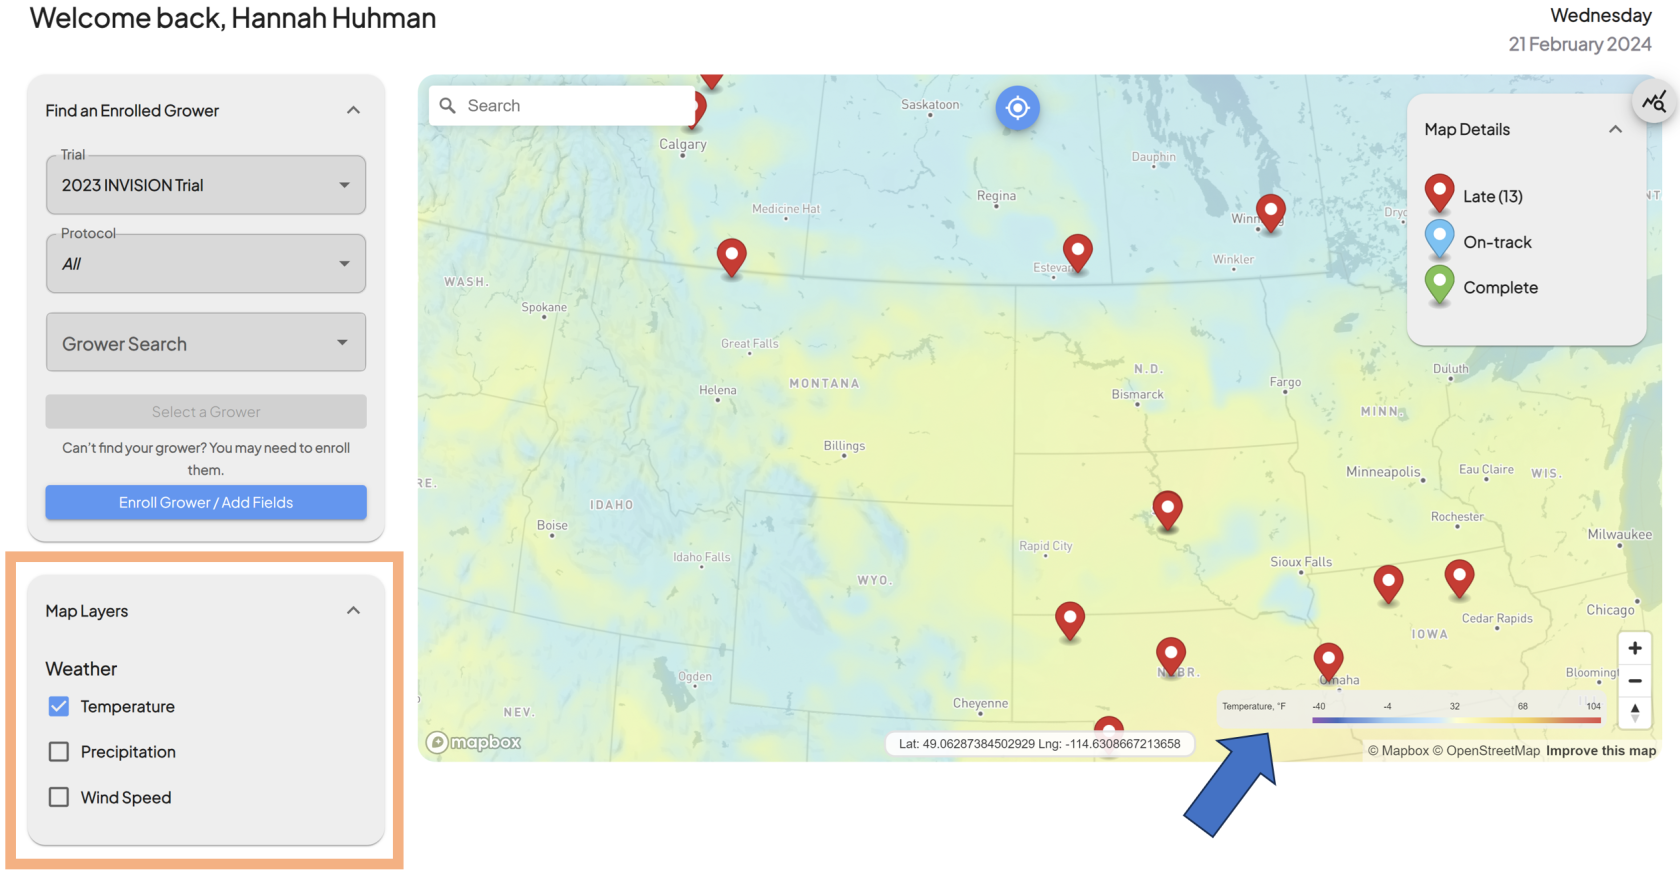](https://docs.prod.intent.ag/uploads/images/gallery/2024-02/screenshot-2024-02-21-155611.png)
6. **Protocol Details**
- **Location**: A designated section on the page.[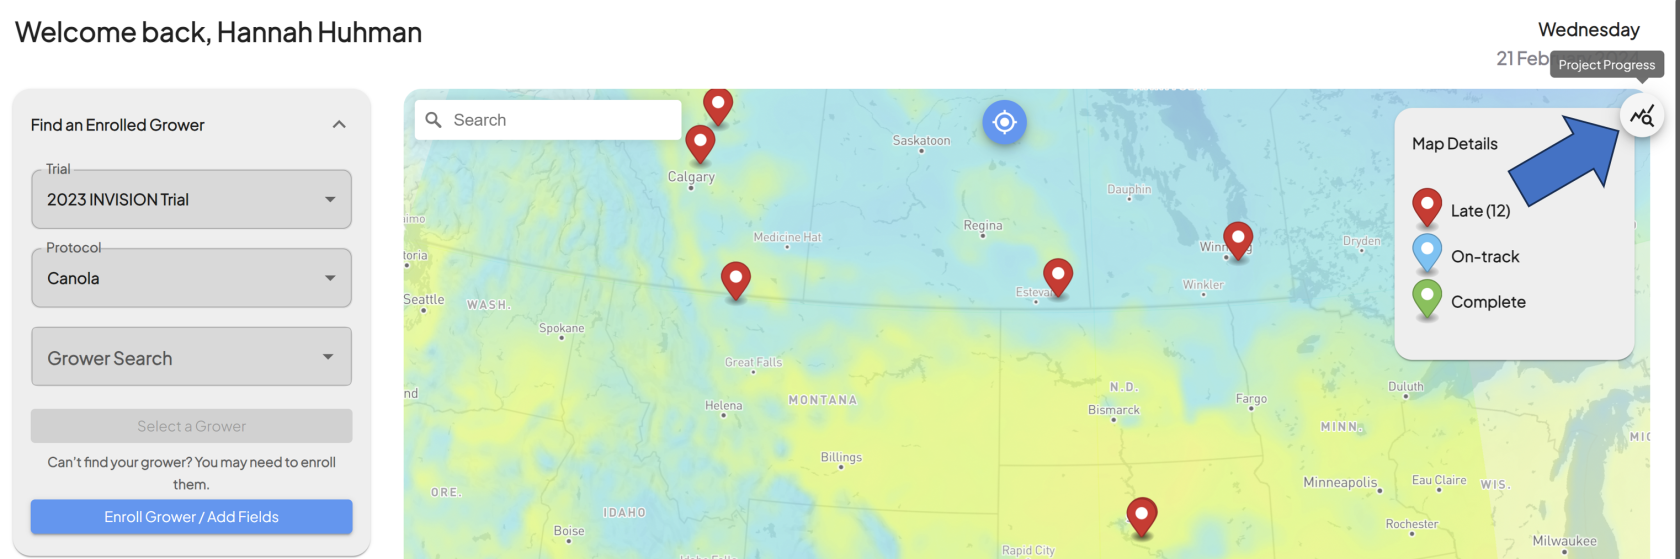](https://docs.prod.intent.ag/uploads/images/gallery/2024-02/screenshot-2024-02-22-142816.png)
- **Function**: Offers detailed insights into each step of the trial protocol. This includes:
- **Step-by-Step Progress Tracking**: Understand each phase of the trial protocol.[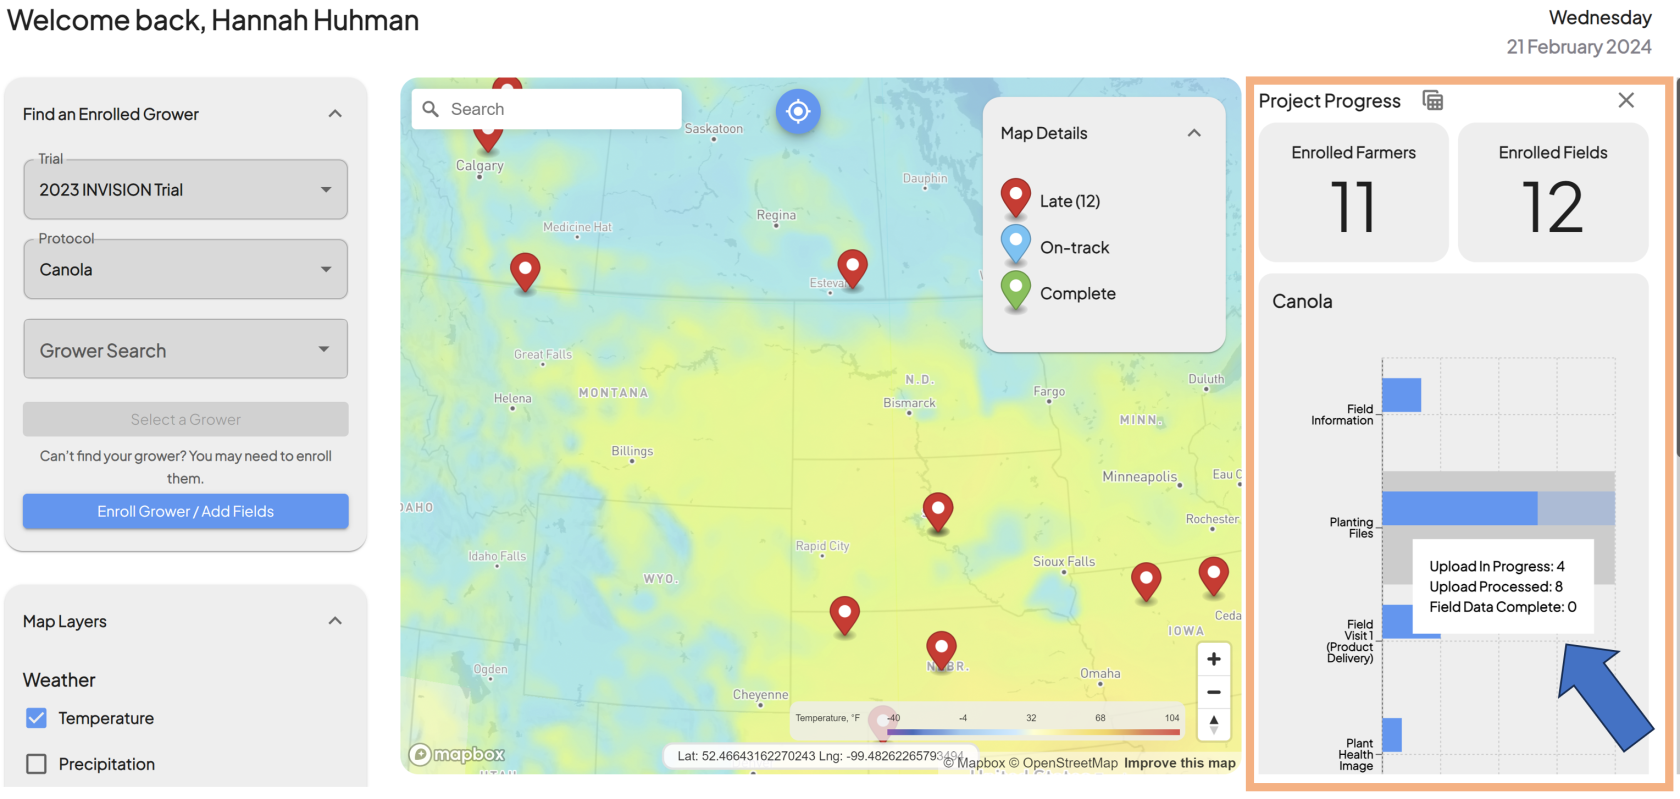](https://docs.prod.intent.ag/uploads/images/gallery/2024-02/screenshot-2024-02-22-143315.png)
- **Issue Identification**: Alerts for steps that require attention.
#### **Navigating the Overview Page**
- The Overview Page is designed for ease of use, with intuitive navigation and interactive elements.
- Users can hover over different components for quick information or click for more detailed data.
- Tooltips and guidance messages are available to assist new users in familiarizing themselves with the platform's features.
#### **Navigating to the View Fields Page**
- The View Fields Page is a more in depth look at a specific grower's field within a trial/protocol. Users can get there from the Overview Page in two different ways:
1. **Clicking on a Field Location Marker**
- Hovering over a Field Location Marker on the map will bring uo Field and Field Owner information.
- Clicking on the Field Location Marker will bring you to the View Fields page for that grower and field.
2. **View Fields Button**
1. From the **Find the Enrolled Grower panel,** select a Trial, Protocol, and Grower
2. Once all of the above are filled out, clicking the **View Fields** button will take you to the View Fields page for that grower and field.
For additional help, follow along with this video for a tour of the **Overview Page**:
---
**Note**: This document can be customized further based on specific user roles, additional features of the INvision Trials platform, or any updates to the system interface.
# Understanding the INVISION View Fields Page
#### **Guide to Understanding View Fields**
The View Fields page of INVISION is designed to offer users an in depth and intuitive view of a specific grower's field and trial progress. This document will guide you through the key components of View Fields, helping you navigate and utilize the platform effectively for optimal trial management.
#### **Components of View Fields**
1. **Trial Panel**
- **Location:** Left side of View Fields.[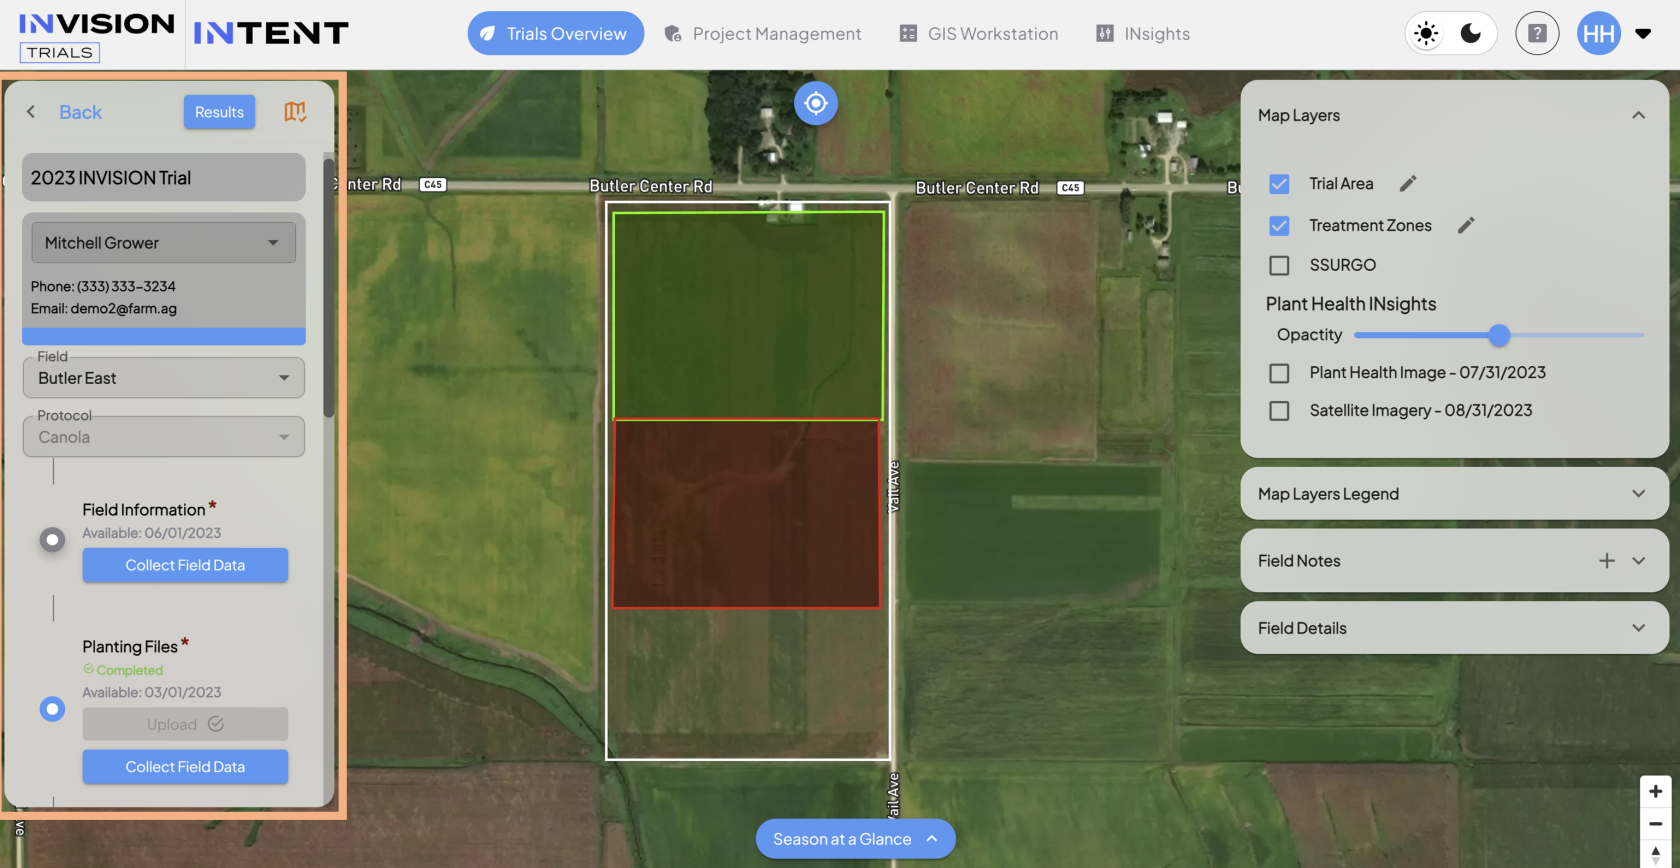](https://docs.prod.intent.ag/uploads/images/gallery/2024-02/screenshot-2024-02-23-135316.png)
- **Function:** The Trial Panel is like the control center of View Fields. This is where users can select or change the field and/or protocol that they're viewing on the map, and it gives access to act on the protocol steps of the trial.
- **Trial:** Displays the Trial of the Field the user is viewing.
- **Grower Selection:** Displays the owner of the field the user is currently viewing on the map. Users can use the dropdown to cycle through other Growers within the same trial to view in View Fields, without having to go back to the Overview Page.
- **Protocol Selection:** Displays the protocol of the field the user is currently viewing. Users can use the dropdown to select other protocols that the current field may also be enrolled in to display on View Fields.
- **Protocol Steps:** All steps of a protocol are represented on the right side of View Fields. Protocol steps will have one or more actionable buttons listed below them.
- Mandatory protocol steps are distinguished with an asterisk.
- Protocol steps are displayed in the order
- **Results Button:** Opens a PDF that summarizes the statistics and results for the specific field the user is viewing.
- **Approve/Disapprove Icon:** For users that have access, this button controls the approval/disapproval to publish the harvest analytics for the specific field the user is viewing.[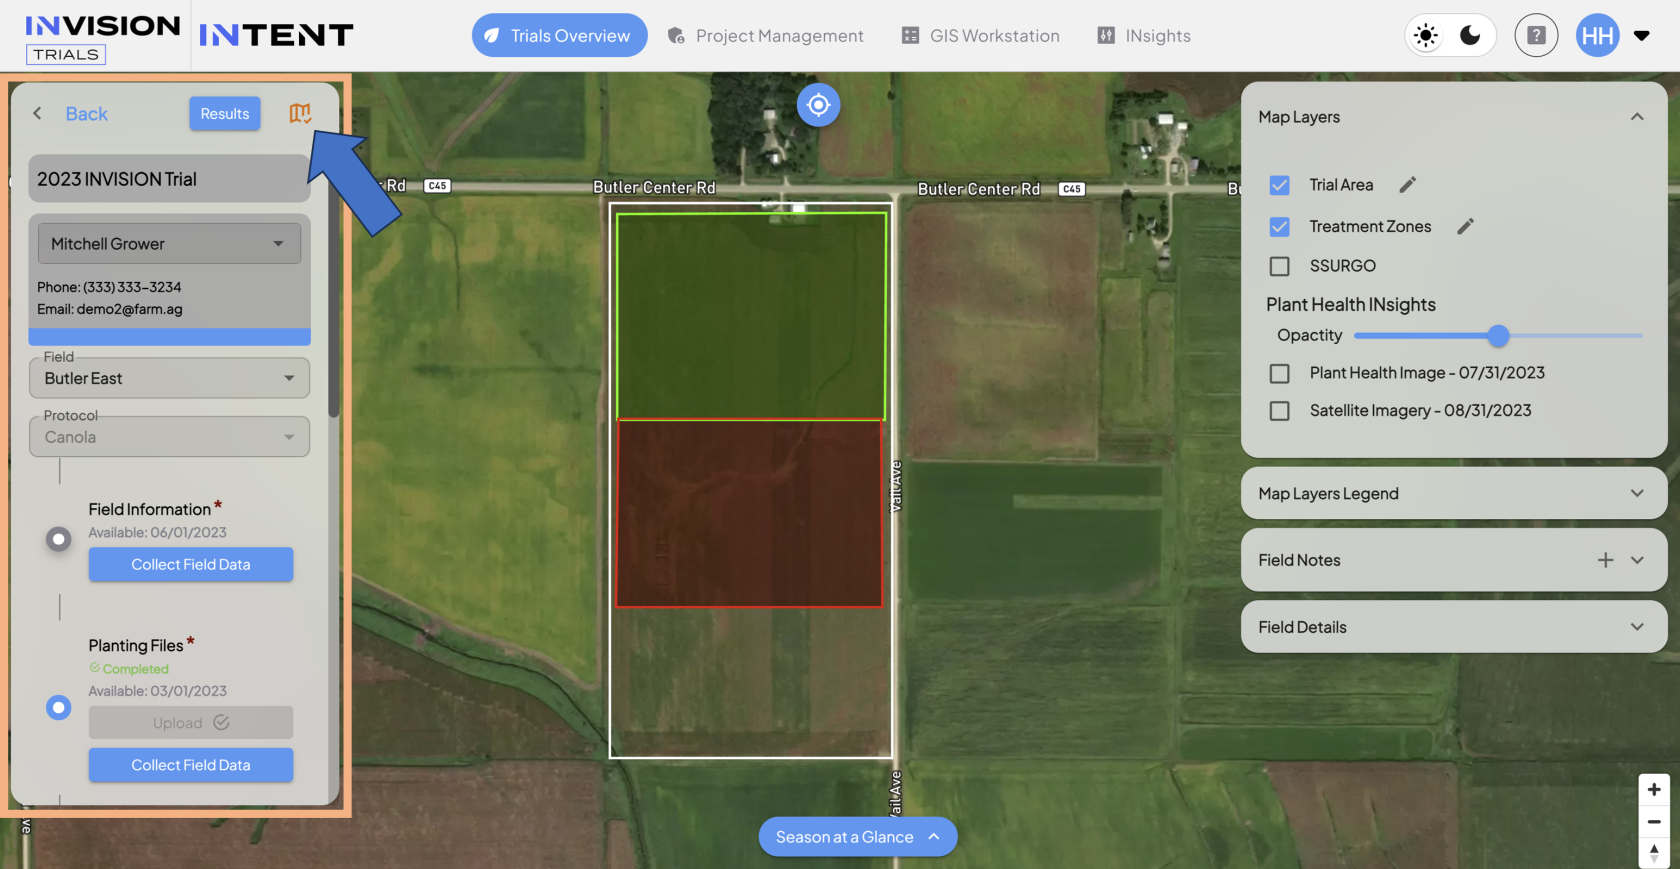](https://docs.prod.intent.ag/uploads/images/gallery/2024-02/screenshot-2024-02-26-095013.png)
2. **Map Component:**
- **Location:** Central Section of View Fields.
- **Function:** Offers a dynamic map view of a specific grower's field.
- **Center Button:** Pans the map so that the field is centered.[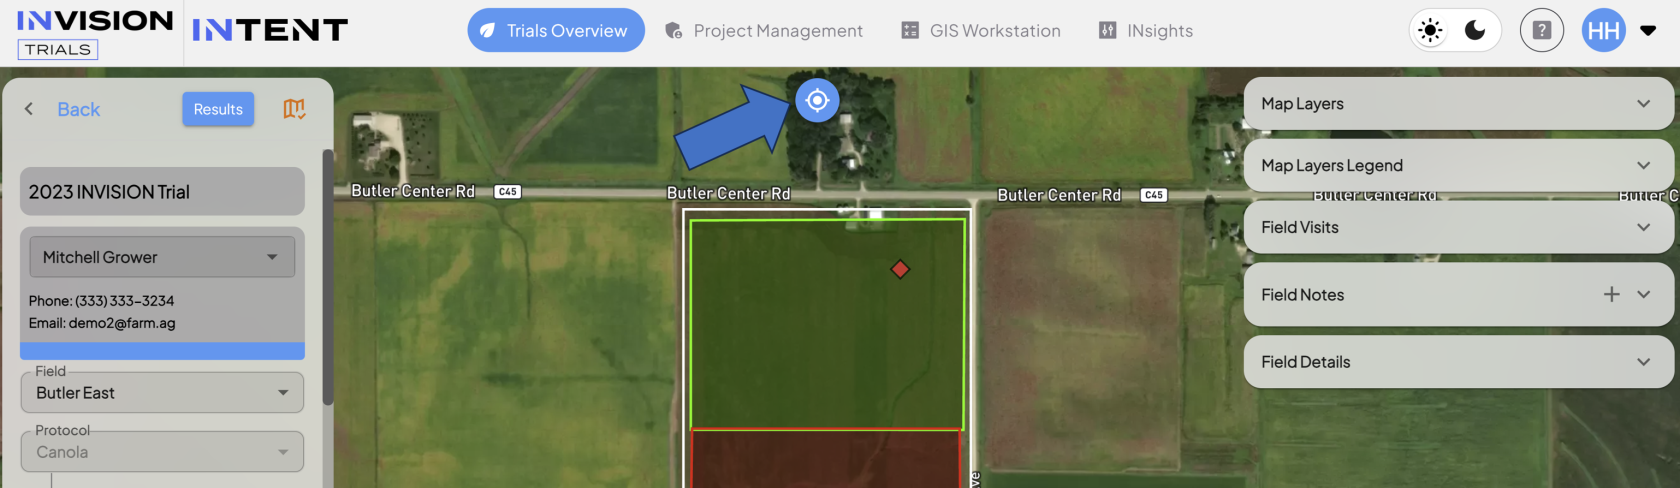](https://docs.prod.intent.ag/uploads/images/gallery/2024-02/screenshot-2024-02-27-110256.png)
- **Zoom Level Controls:** Users can zoom the map in and out with a mouse or trackpad, but plus and minus buttons are also available to control the zoom level of the map. [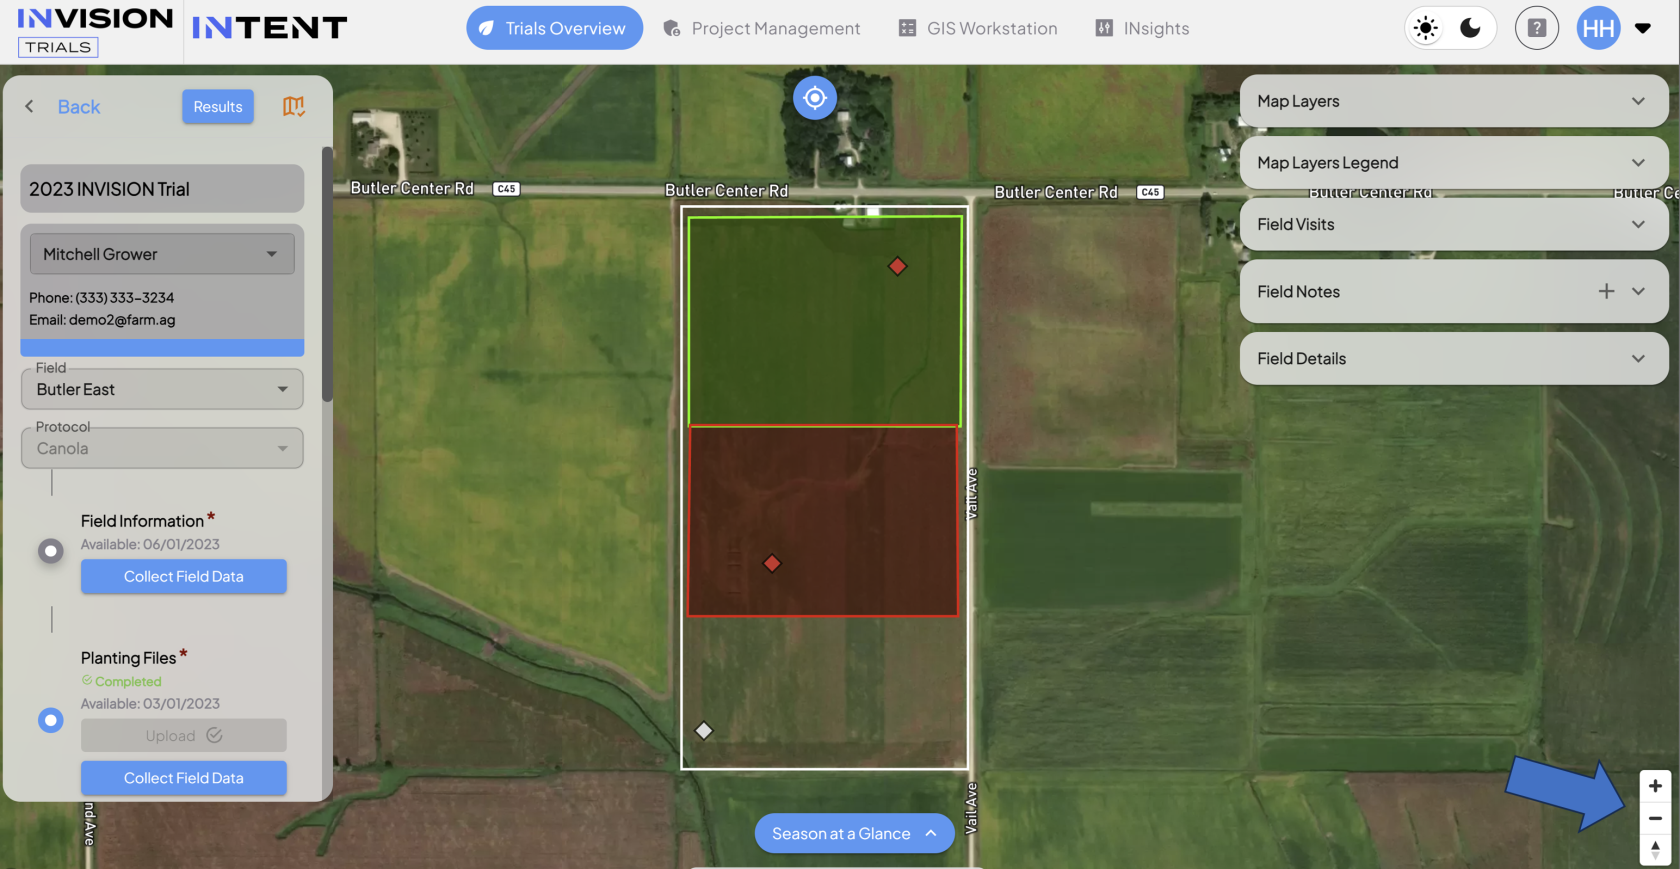](https://docs.prod.intent.ag/uploads/images/gallery/2024-02/screenshot-2024-02-27-110737.png)
3. **Map Layers:**
- **Location:** Right side of View Fields.
- **Function:** Gives the user the ability to toggle the display of different map layers on or off. The following are examples of layers you might see in **View Fields:**
- **Trial Area:** Users with specific permissions can edit their field boundary for a specific protocol, and the resulting layer is the **Trial Area.** This is useful if unforeseen circumstances have an impact on the field, for example, flooding in a particular area of the field prevents the application of a product. In that case, the area of the field that is still active in the trial can be outline with the **Trial Area.** [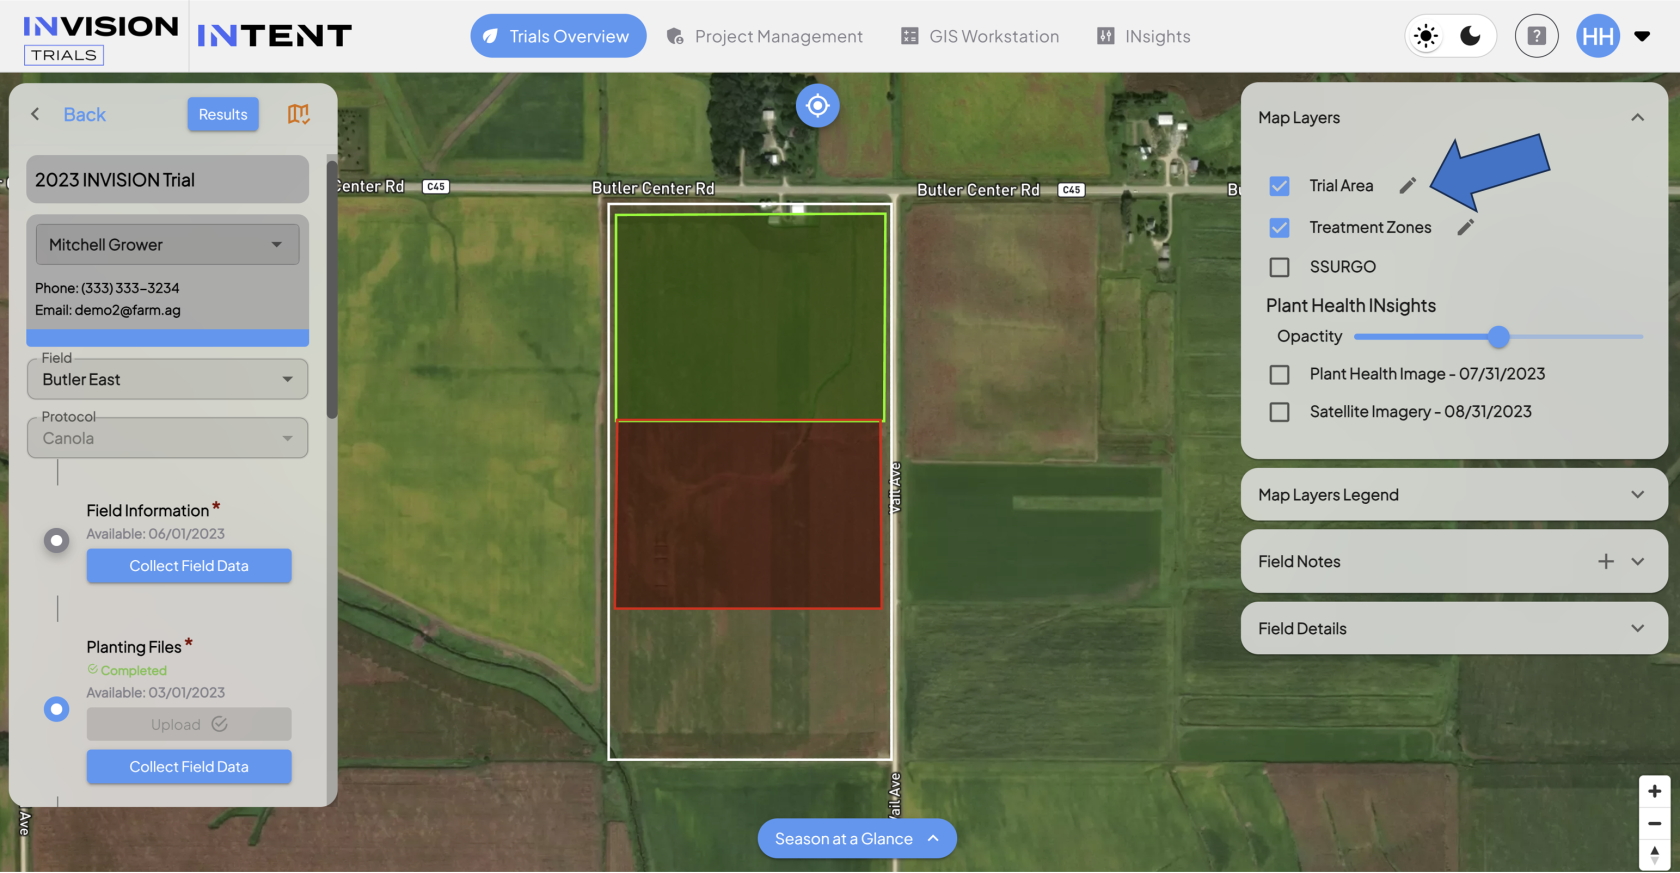](https://docs.prod.intent.ag/uploads/images/gallery/2024-02/screenshot-2024-02-27-102154.png)
- **Field Visits:** When users complete field visits through the **INVISION Mobile App**, the data, including photos and location markers, are shown in **View Fields.** Users with specific permissions are able to edit the data, location, or photos captured in these field visits from the INVISION Platform. **[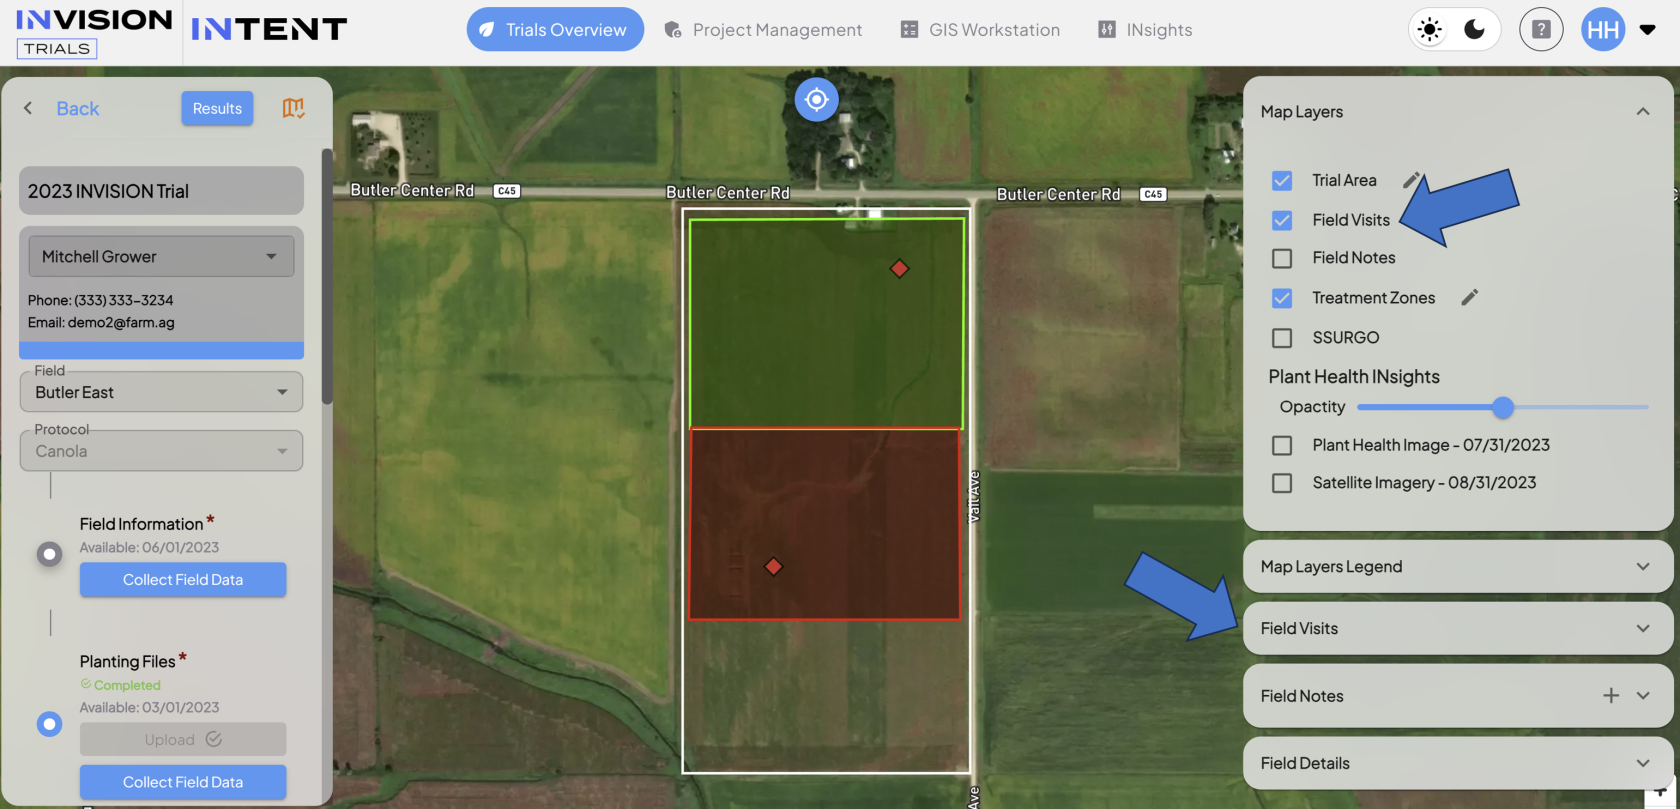](https://docs.prod.intent.ag/uploads/images/gallery/2024-02/screenshot-2024-02-27-113811.png)**
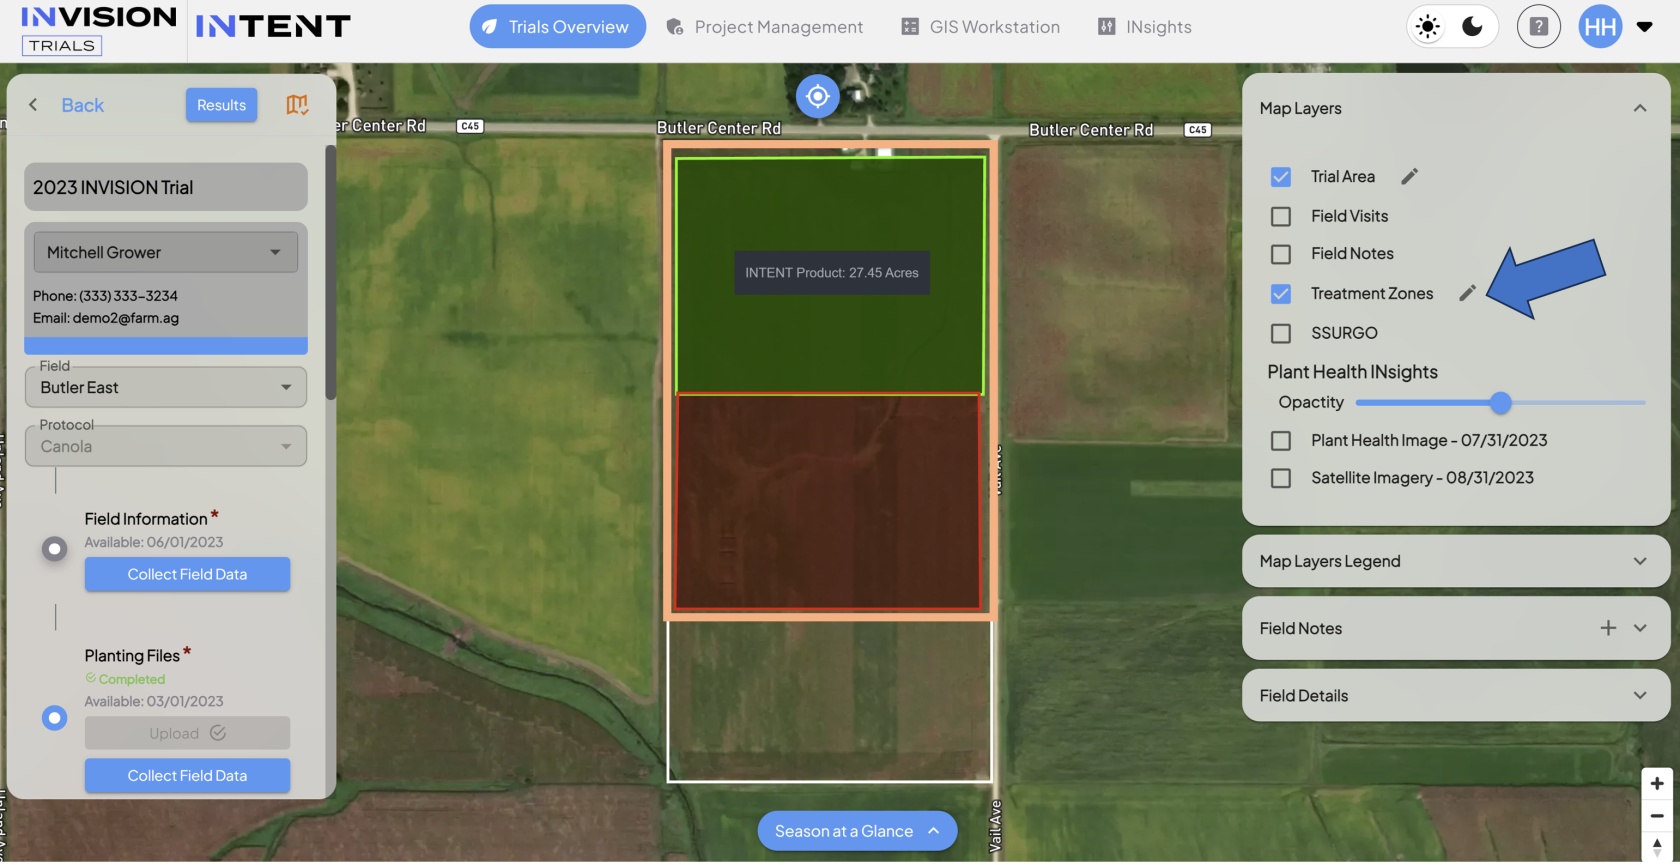
- **Treatment Zones:** Users with specific permissions can create **Treatment Zones** for fields. These **Treatment Zones** represent areas of the field where different treatment procedures are carried out. For example, the green area in the photo below may represent where one area was treated with a different product that was applied to the red area.
**[](https://docs.prod.intent.ag/uploads/images/gallery/2024-02/screenshot-2024-02-27-104238.png)**
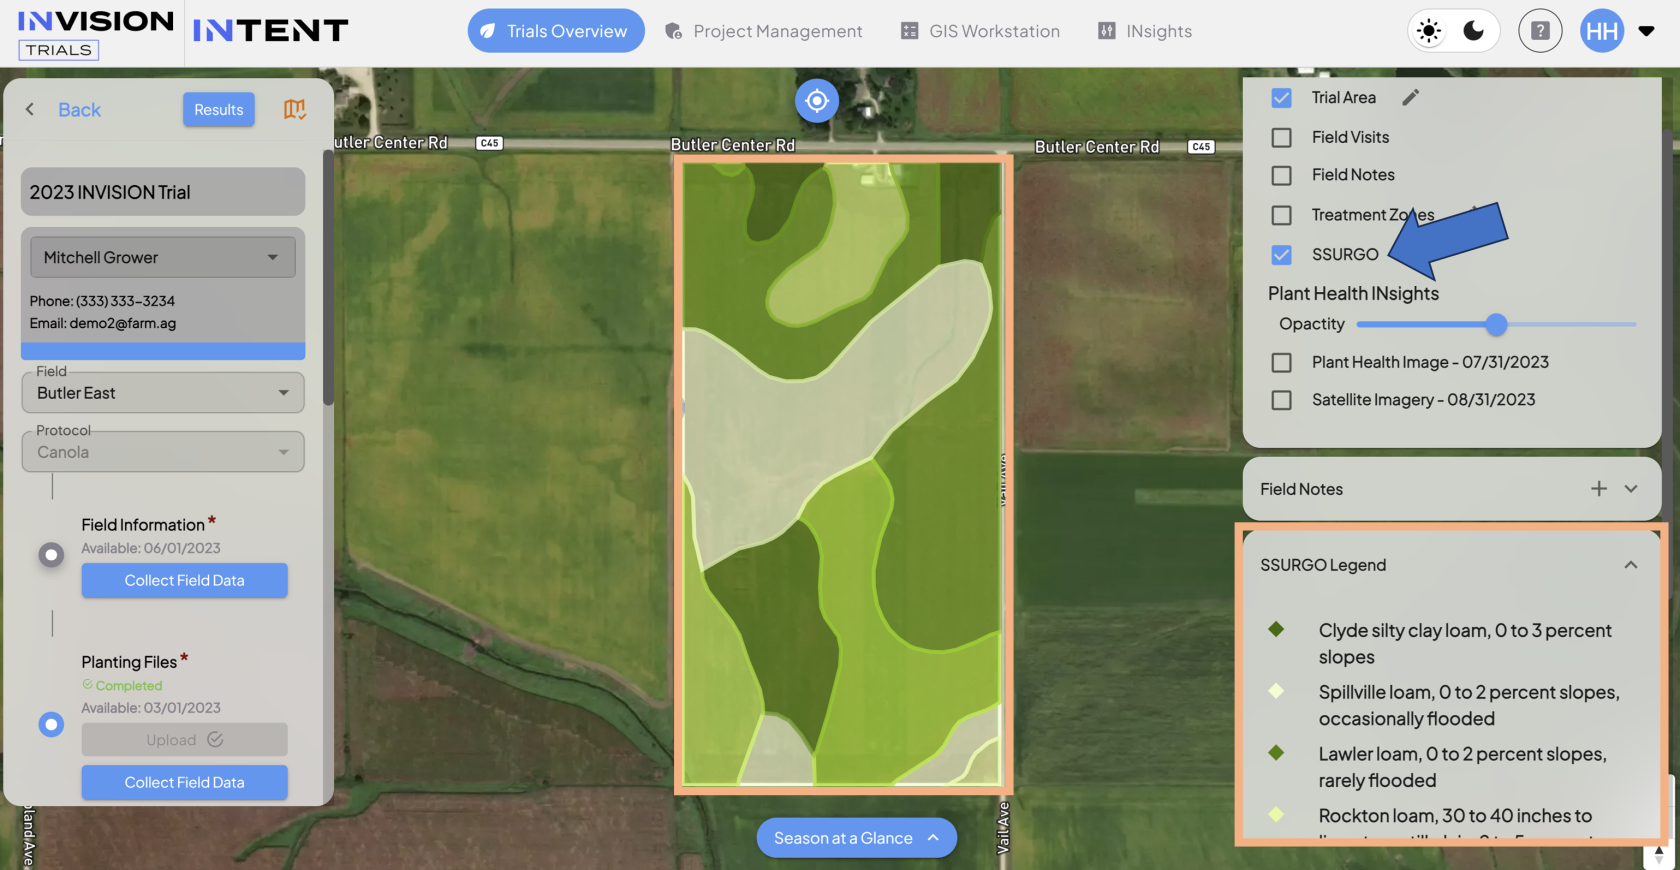
- **SSURGO/SWAT: SSURGO** layer for the US and **SWAT** layer for Canada provide information about the soil classification for the the field.
[](https://docs.prod.intent.ag/uploads/images/gallery/2024-02/screenshot-2024-02-27-114848.png)
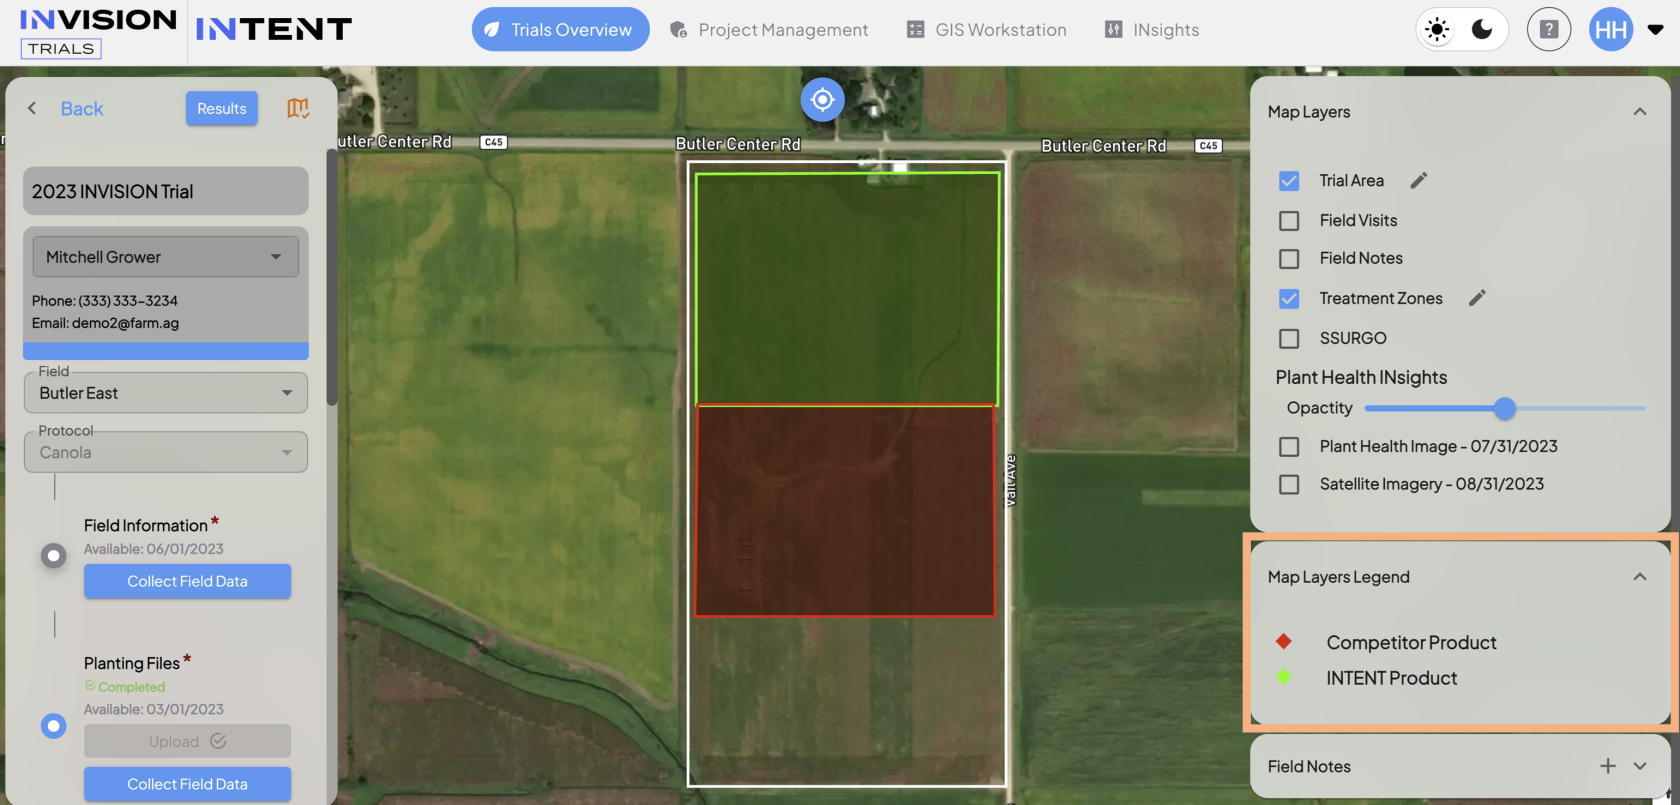
4. **Map Layers Legend:**
- **Location:** Right side of View Fields.
[](https://docs.prod.intent.ag/uploads/images/gallery/2024-02/screenshot-2024-02-27-115416.png)
- **Function:** Provides context for the layers displayed on the map.
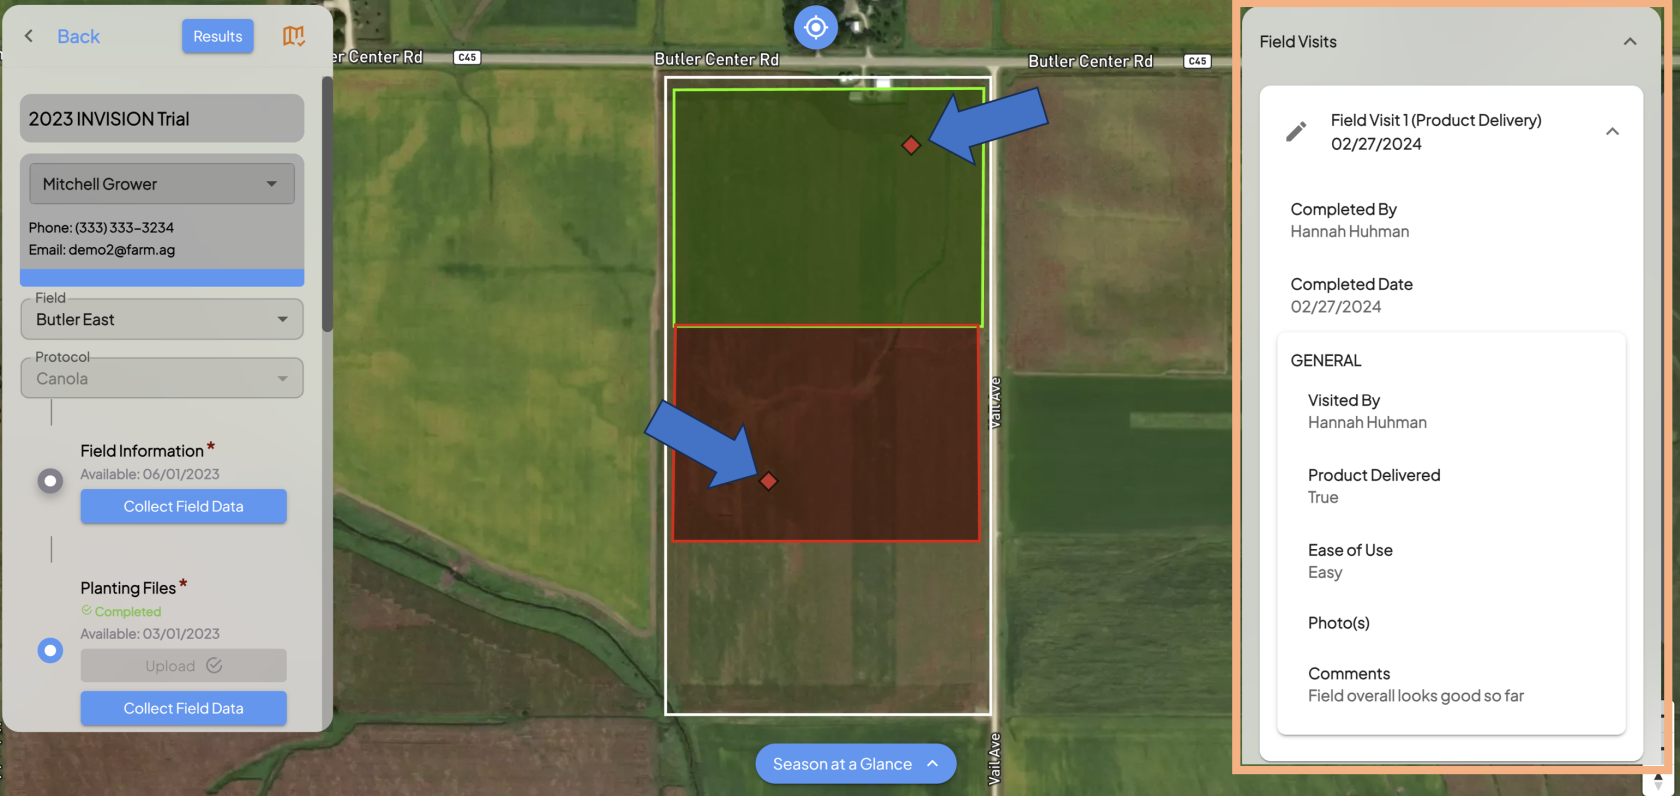
5. **Field Visits**
- **Location:** Right side of View Fields.
**[](https://docs.prod.intent.ag/uploads/images/gallery/2024-02/sDEimage.png)**
- **Function:** Displays the data captured during field visits, including location markers shown on the map.
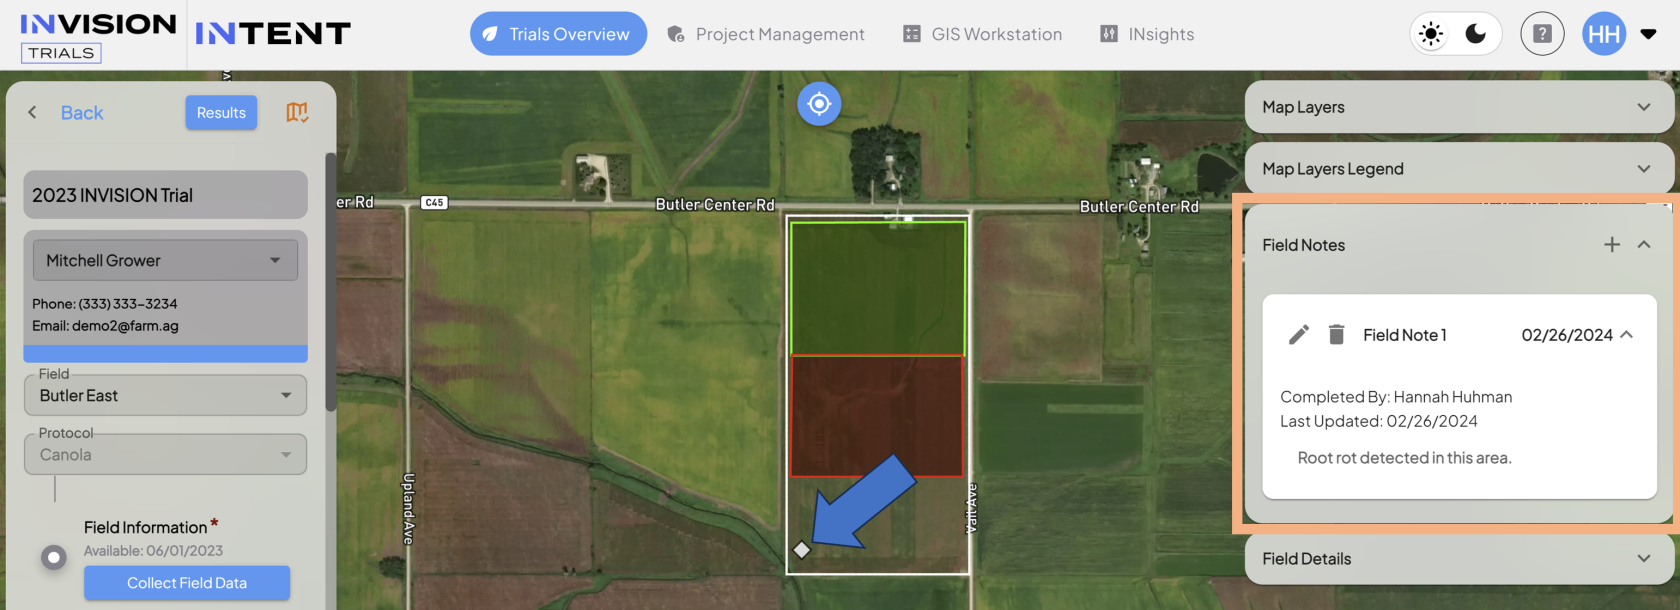
6. **Field Notes:**
1. **Location:** Right side of View Fields.
2. **Function:** Displays the data captured in field notes, including a location marker shown on the map.
[](https://docs.prod.intent.ag/uploads/images/gallery/2024-02/screenshot-2024-02-26-145155.png)
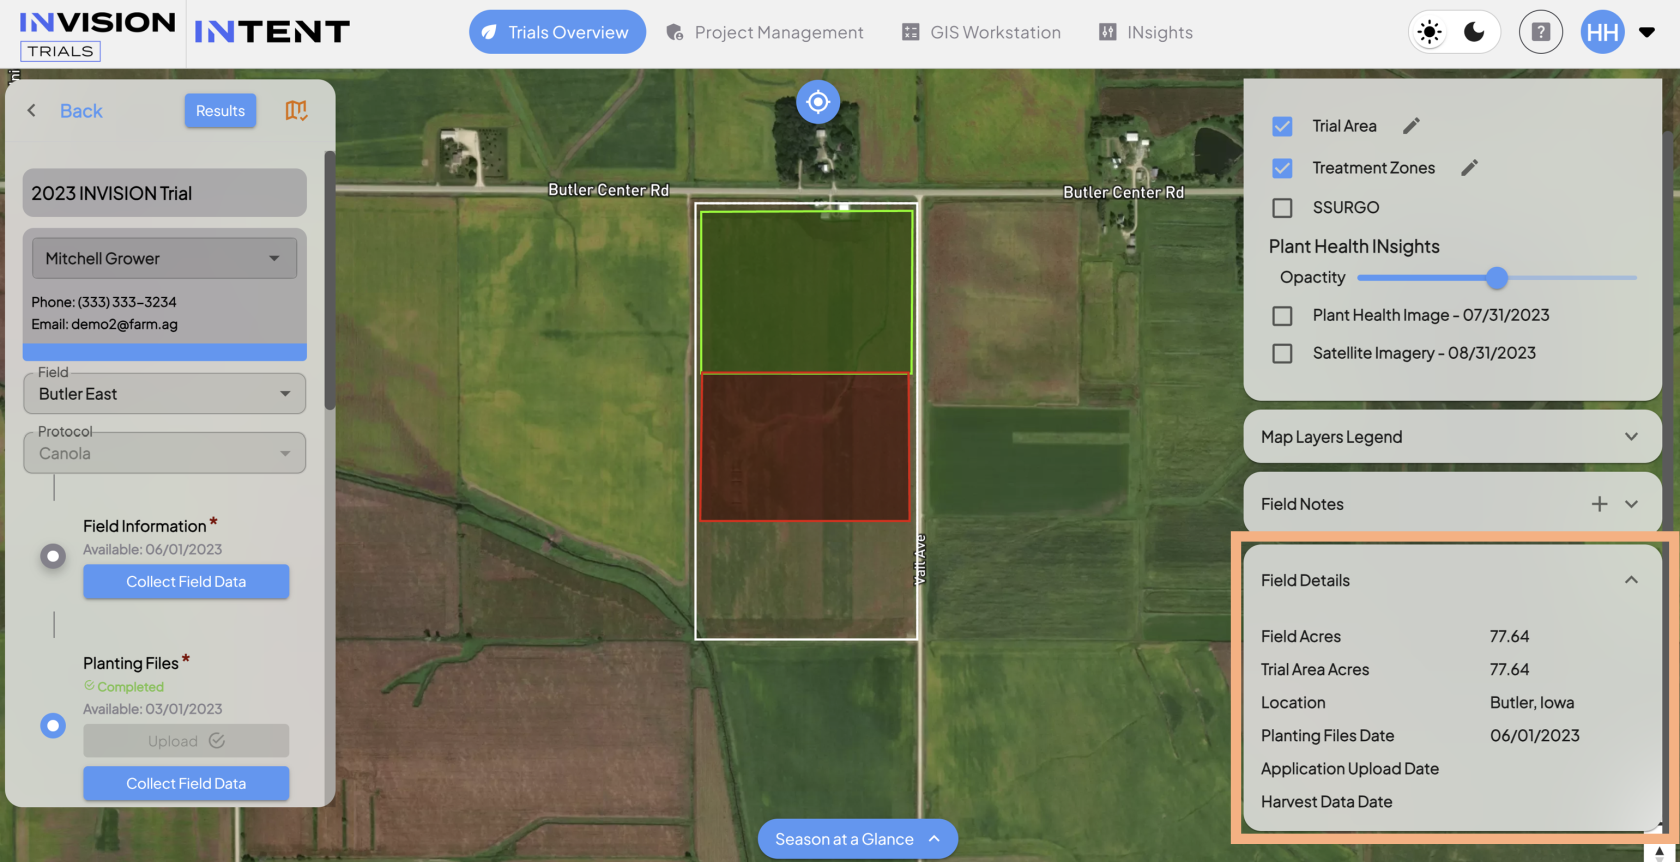
7. **Field Details:**
- **Location:** Right side of View Fields.
[](https://docs.prod.intent.ag/uploads/images/gallery/2024-02/screenshot-2024-02-26-143442.png)
- **Function:** Displays quick facts about the field shown on the map.
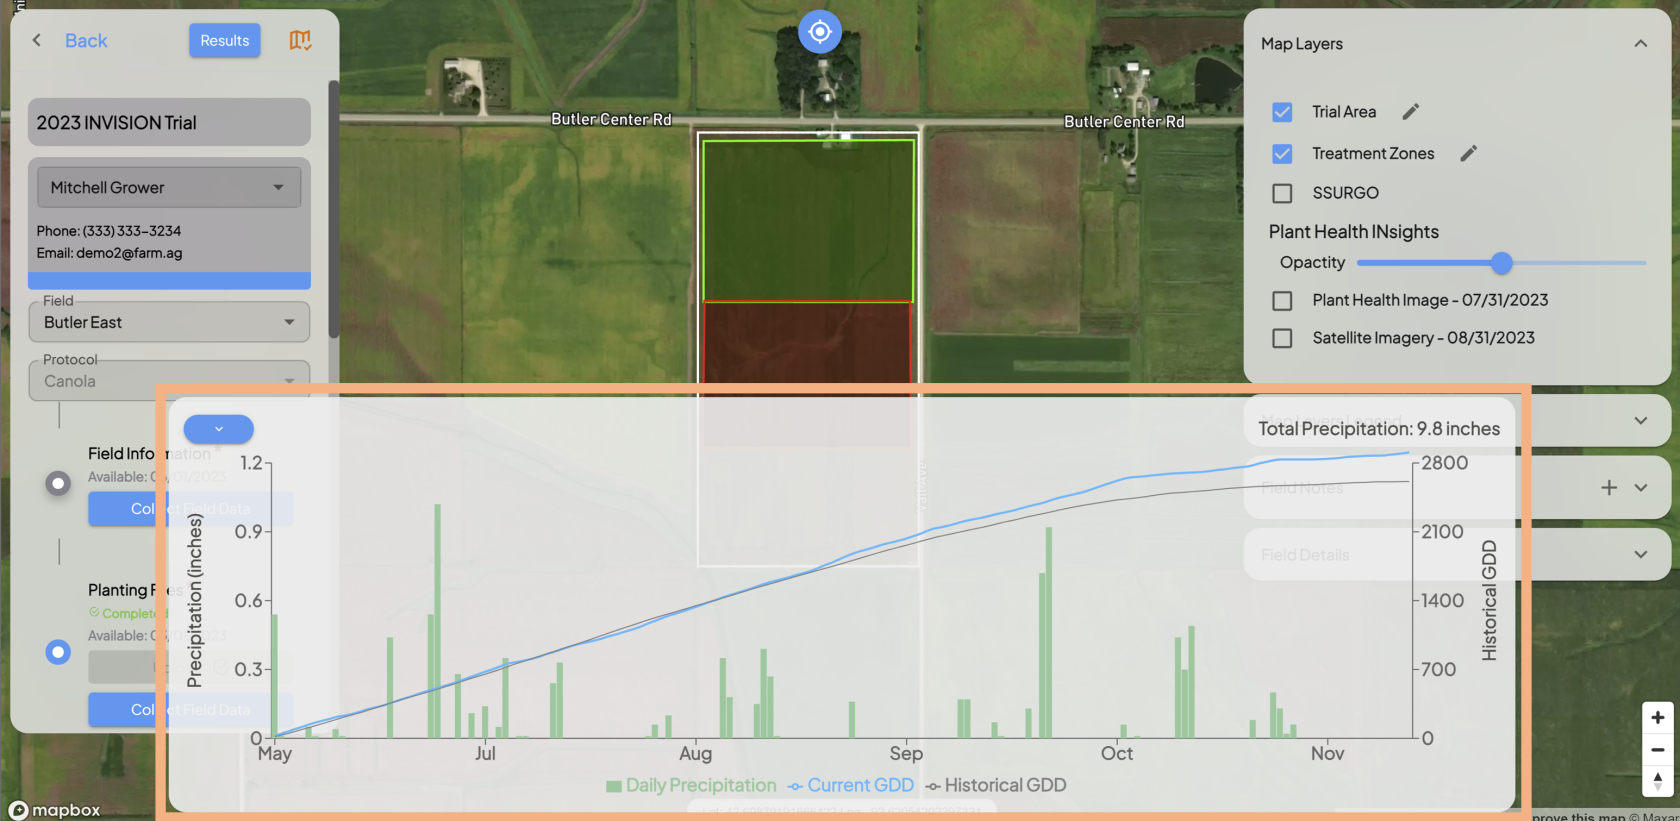
8. **Season at a Glance:**
- **Location:** Bottom center of the map.
[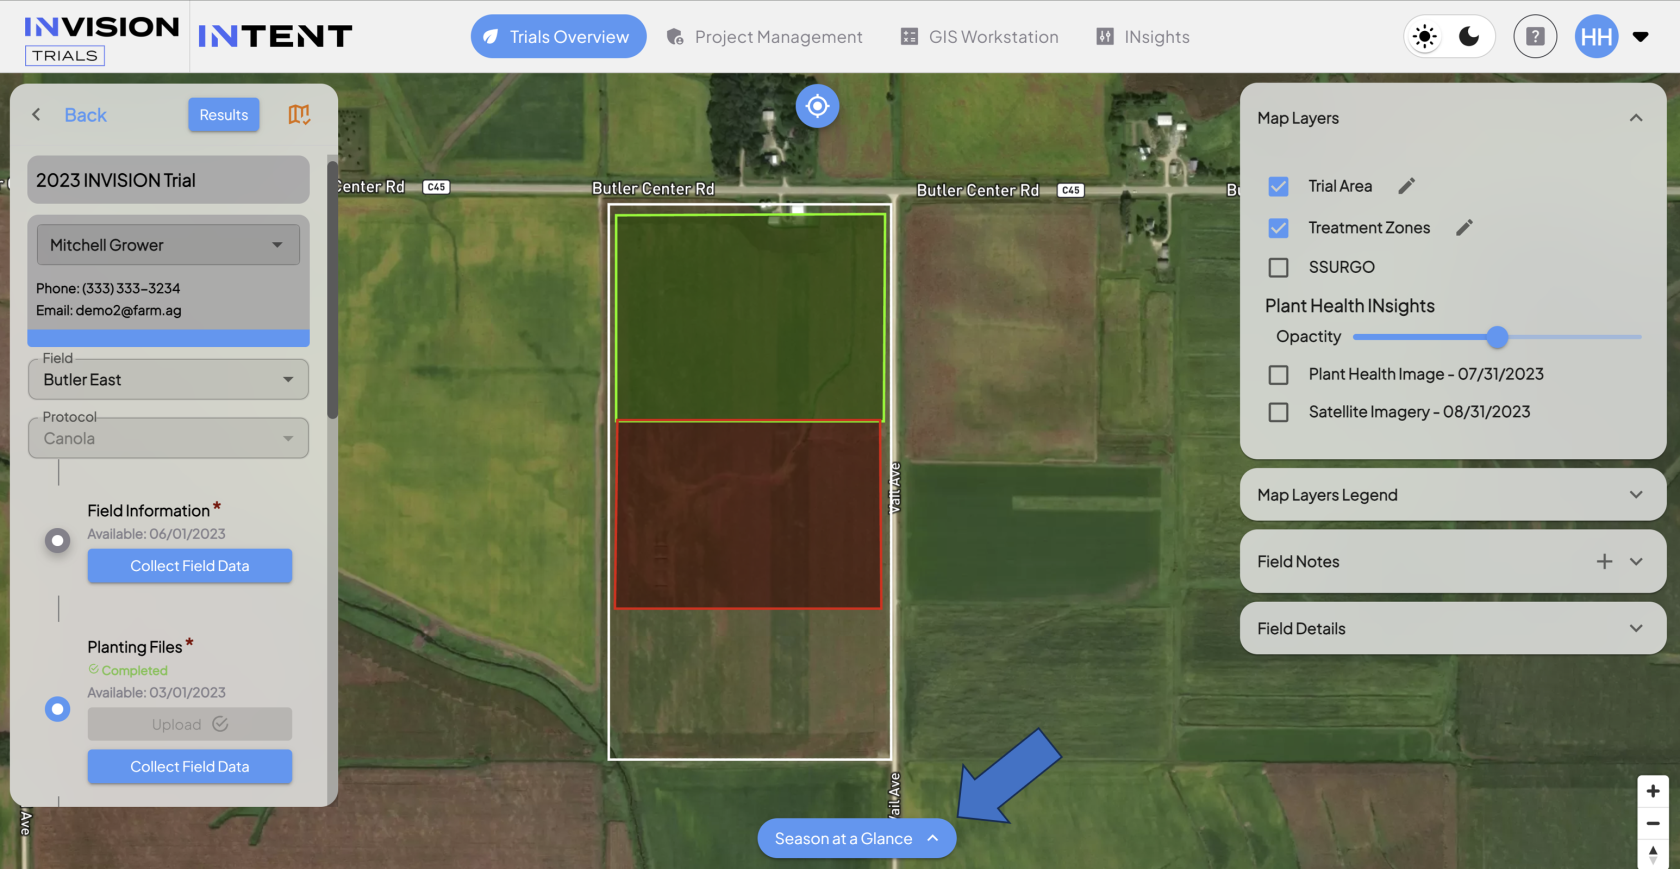](https://docs.prod.intent.ag/uploads/images/gallery/2024-02/screenshot-2024-02-26-103223.png)
- **Function:** A chart which displays Precipitation on the left vertical axes, Historical Growing Degree Days on the right vertical access, and time (in months) on the horizontal access.
**[](https://docs.prod.intent.ag/uploads/images/gallery/2024-02/screenshot-2024-02-26-103549.png)**
For additional help, follow along with this video for a tour of **View Fields:**
****
# How to Enroll a Grower - For Admins
#### **Guide For Admins: How to Enroll a Grower**
The enrollment process for the INVISION Platform is a two step process:
1. **Grower Enrollment:** Growers need to be enrolled into a Trial and Protocol. Through this process we collect contact information about the grower, and
2. **Field Enrollment:** Once the grower is enrolled in a trial/protocol, the field they're using for the trial needs to be enrolled. Through this process we collect the field boundary, which makes it possible to collect and analyze data specific to this field.
This document will walk admins through the process of **Grower Enrollment.**
1. **Login to INVISION**
- Head over to the [INVISION website](https://trials.prod.intent.ag/login) and login.
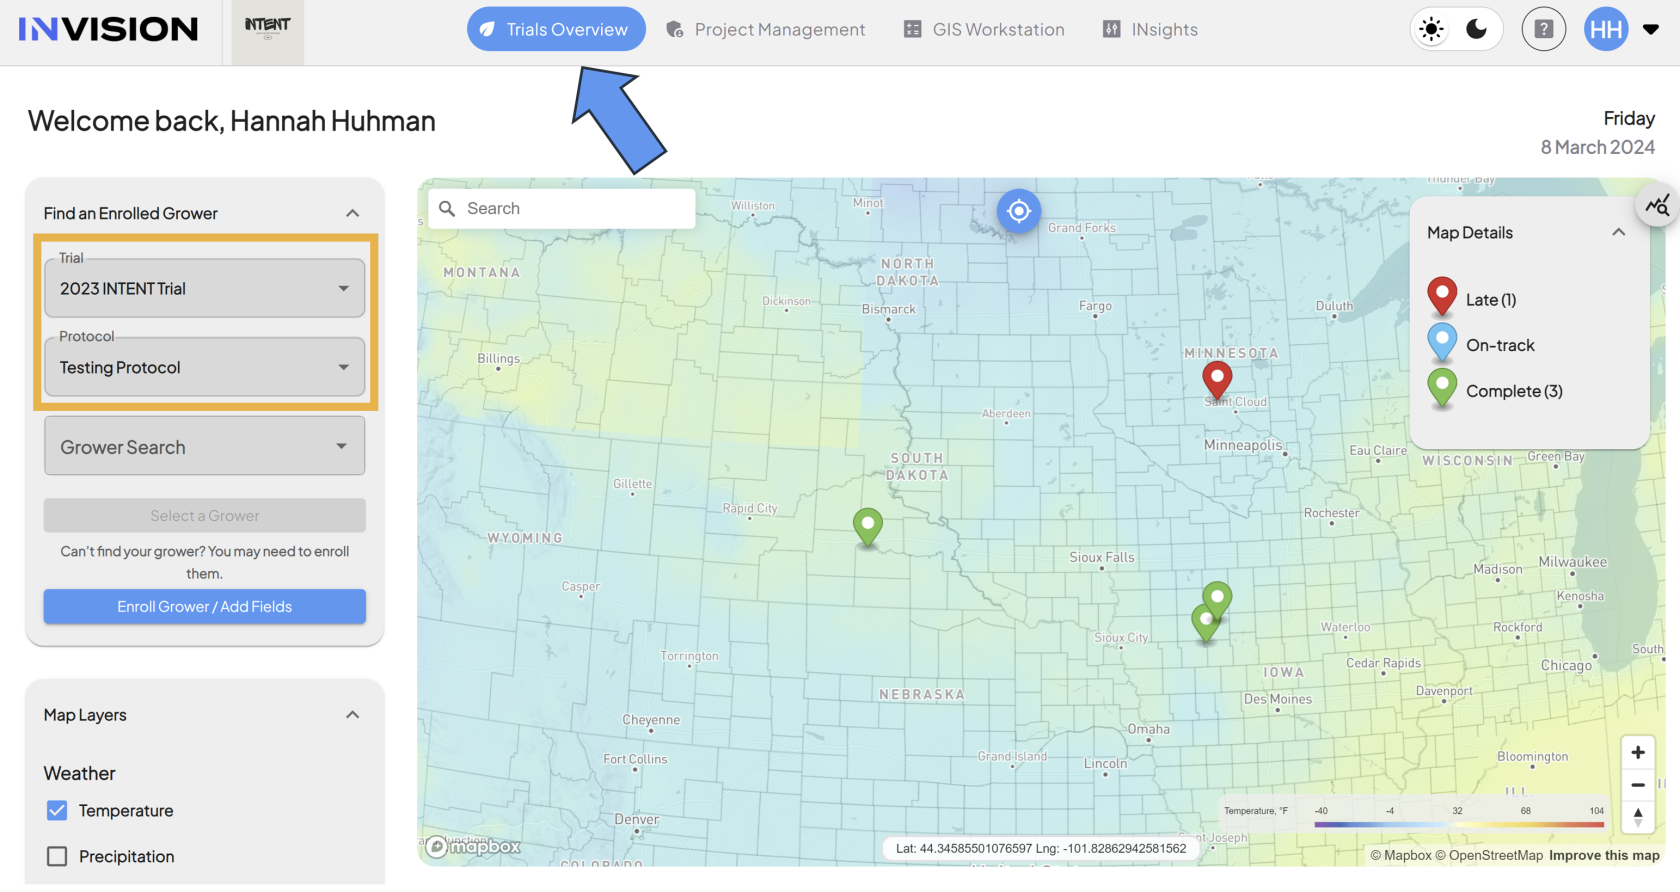
2. **Choose the Trial and Protocol**
- From the Trials Overview page, select the correct Trial and Protocol that the grower needs to be enrolled into using the *Find an Enrolled Grower* panel.
[](https://docs.prod.intent.ag/uploads/images/gallery/2024-03/screenshot-2024-03-08-134708.png)
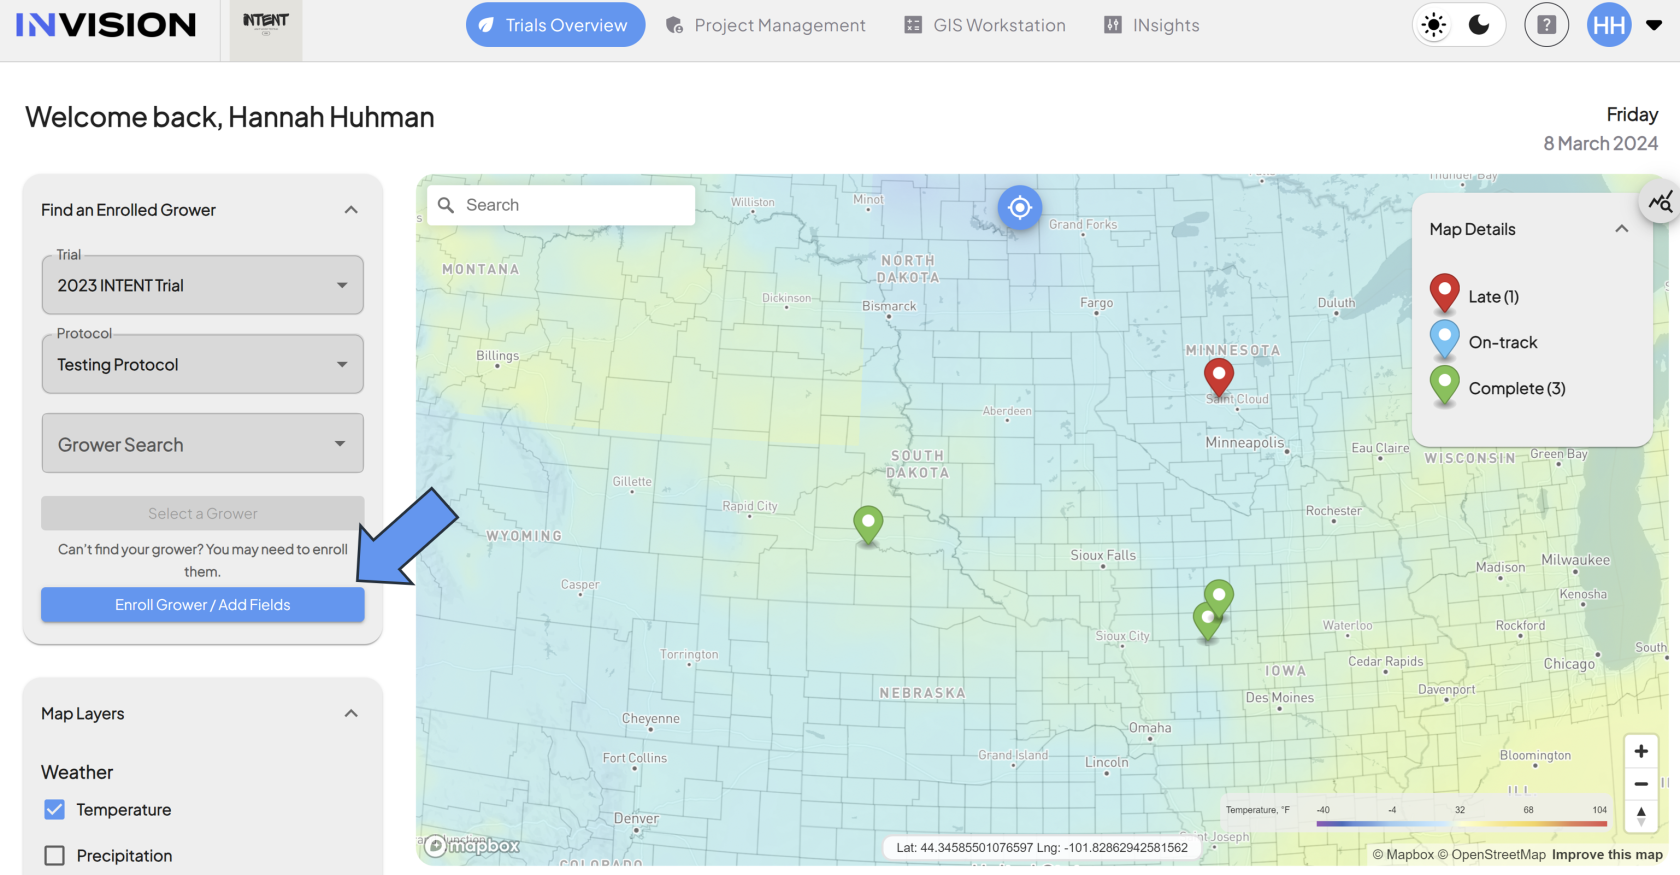
3. **Open the Enrollment Panel**
- Once you've selected the trial/protocol click the **Enroll Grower / Add Fields** button at the bottom of the panel.
[](https://docs.prod.intent.ag/uploads/images/gallery/2024-03/screenshot-2024-03-08-144128.png)
- This will open the Enrollment Panel, where you now have two options:
[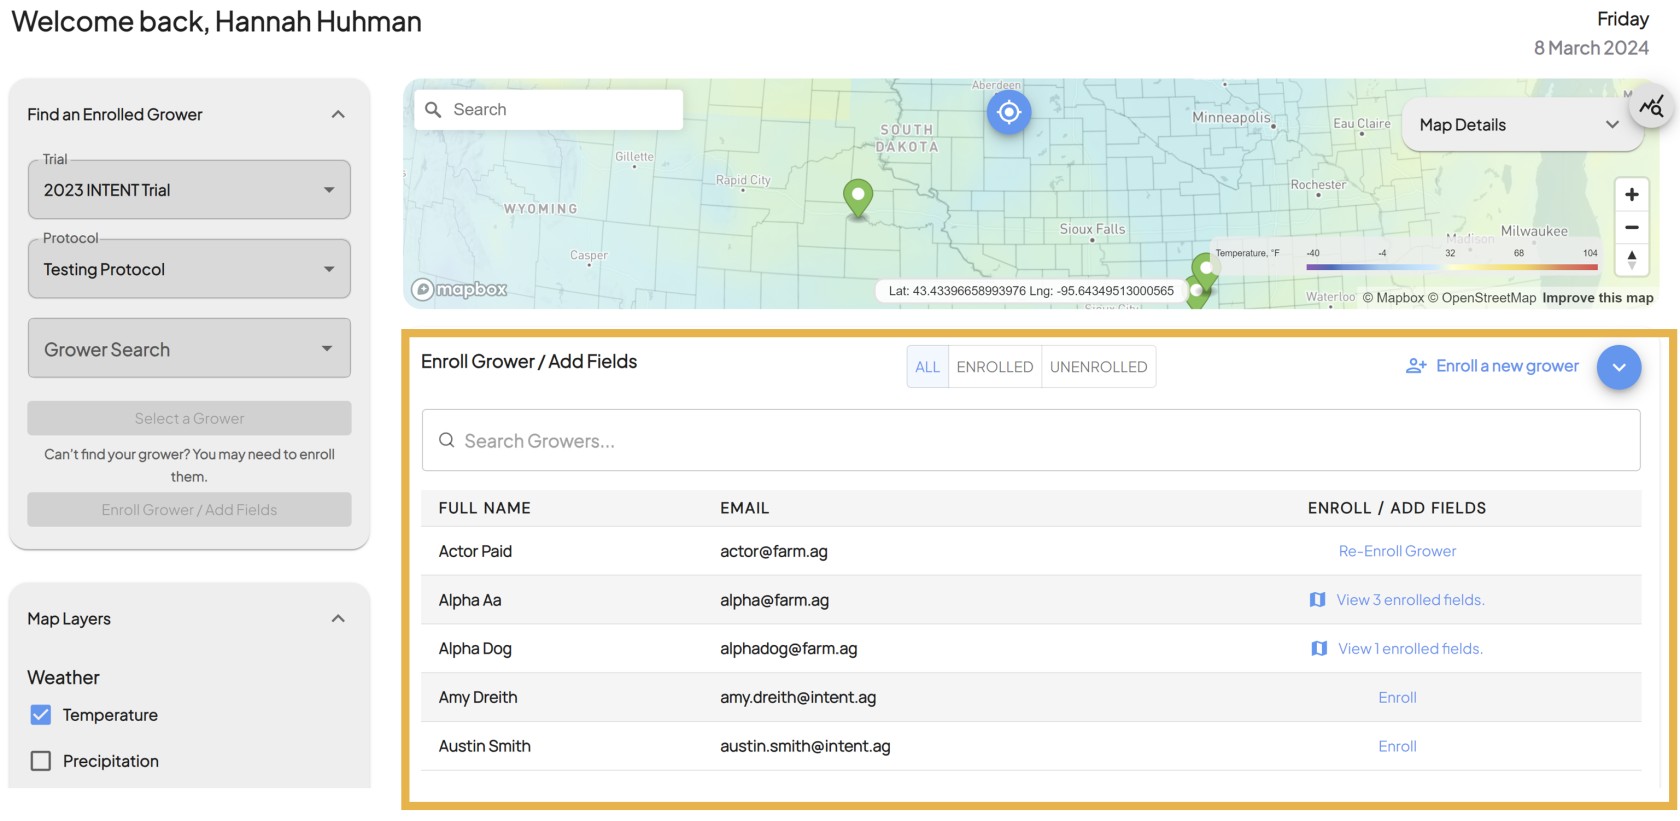](https://docs.prod.intent.ag/uploads/images/gallery/2024-03/screenshot-2024-03-08-145811.png)
1. **Enroll a Grower Into A Trial For the First Time**
- If you need to enroll a grower into a trial/protocol for the first time, click on the **Enroll a new grower** button in the top right corner of the enrollment panel.
[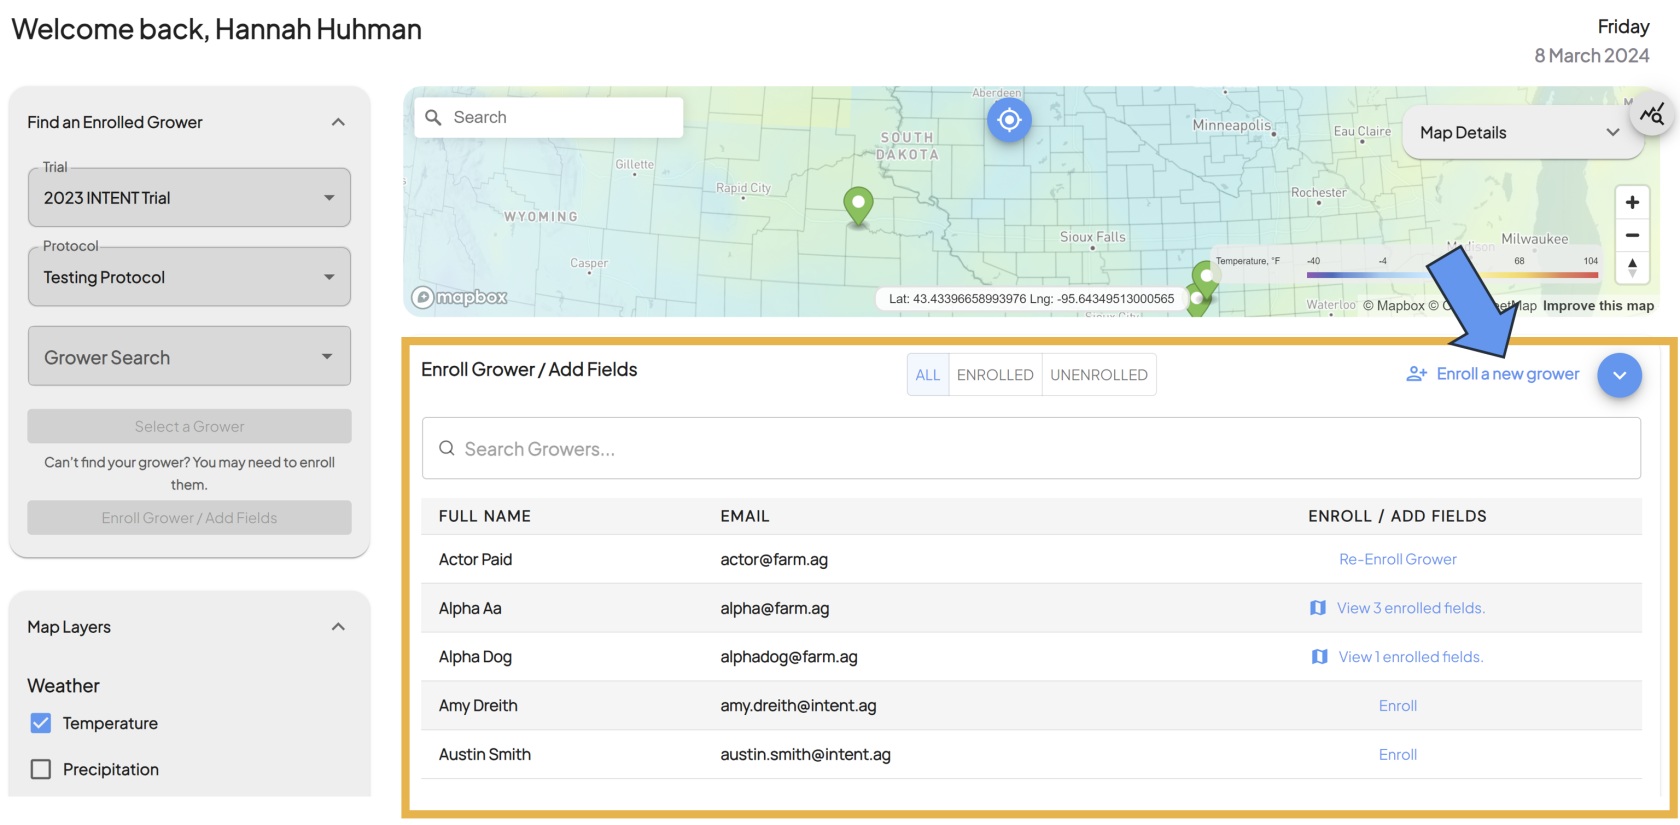](https://docs.prod.intent.ag/uploads/images/gallery/2024-03/screenshot-2024-03-08-151251.png)
- This will bring up a popup where you will enter in the grower's information.
- You first need to check that the grower is not already in our system. Enter the growers email in the *Email Address* field, and click the **Check Email** button.
[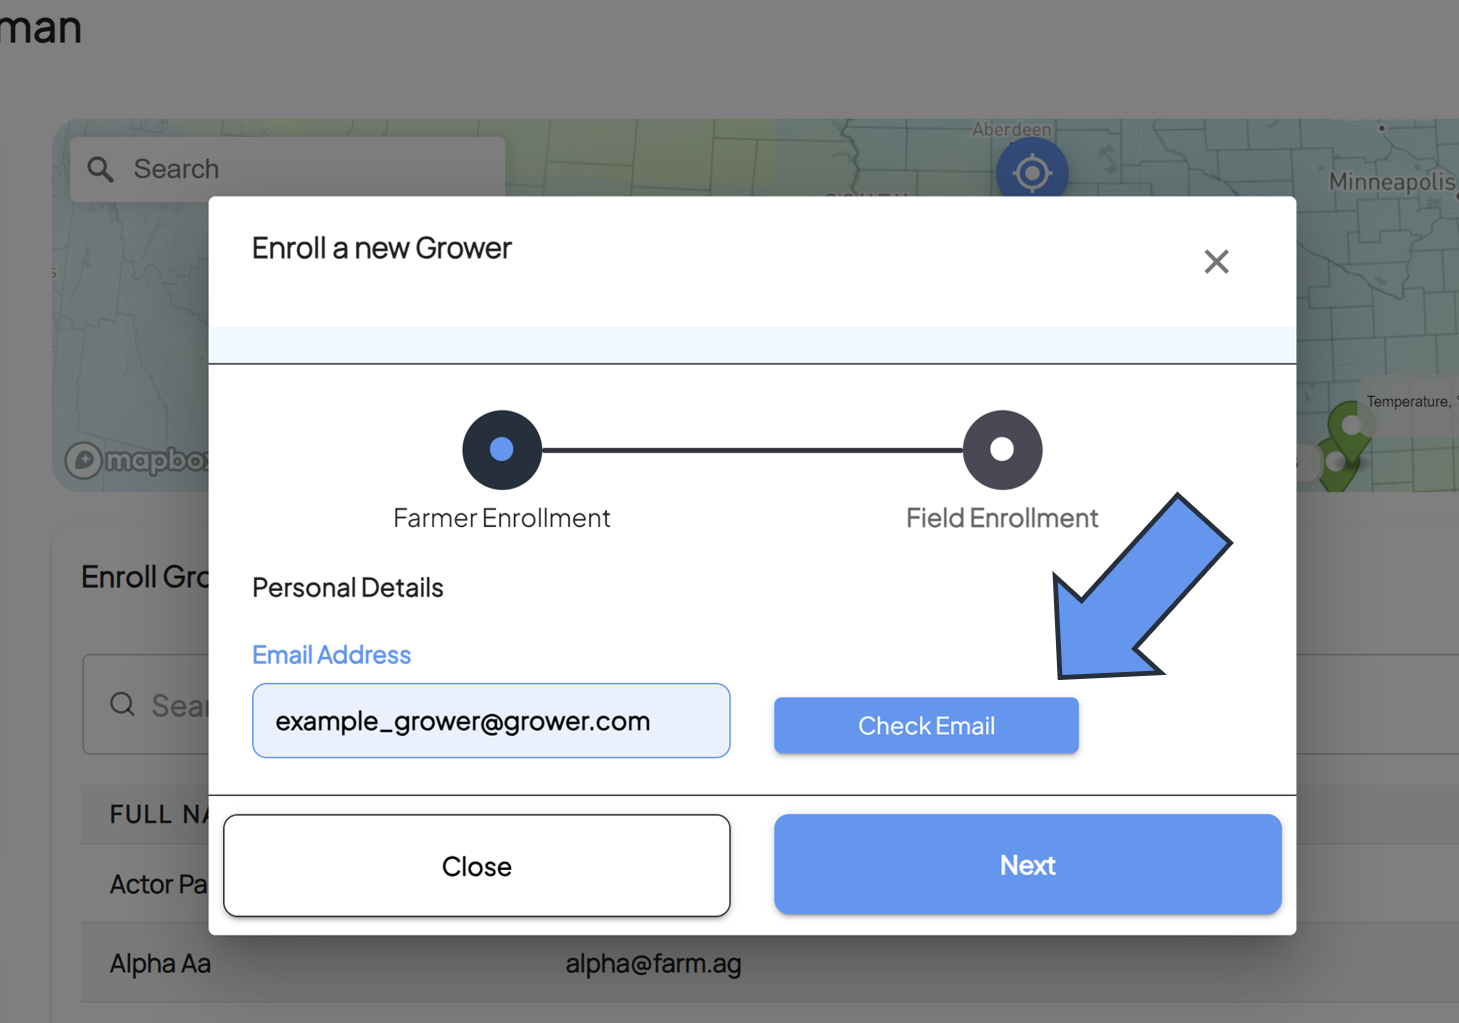](https://docs.prod.intent.ag/uploads/images/gallery/2024-03/screenshot-2024-03-08-153125.png)
- If the grower is familiar to our system, most fields will be auto filled and you only need to select the protocol from the dropdown.[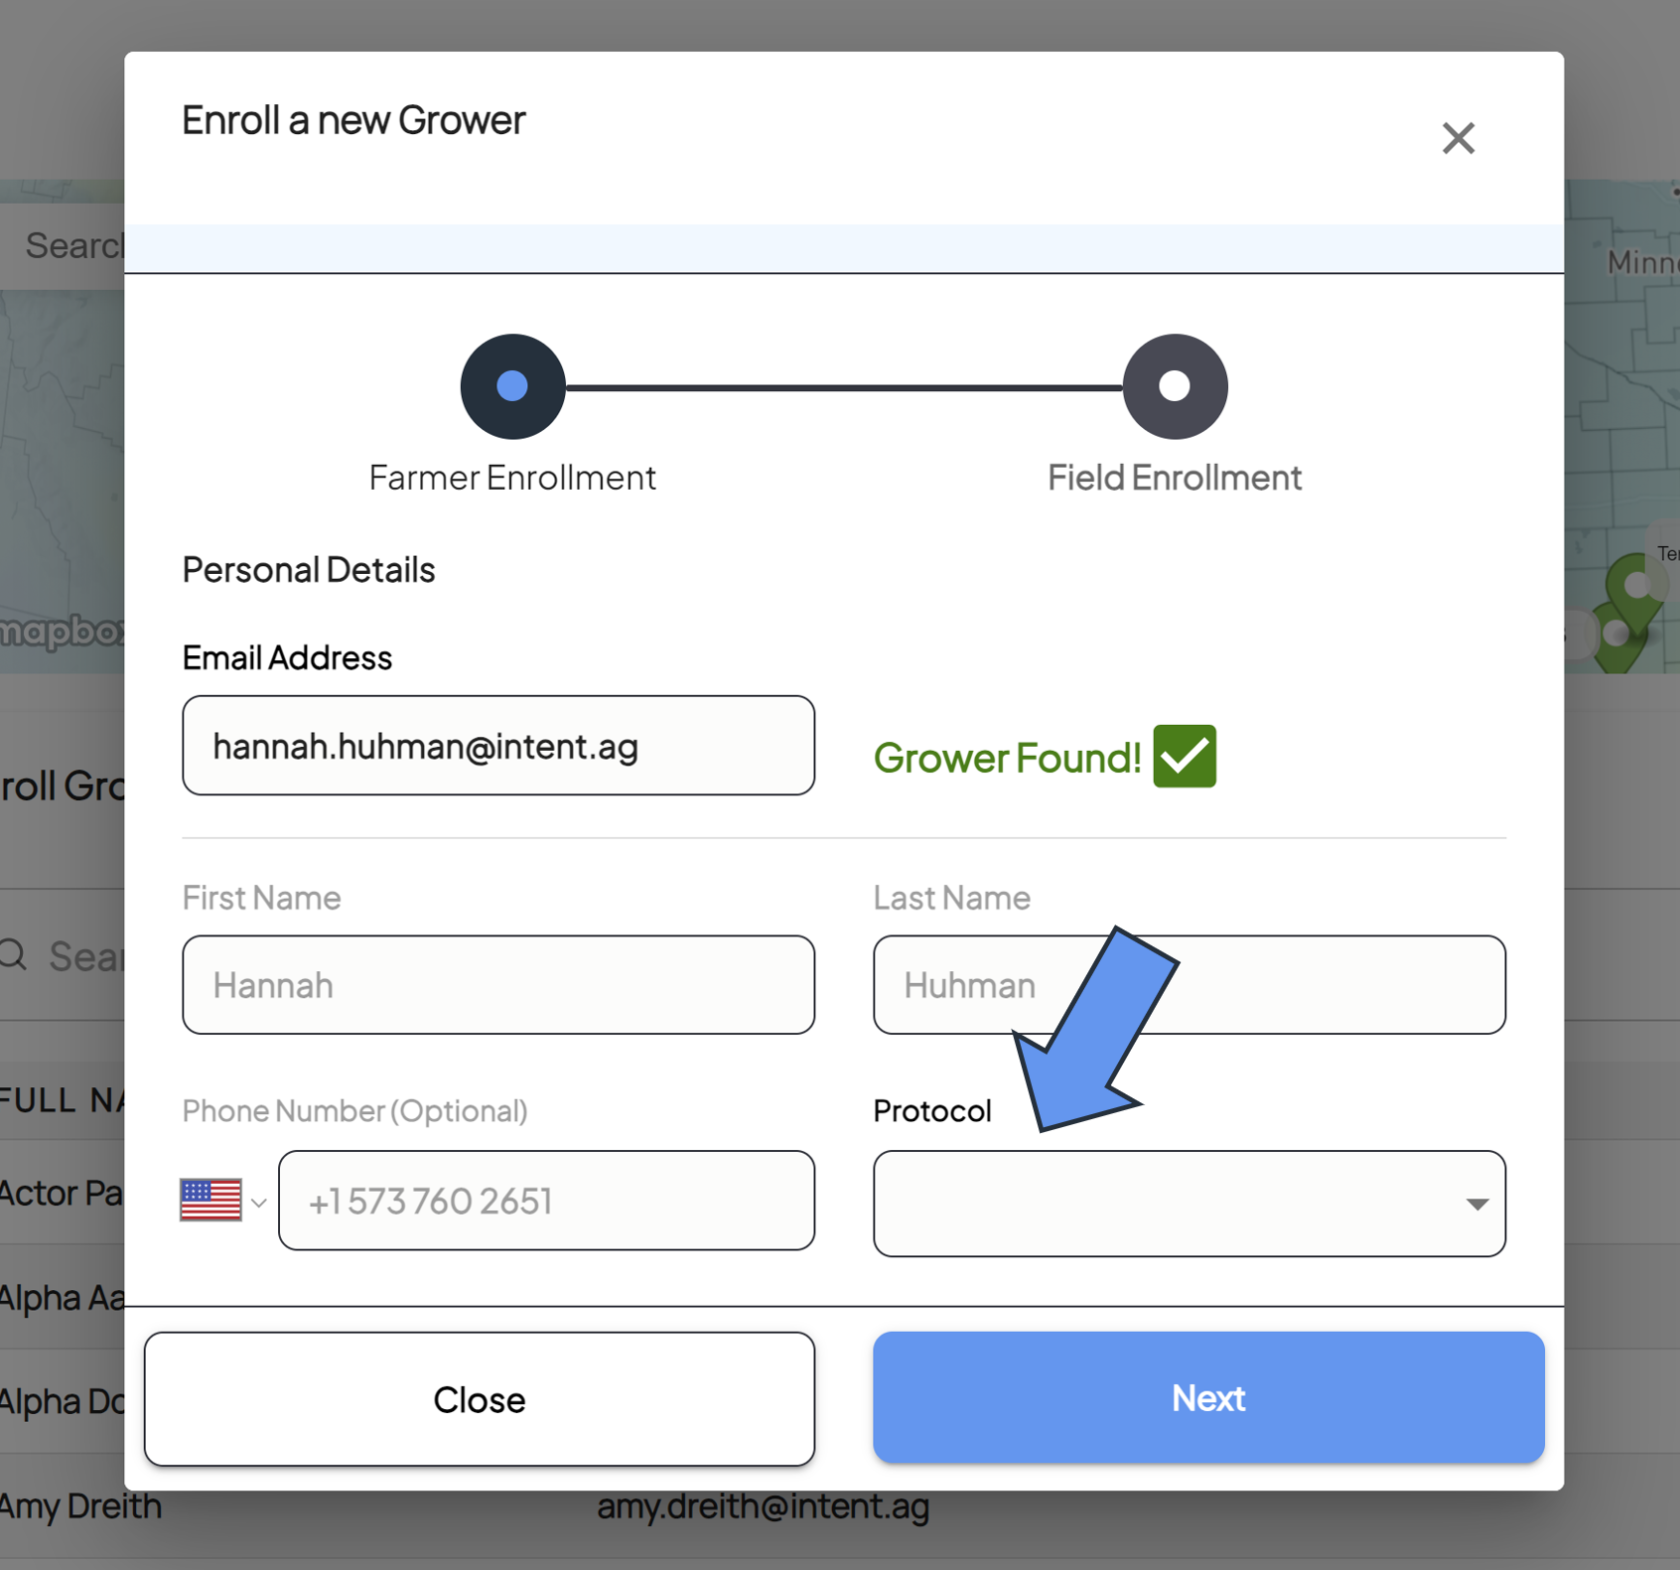](https://docs.prod.intent.ag/uploads/images/gallery/2024-03/screenshot-2024-03-08-153522.png)
- Hitting the **Next** button will complete the grower enrollment.
- If the grower is new to our system, you will need to fill out the following blank fields:
[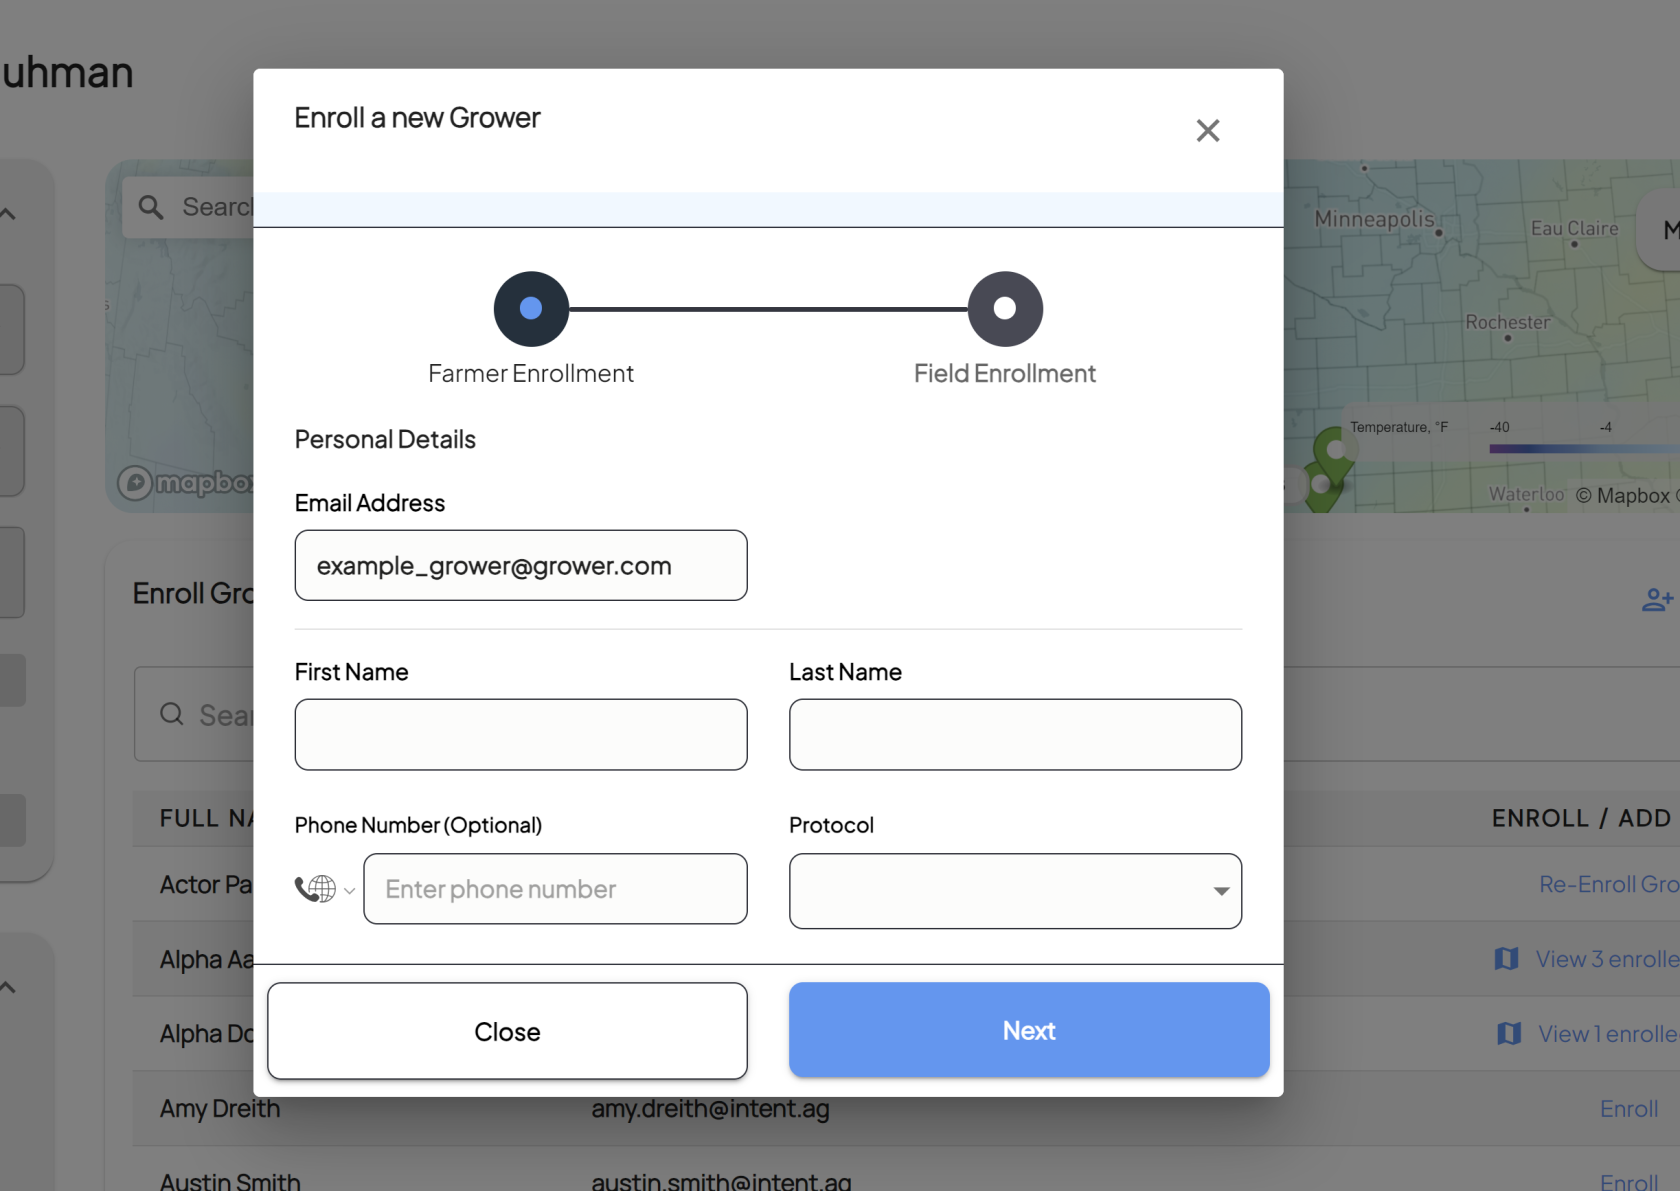](https://docs.prod.intent.ag/uploads/images/gallery/2024-03/screenshot-2024-03-08-152614.png)
- Grower's first name
- Grower's last name
- Grower's phone number (optional)
- Select the correct protocol
- Hitting the **Next** button will complete the grower enrollment.
2. **Enroll a Grower That's Been Previously Enrolled**
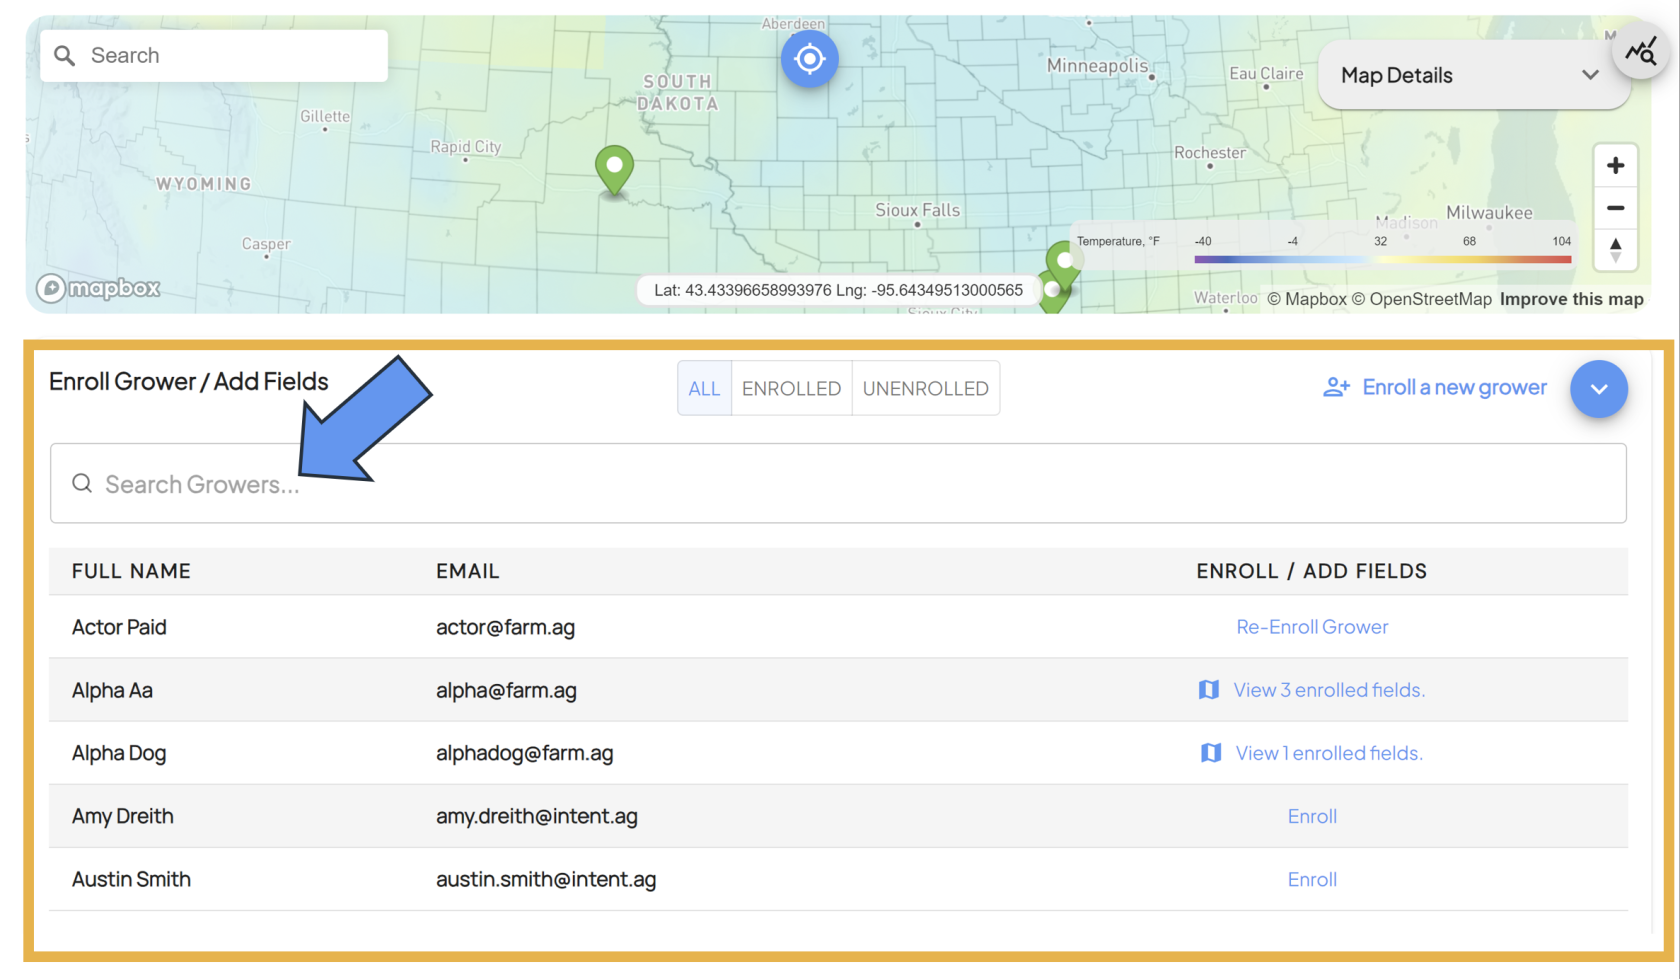
- If you know a grower has been enrolled in a trial previously, you'll be able to find them in the table in the Enrollment Panel.
- You can use the search bar at the top to search for the grower's name.
[](https://docs.prod.intent.ag/uploads/images/gallery/2024-03/screenshot-2024-03-12-085902.png)
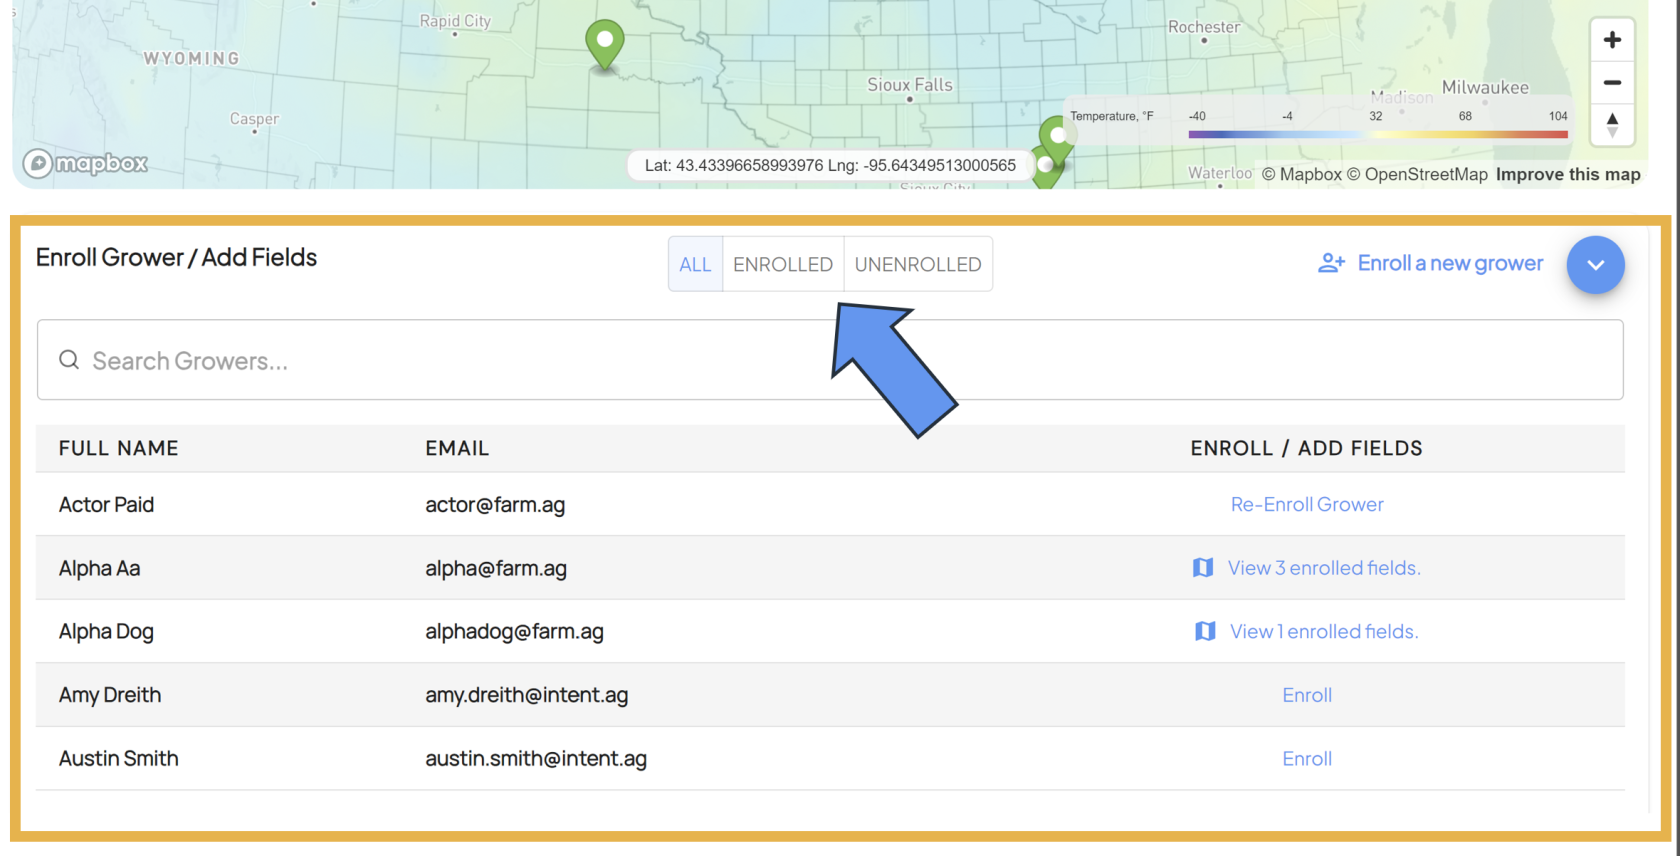
- There are also three filters at the top to help find your grower more easily in the table:
[](https://docs.prod.intent.ag/uploads/images/gallery/2024-03/screenshot-2024-03-12-091847.png)
- **All:** This filter will show all growers, regardless of their enrollment status
- **Enrolled:** This filter will only show growers that are enrolled in the trial/protocol that are selected
- **Unenrolled:** This filter will only show growers that are *not* enrolled in the selected trial/protocol
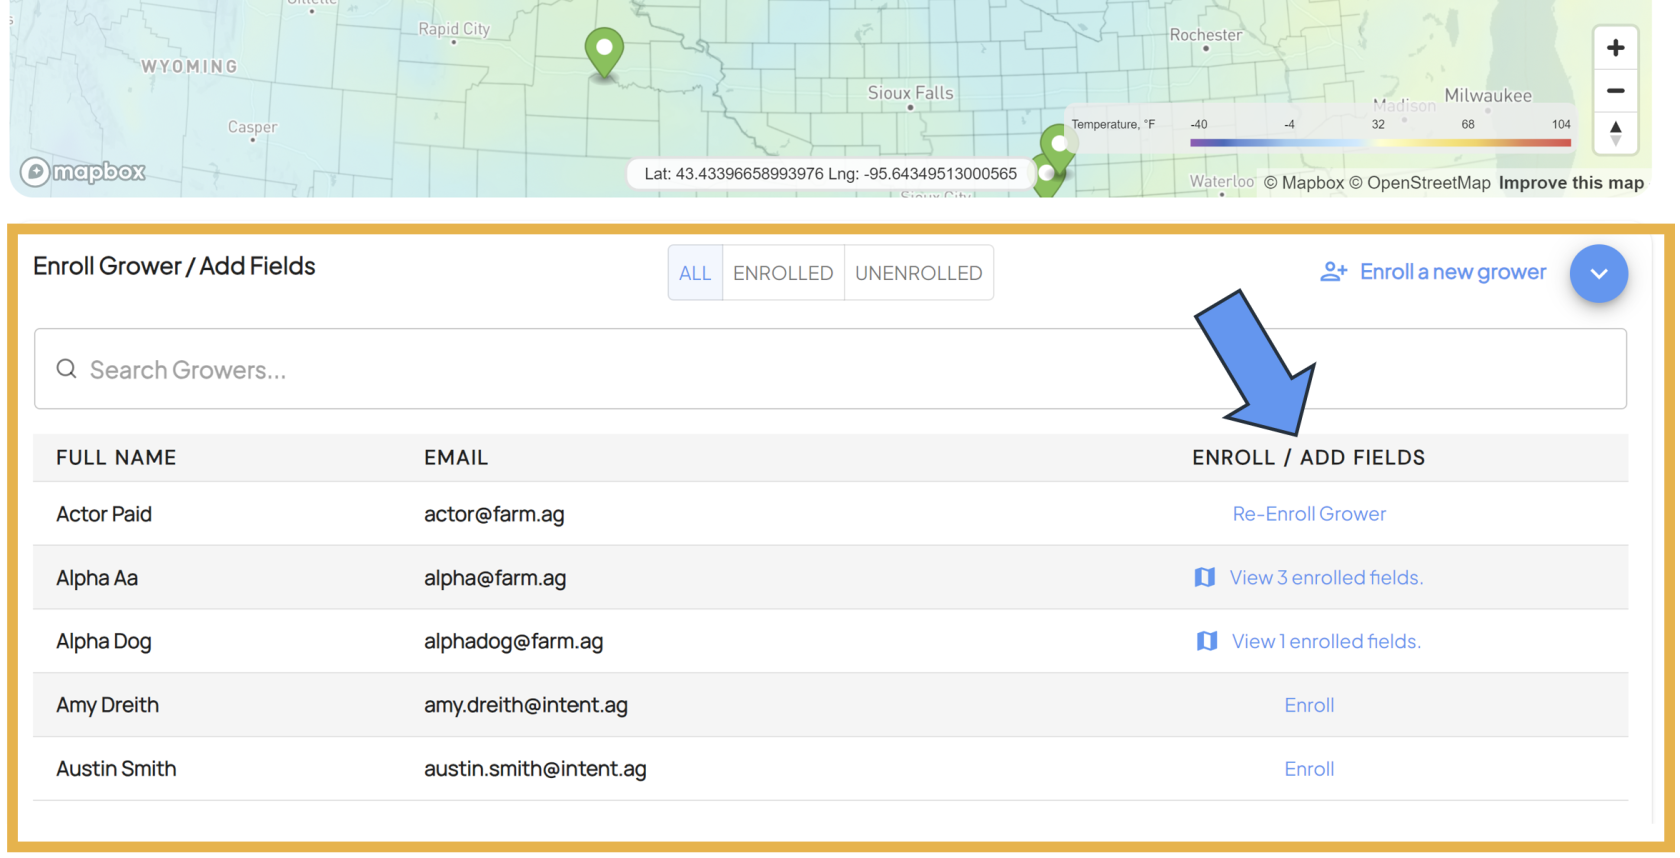
- Once you've found the grower in the table that you need to enroll, you can see the status of that grower's enrollment under the *ENROLL / ADD FILTERS* column in the table.
[](https://docs.prod.intent.ag/uploads/images/gallery/2024-03/screenshot-2024-03-12-142304.png)
- The grower will have one of the following statuses:
- **Enroll:** This status means the grower is not currently enrolled in any trials/protocols
- **Re-Enroll:** This status means the grower was previously enrolled in a trial/protocol but was dropped out.
- **View \[#\] enrolled fields:** This status means the grower is enrolled in more than one trials/protocols
- **Enrollment process not completed:** This status means the the grower enrollment is complete, but the field enrollment is not
- Select the enrollment status of the grower to enroll them in whichever trial/protocol you need.
- Selecting the status will open a new menu that lays out all fields that are enrolled for that grower, and the trial/protocol that they are enrolled into.
[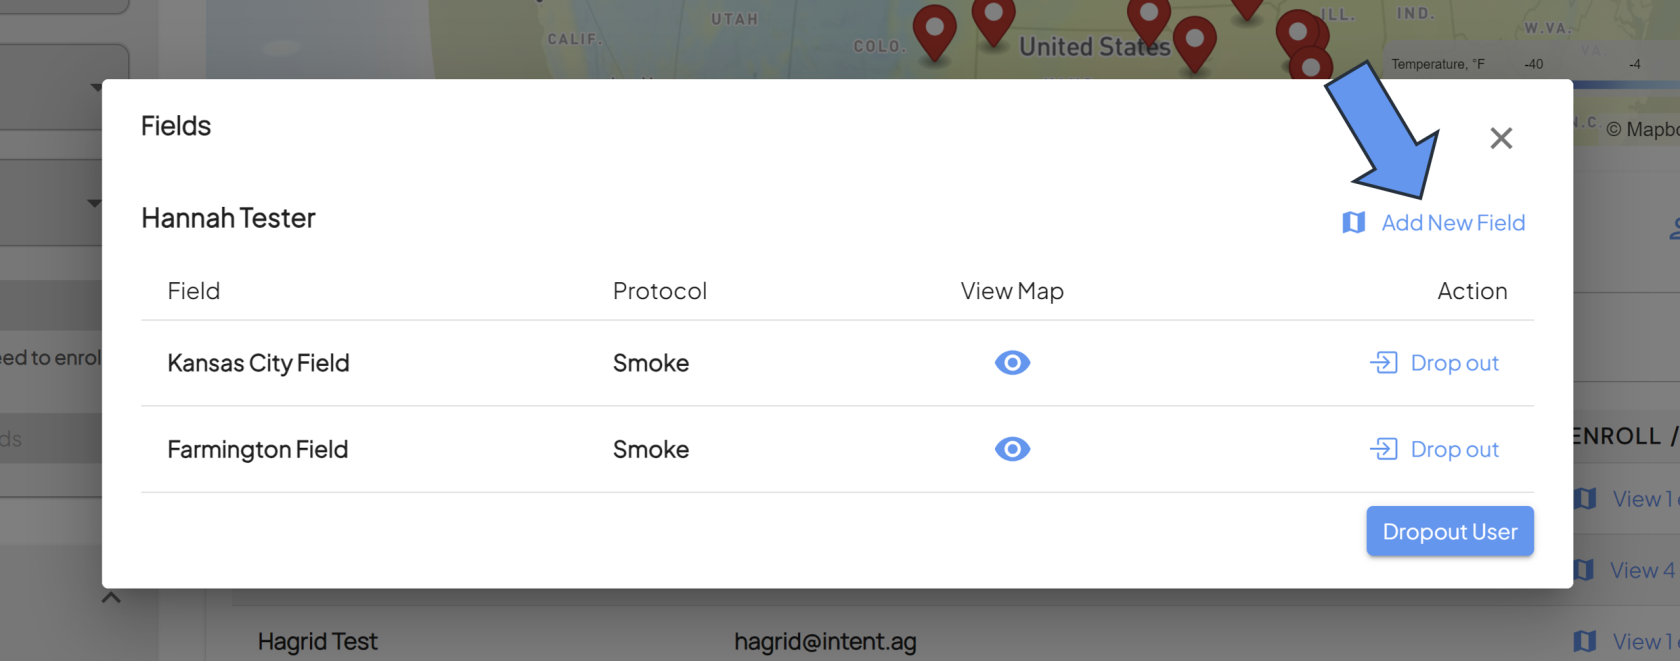](https://docs.prod.intent.ag/uploads/images/gallery/2024-03/screenshot-2024-03-12-143255.png)
- To enroll the grower, select the **Add New Field** button in the top right corner.
- This will trigger a pop-up where you can both enroll the selected grower into a new trial/protocol, and complete their field enrollment.
[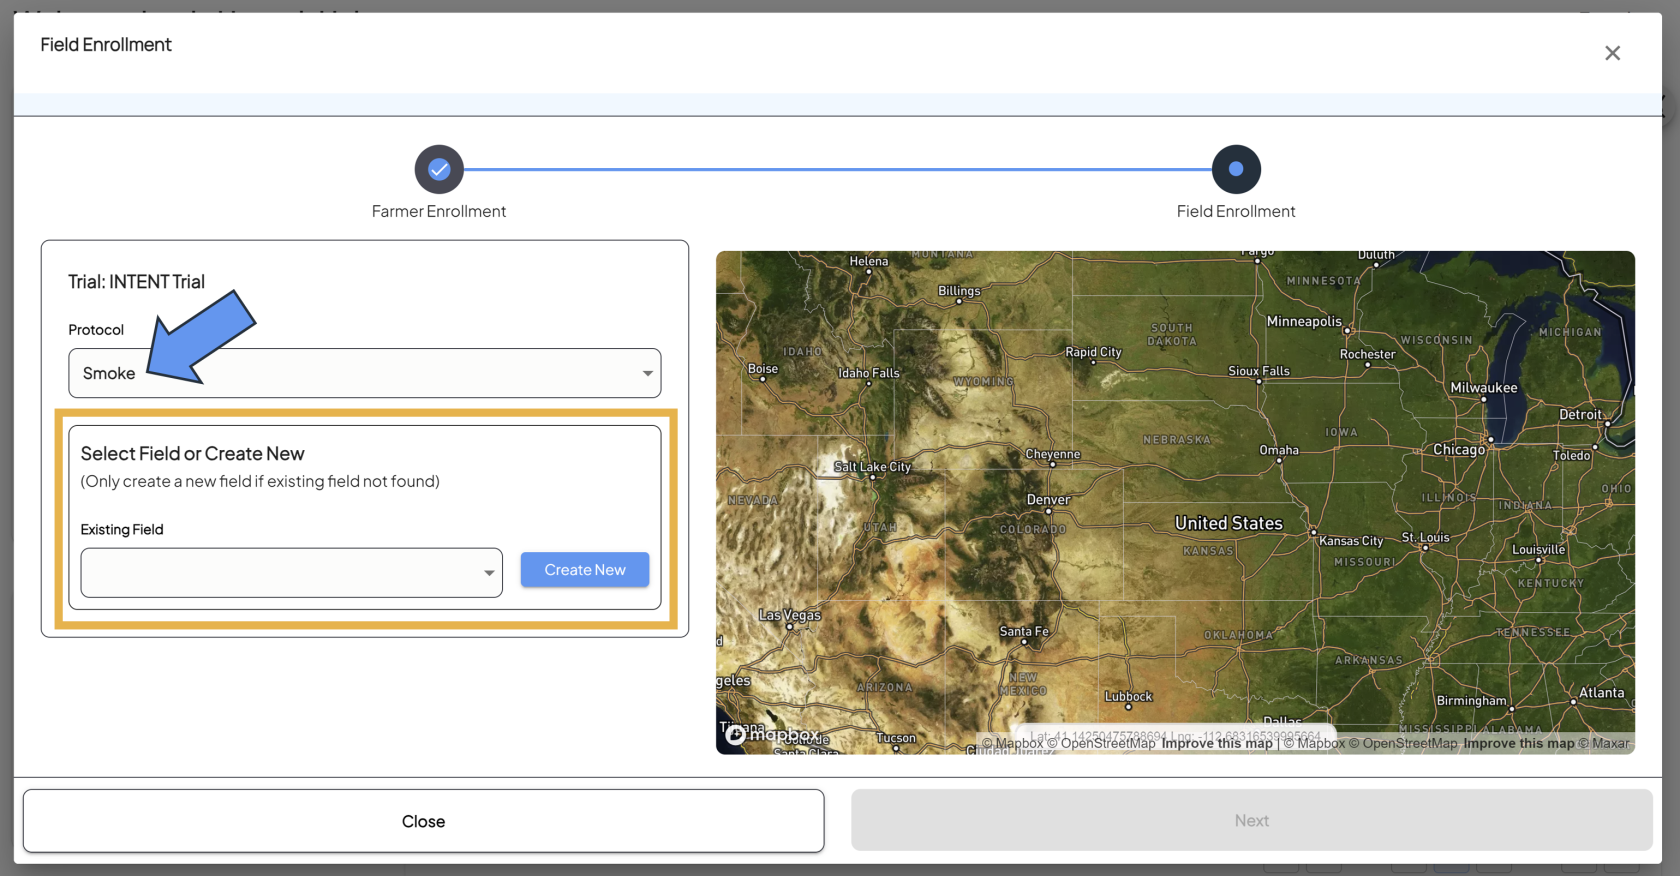](https://docs.prod.intent.ag/uploads/images/gallery/2024-03/screenshot-2024-03-12-144041.png)
- The *Protocol* field will default to the protocol that was originally selected, but can be changed to any protocol within the trial.
- Existing field boundaries can be selected from the dropdown menu under *Select Field or Create New.*
- A new field can also be created here. For additional information, please see our [Guide To Field Enrollment - For Admins](https://docs.prod.intent.ag/books/invision-learning-guide/page/how-to-enroll-a-field-for-admins).
- Once the field boundary is selected/created, ensure the boundary looks correct on the map, and double check that the protocol is correct.
[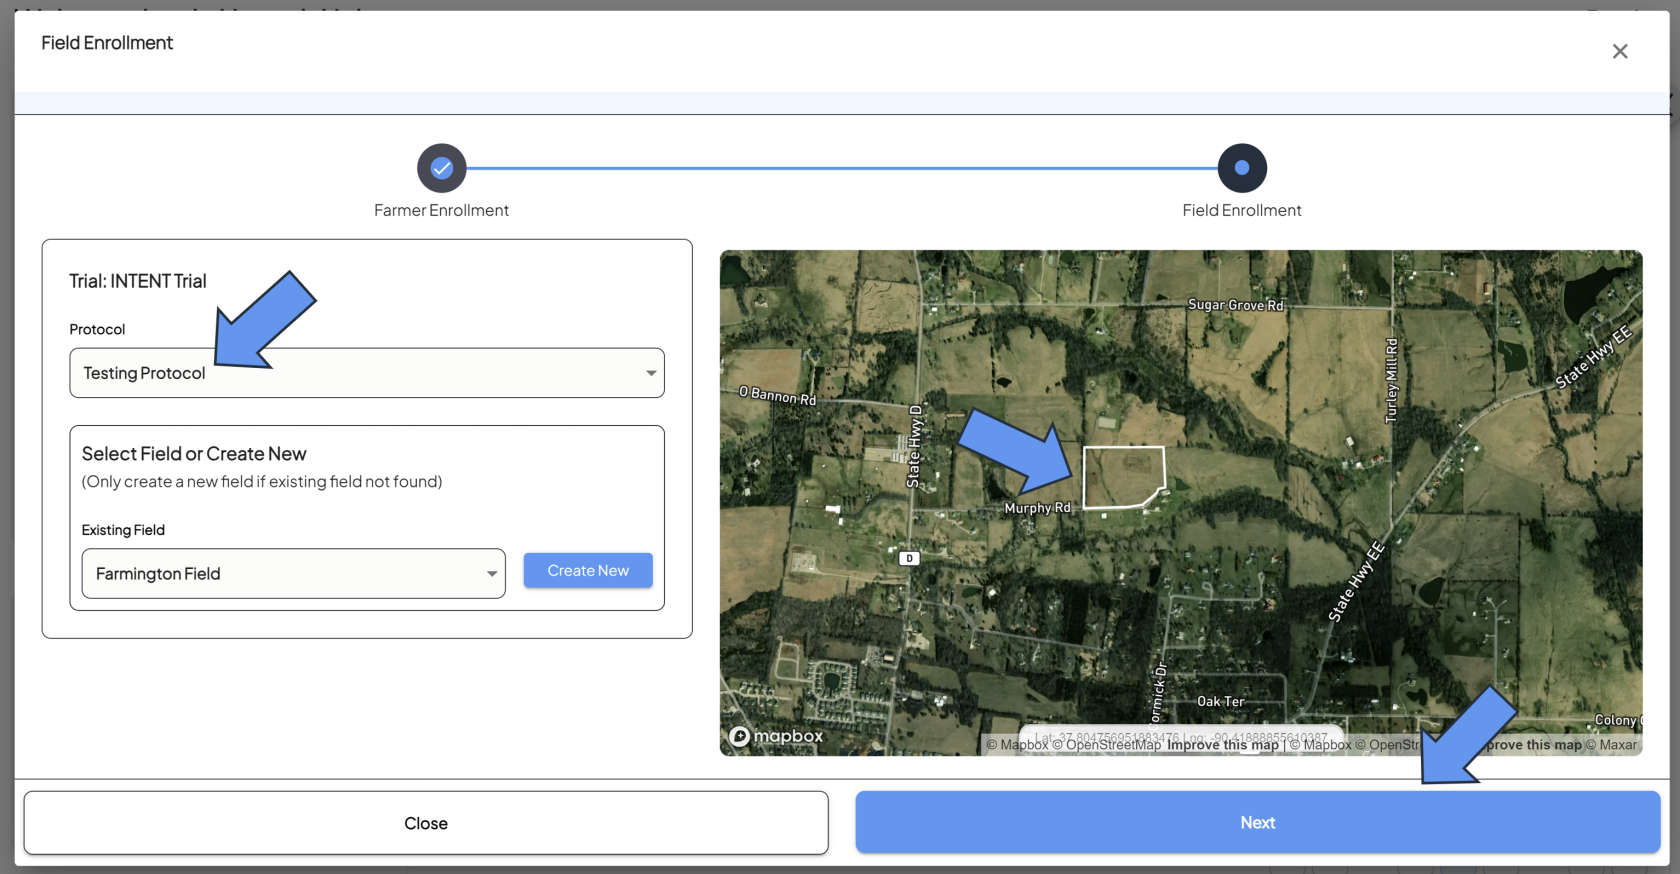](https://docs.prod.intent.ag/uploads/images/gallery/2024-03/screenshot-2024-03-12-144834.png)
- Hitting **Next** will complete the enrollment process.
[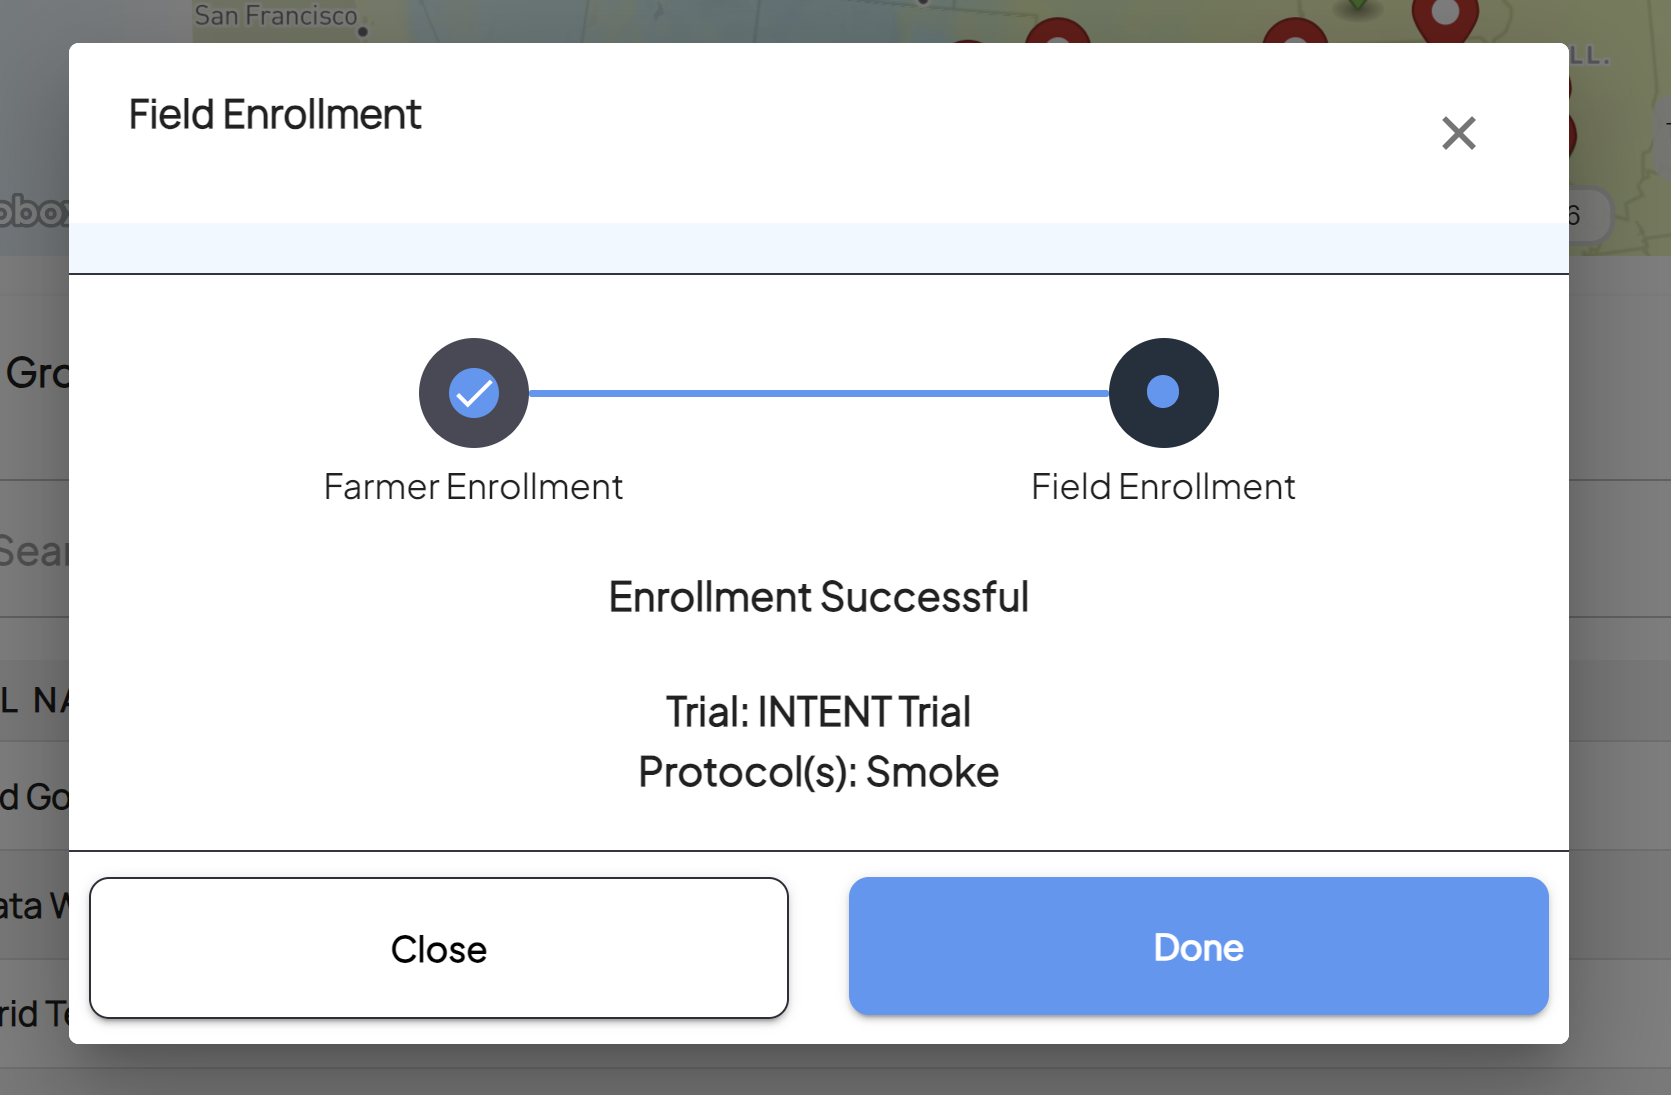](https://docs.prod.intent.ag/uploads/images/gallery/2024-03/screenshot-2024-03-12-144916.png)
- For additional help, follow along with this video demonstrating how to enroll a grower in a trial:
# How to Enroll a Field - For Admins
#### **Guide For Admins: How to Enroll a Field**
The enrollment process for the INVISION Platform is a two step process:
1. **Grower Enrollment:** Growers need to be enrolled into a Trial and Protocol. Through this process we collect contact information about the grower, and
2. **Field Enrollment:** Once the grower is enrolled in a trial/protocol, the field they're using for the trial needs to be enrolled. Through this process we collect the field boundary, which makes it possible to collect and analyze data specific to this field.
This document will walk admins through the process of **Field Enrollment.** Field Enrollment cannot be started unless the Grower Enrollment has been completed. Please see our [Guide to Enrolling a Grower In a Trial - For Admins](https://docs.prod.intent.ag/books/invision-learning-guide/page/how-to-enroll-a-grower-for-admins) if you haven't completed this step first.
##### **Jump to Sections Below:**
**[Enroll a Field from Grower Enrollment](https://docs.prod.intent.ag/books/invision-learning-guide/page/how-to-enroll-a-field-for-admins-updated-352025#bkmrk-enroll-a-field-from--1)**
- [Enrolling a Field That Already Exists in the System](https://docs.prod.intent.ag/books/invision-learning-guide/page/how-to-enroll-a-field-for-admins-updated-352025#bkmrk-enrolling-a-field-th-2)
- [Enrolling a New Field](https://docs.prod.intent.ag/books/invision-learning-guide/page/how-to-enroll-a-field-for-admins-updated-352025#bkmrk-enrolling-a-new-fiel)
[**Standalone Field Enrollment**](https://docs.prod.intent.ag/books/invision-learning-guide/page/how-to-enroll-a-field-for-admins-updated-352025#bkmrk-standalone-field-enr-1)
- [Enrolling a Field That Already Exists in the System](https://docs.prod.intent.ag/books/invision-learning-guide/page/how-to-enroll-a-field-for-admins-updated-352025#bkmrk-enrolling-a-field-th-3)
- [Enrolling a New Field](https://docs.prod.intent.ag/books/invision-learning-guide/page/how-to-enroll-a-field-for-admins-updated-352025#bkmrk-enrolling-a-new-fiel-1)
##### **Enroll a Field from Grower Enrollment**
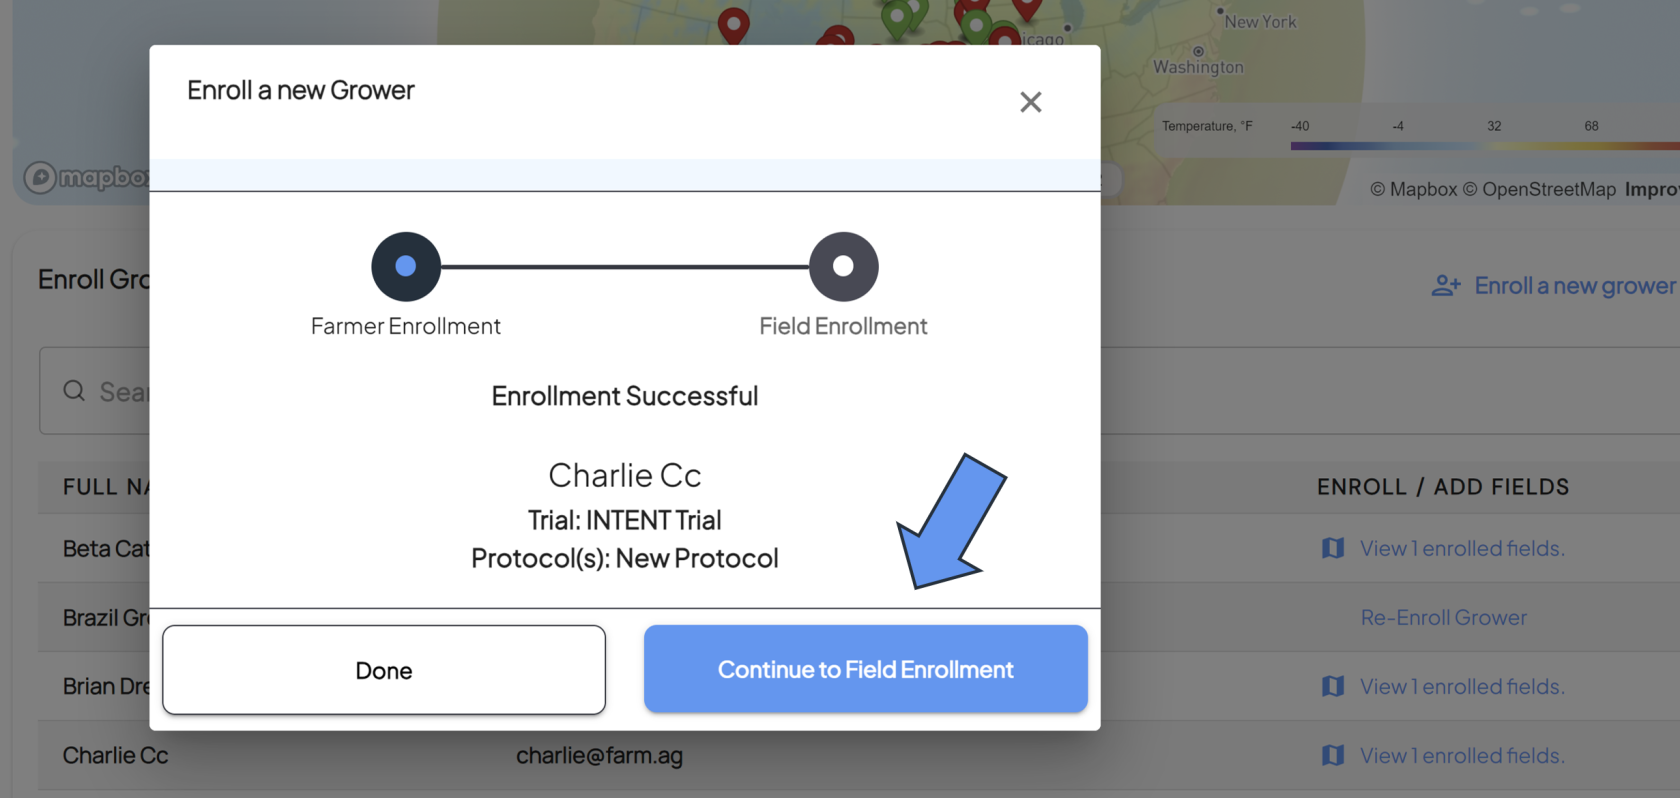
If you've just completed enrolling a grower into a trial, your confirmation window has an option to continue onto the field enrollment.
- **Start Field Enrollment**
- Click the **Continue to Field Enrollment** to start the process.
[](https://docs.prod.intent.ag/uploads/images/gallery/2024-03/screenshot-2024-03-15-161350.png)
- **Select Which Type of Field**
- At this point, you have two different options for enrolling a field:
- **Enroll a field that already exists in the system.**
- **Create a new field boundary and enroll that field.**
##### **Enrolling a Field That Already Exists in the System**
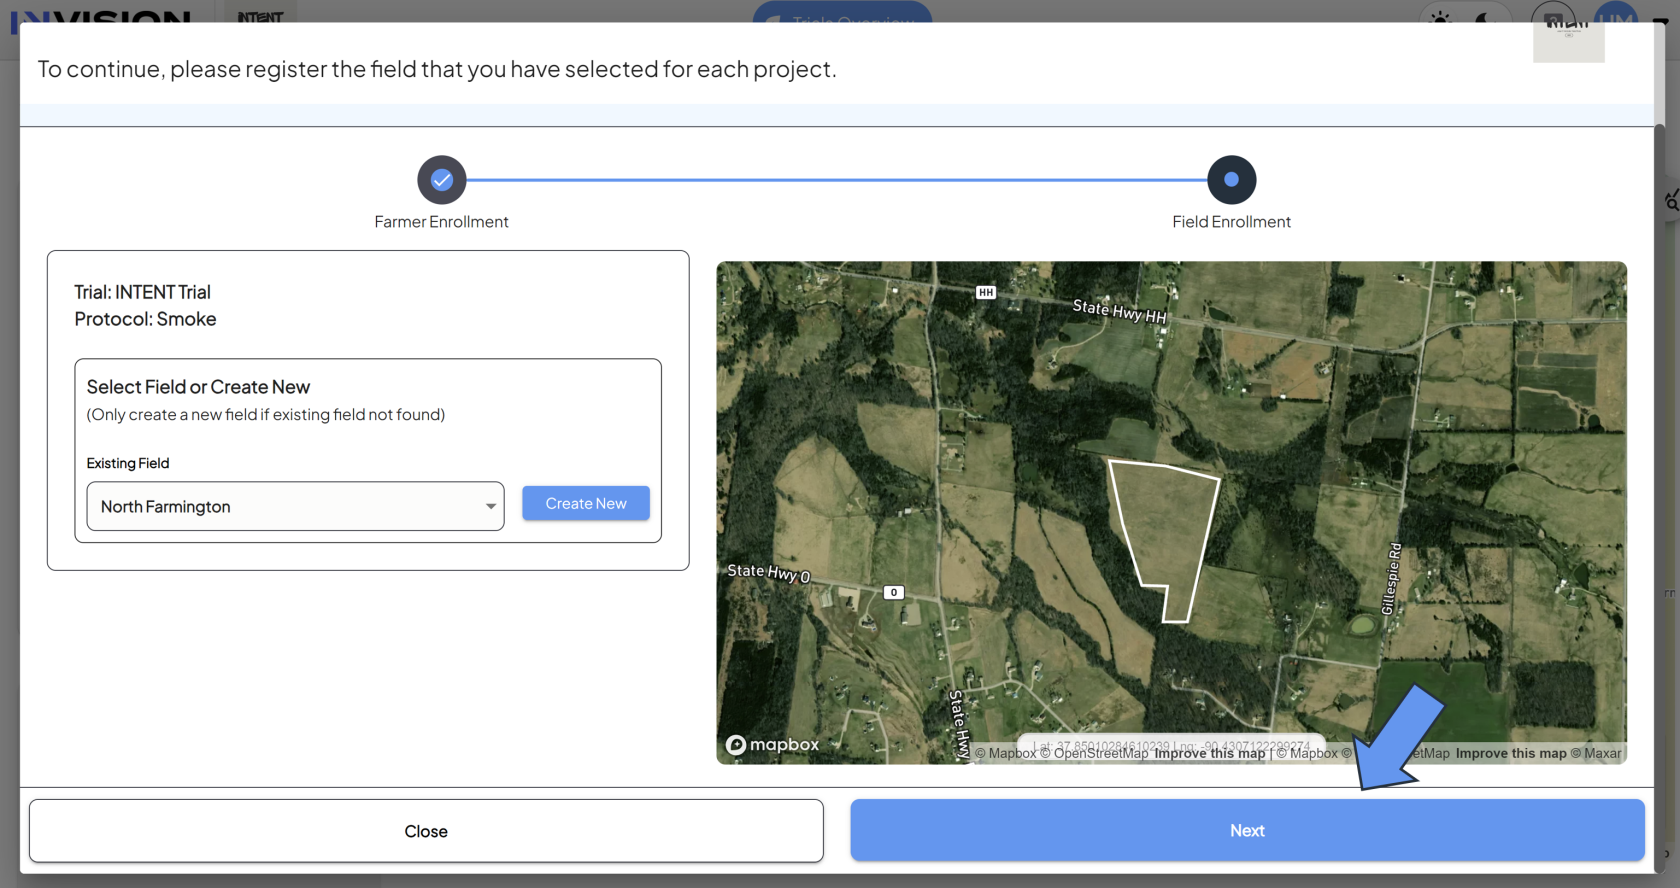
1. **Select A Previously Created Field**
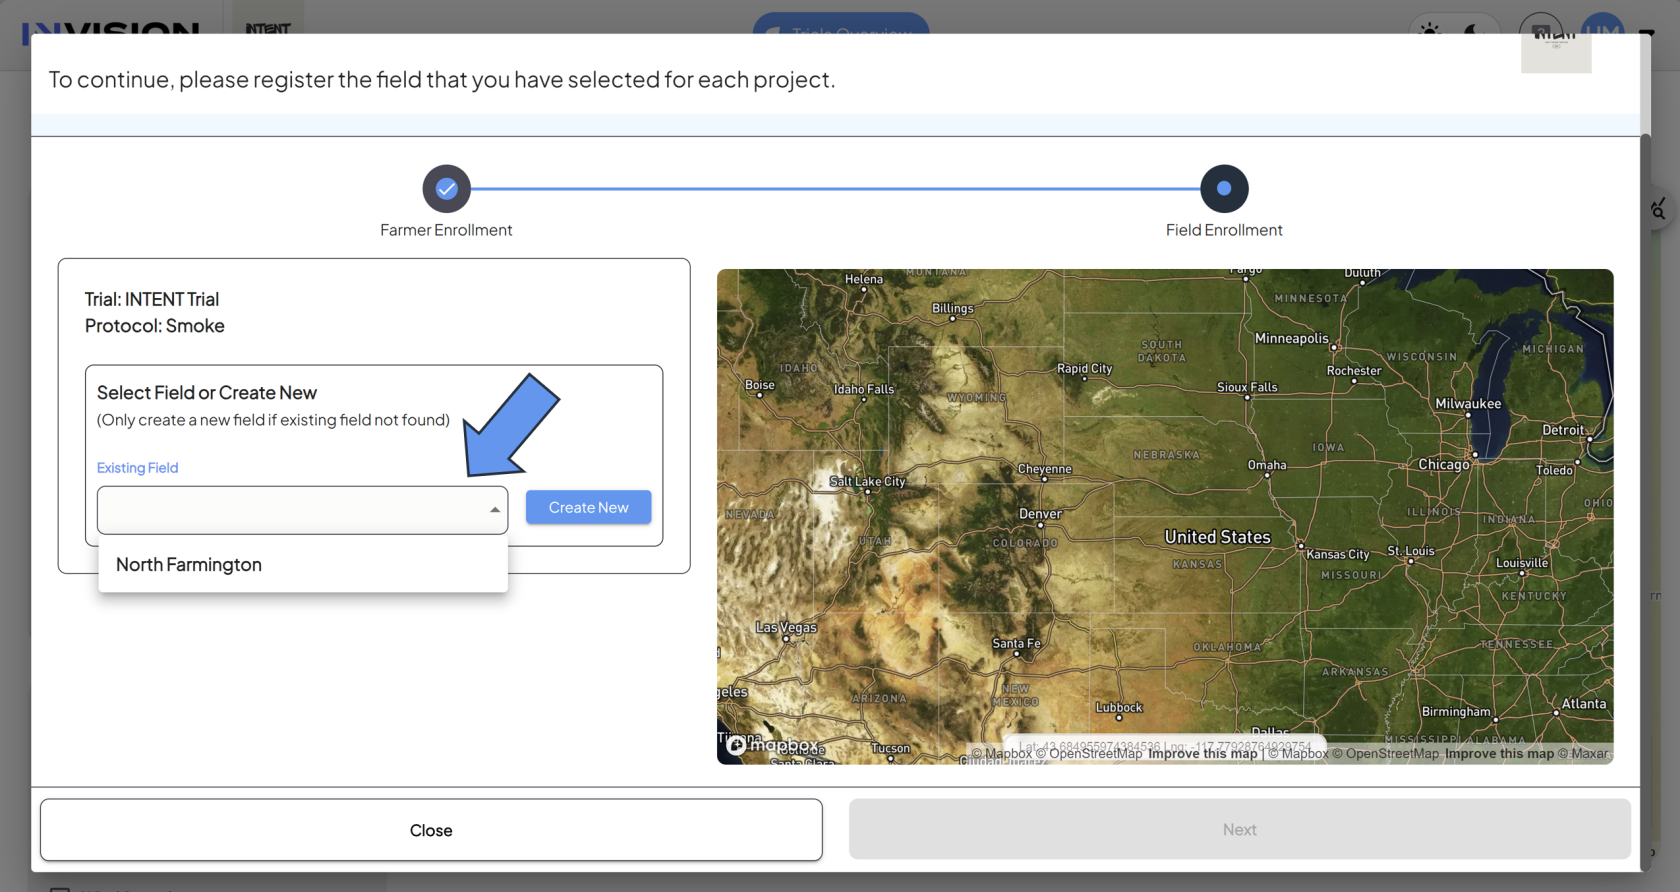
- If you have enrolled fields in a trial before, you can select them from the **dropdown menu.**
- You do not need to redraw boundaries for fields that have already been created and enrolled in a previous trial.
[](https://docs.prod.intent.ag/uploads/images/gallery/2024-03/screenshot-2024-03-06-103950.png)
- **Check the Boundary**
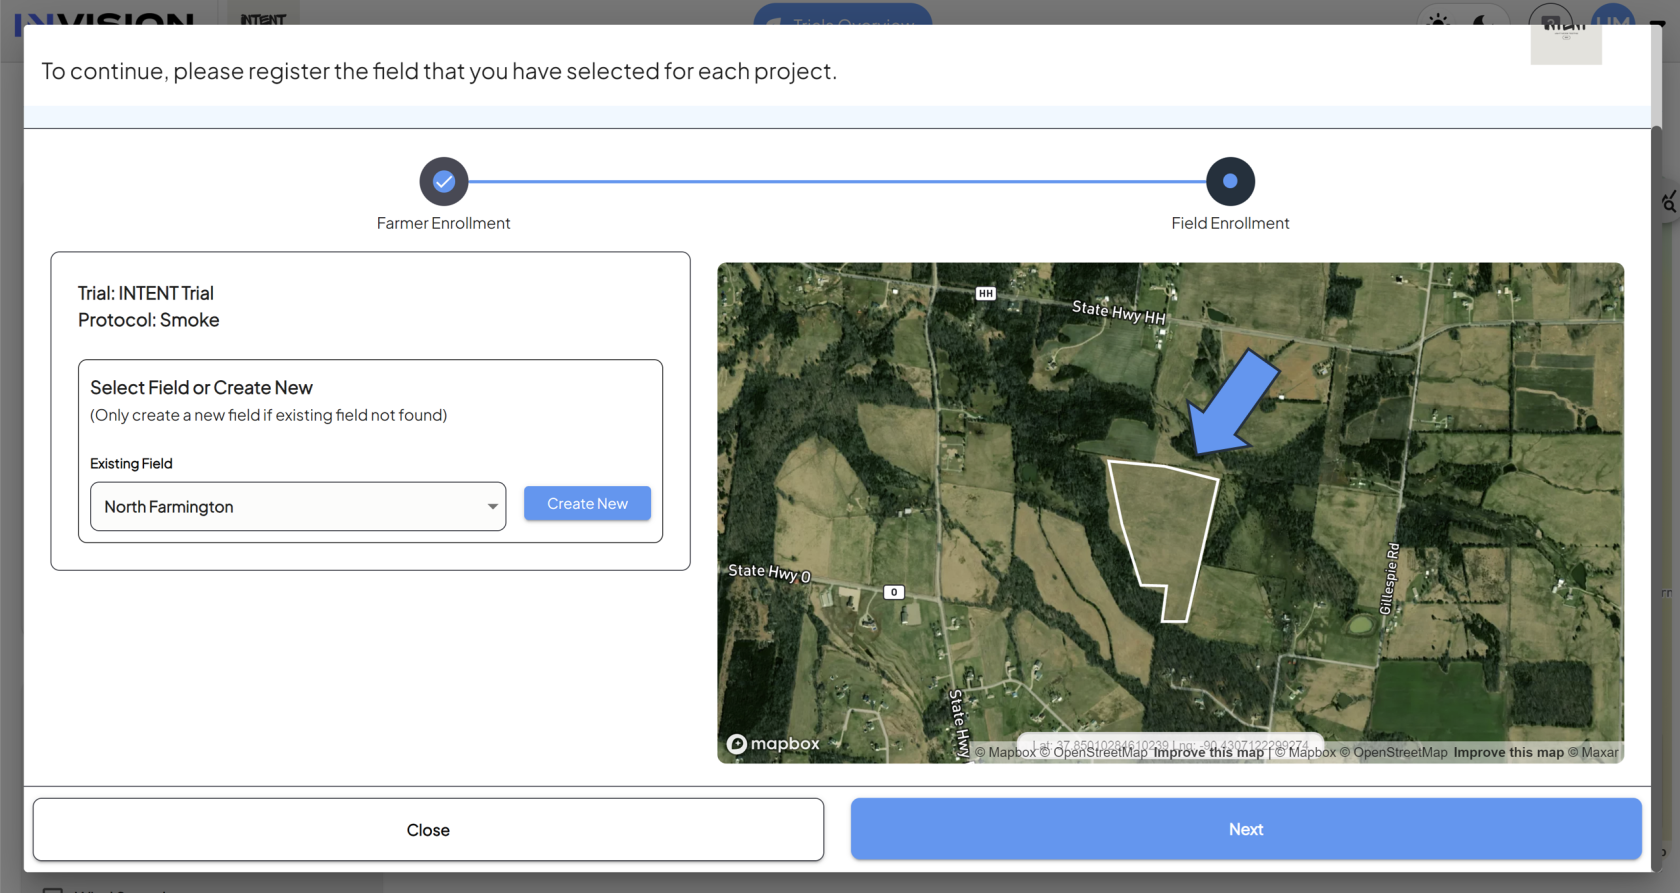
- - After selecting one of your fields from the dropdown menu, check that the boundary is correct by viewing it on the map.
[](https://docs.prod.intent.ag/uploads/images/gallery/2024-03/screenshot-2024-03-06-104948.png)
- **Select Trial Tag (if applicable)**
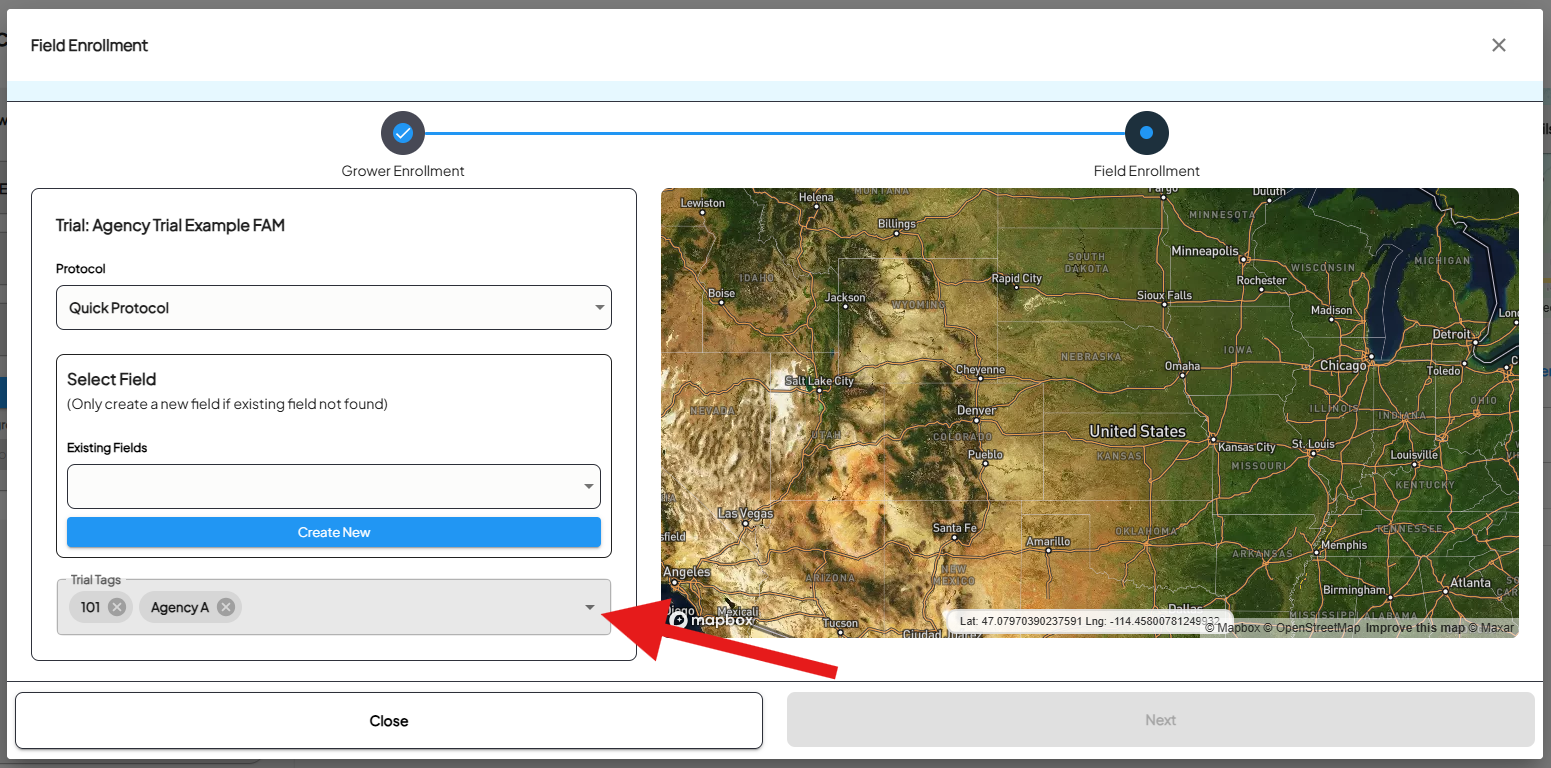
- If your Trial uses Agency or Territory Codes, you will be able to select them from the Trial Tags dropdown.
[](https://docs.prod.intent.ag/uploads/images/gallery/2025-02/kwDimage.png)
- **Confirm and Enroll**
- If this is the correct field, hitting the **Next** button will enroll that field.
[](https://docs.prod.intent.ag/uploads/images/gallery/2024-03/screenshot-2024-03-06-105053.png)
- - You should then see a confirmation screen. Click **Done** to complete the enrollment process.
[](https://docs.prod.intent.ag/uploads/images/gallery/2024-03/screenshot-2024-03-06-105228.png)
##### **Enrolling a New Field**
1. **Create A Field Boundary**
- To start enrolling your field, you click **Create New** beside the dropdown. **[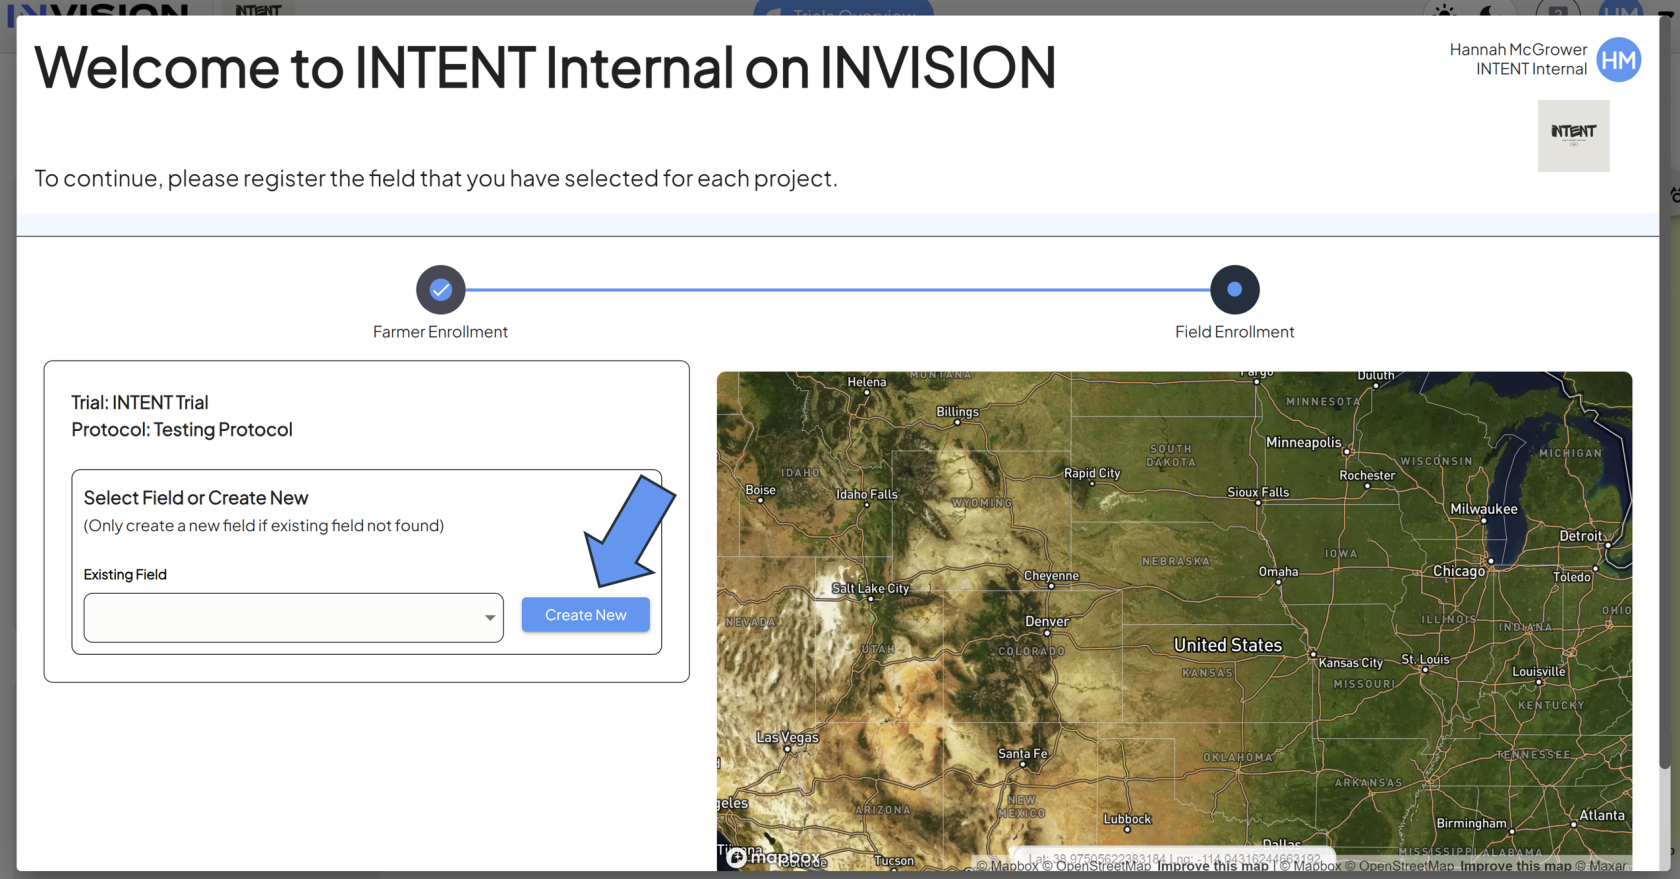](https://docs.prod.intent.ag/uploads/images/gallery/2024-03/screenshot-2024-03-06-111509.png)**
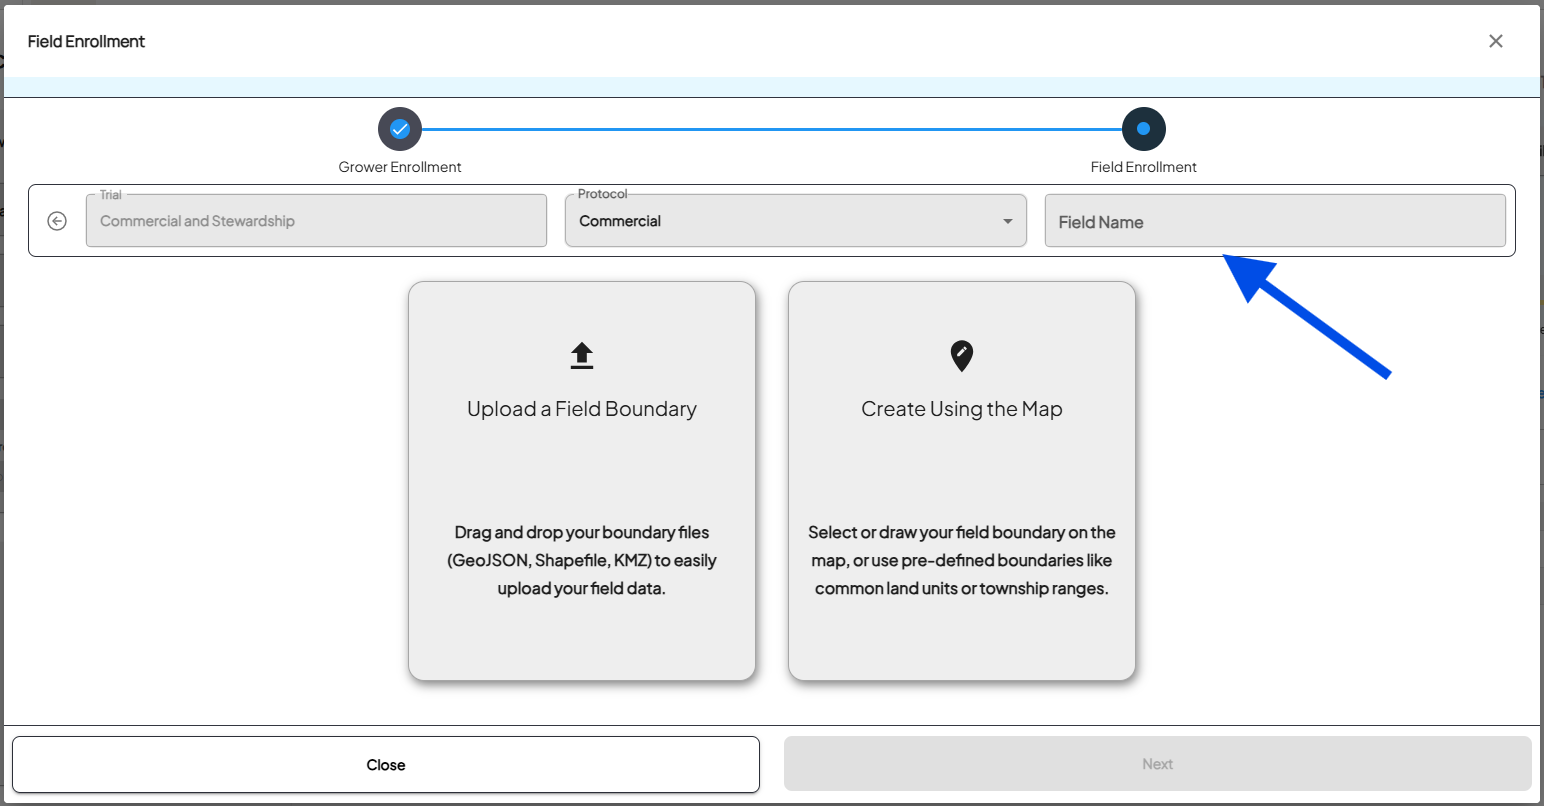
- **Name Your Field**
- Choose a unique name for your field and enter it into the *Field Name* box.
[](https://docs.prod.intent.ag/uploads/images/gallery/2024-12/screenshot-2024-12-10-125736.png)
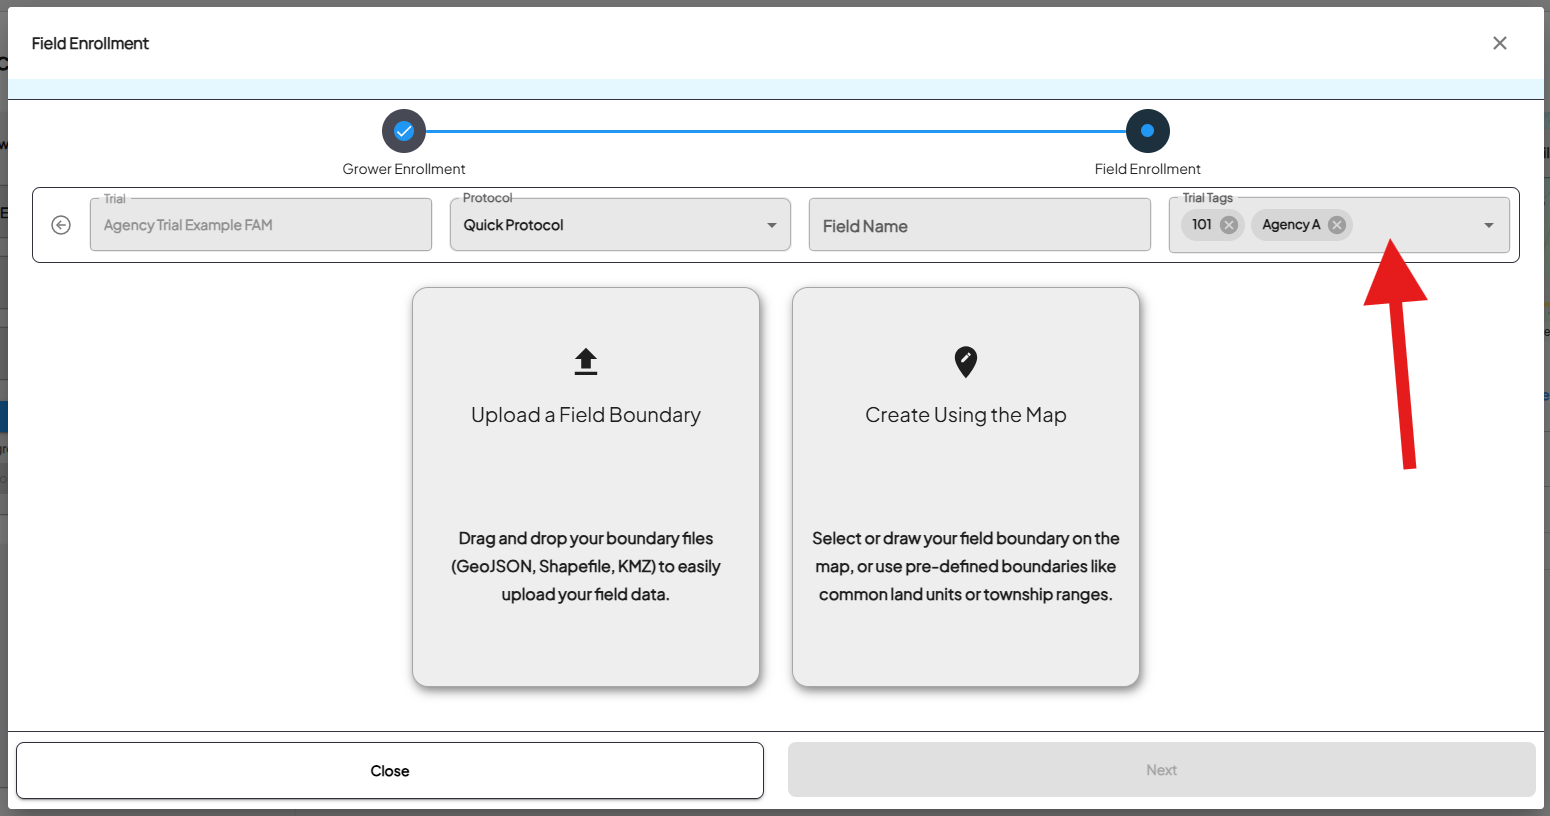
- - **Select Trial Tag (if applicable)**
- If your Trial uses Agency or Territory Codes, you will be able to select them from the Trial Tags dropdown.
[](https://docs.prod.intent.ag/uploads/images/gallery/2025-02/JBDimage.png)
- - **Decide Which Boundary Creation Method to Use**
- From here, you have three options to create your field boundary:
1. **Draw the Boundary**
- Select **Create Using the Map**
**[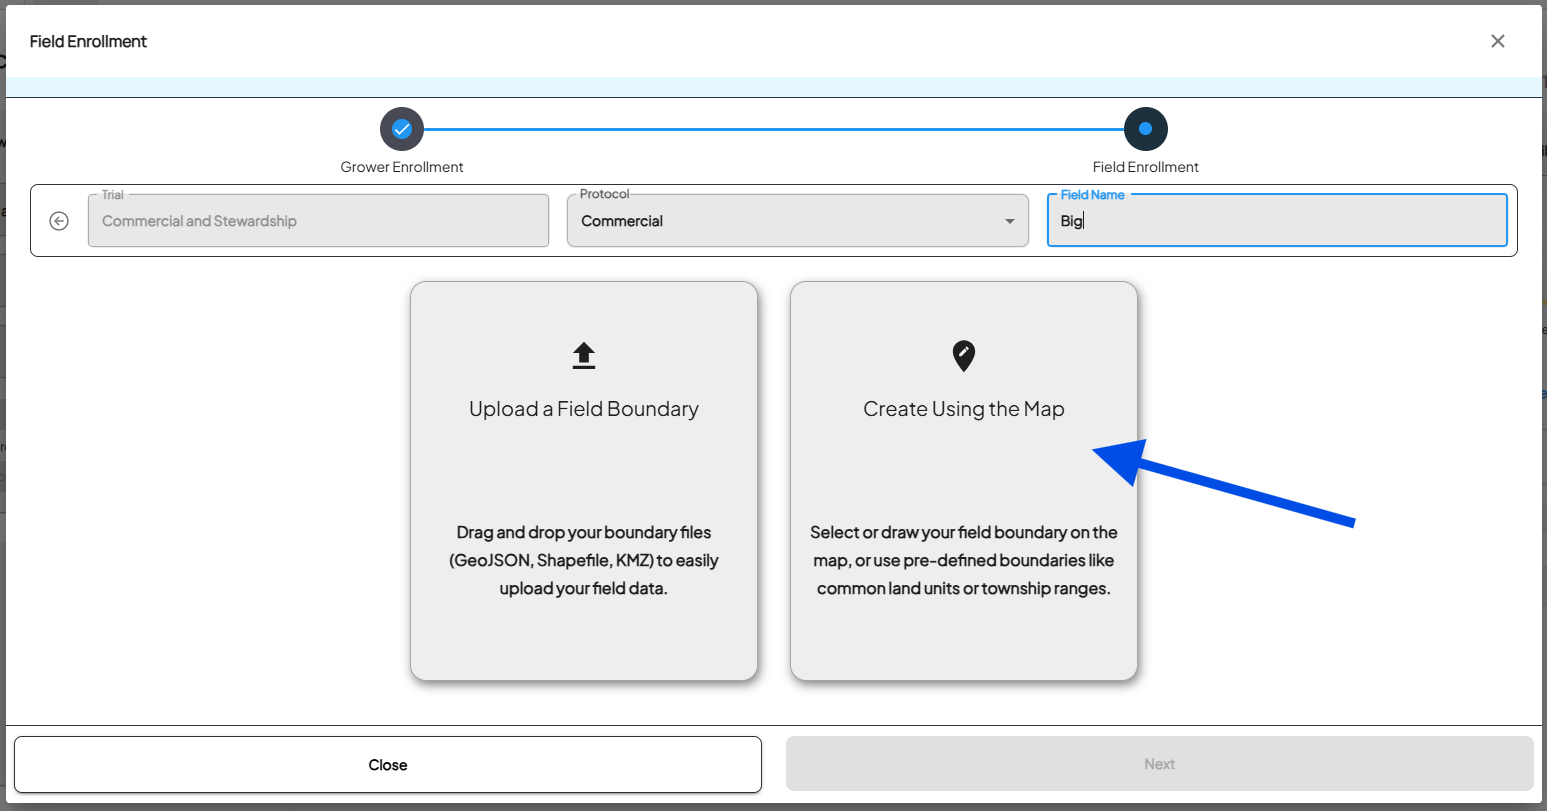](https://docs.prod.intent.ag/uploads/images/gallery/2024-12/screenshot-2024-12-10-134057.png)**
- - - - - You can use the search bar to navigate to the area on the map where your field is located.
[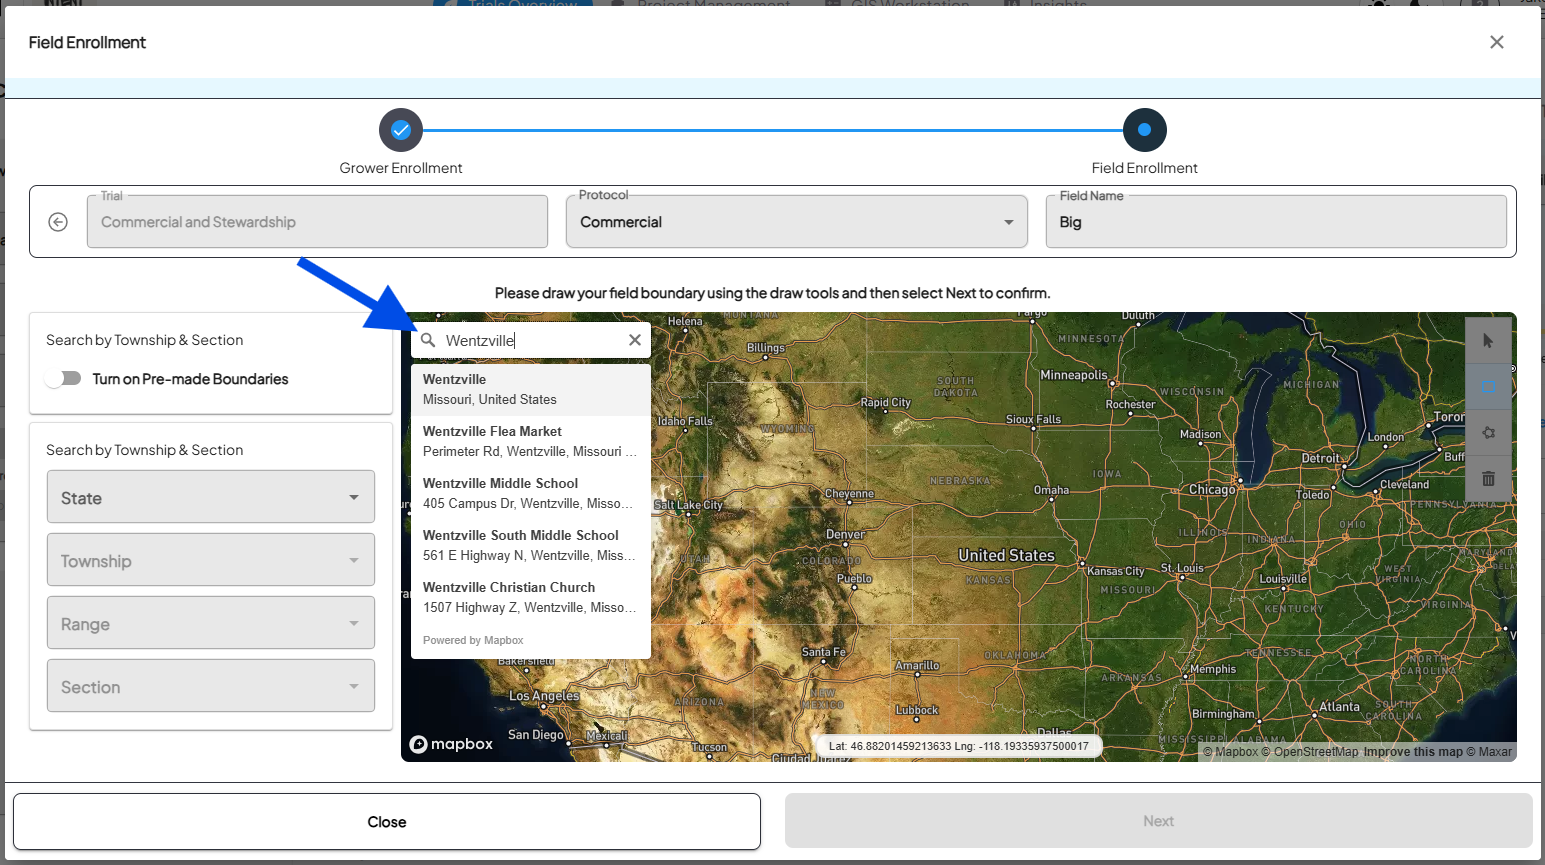](https://docs.prod.intent.ag/uploads/images/gallery/2024-12/screenshot-2024-12-10-134738.png)
- - - - - You can also search by State-Township-Range-Section.
[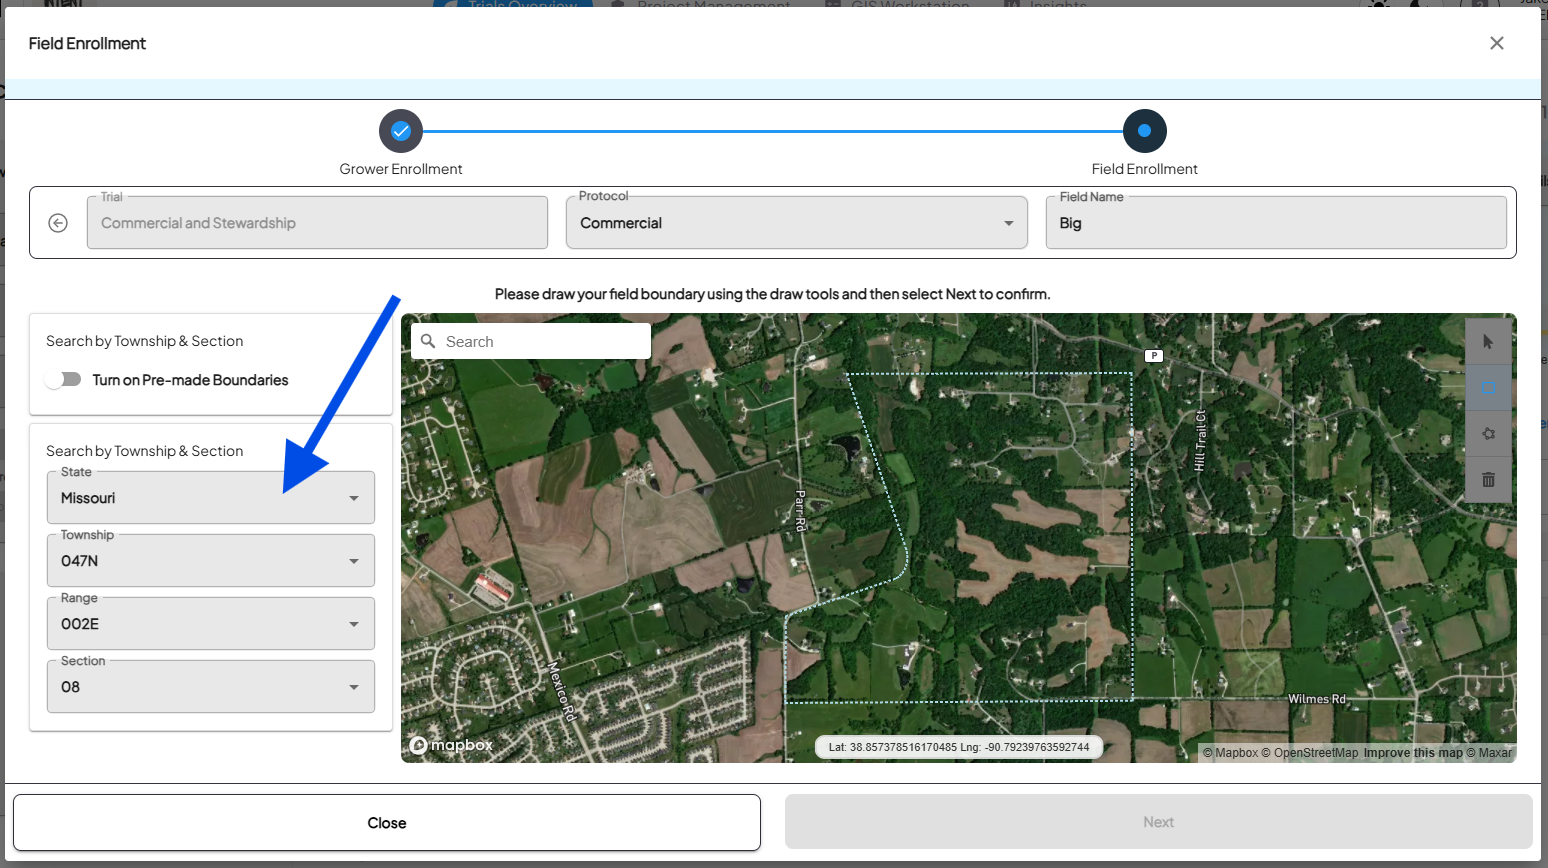](https://docs.prod.intent.ag/uploads/images/gallery/2024-12/screenshot-2024-12-10-140407.png)
- - - - - Once you're in the correct area, you have two different drawing tools available to you.
- - The *rectangular polygon tool* will create a rectangular polygon shape as you drag your mouse.
[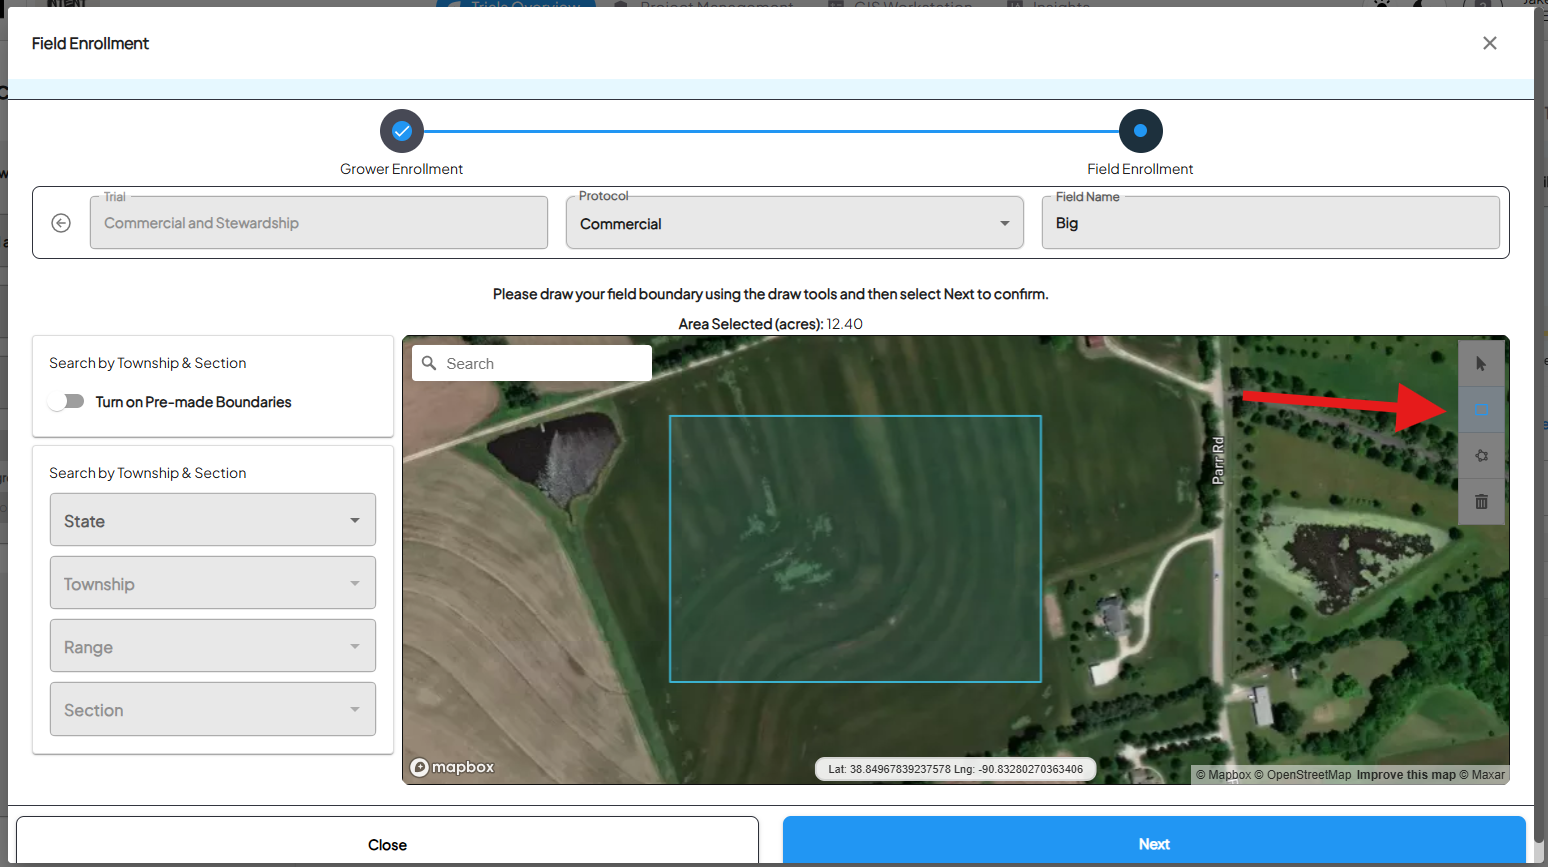](https://docs.prod.intent.ag/uploads/images/gallery/2024-12/screenshot-2024-12-10-141729.png)
- - - - - - - The *star shaped polygon* *tool* will allow you to drop connected points to create a polygon. This tool provides more control over the shape of the field boundary you create.
[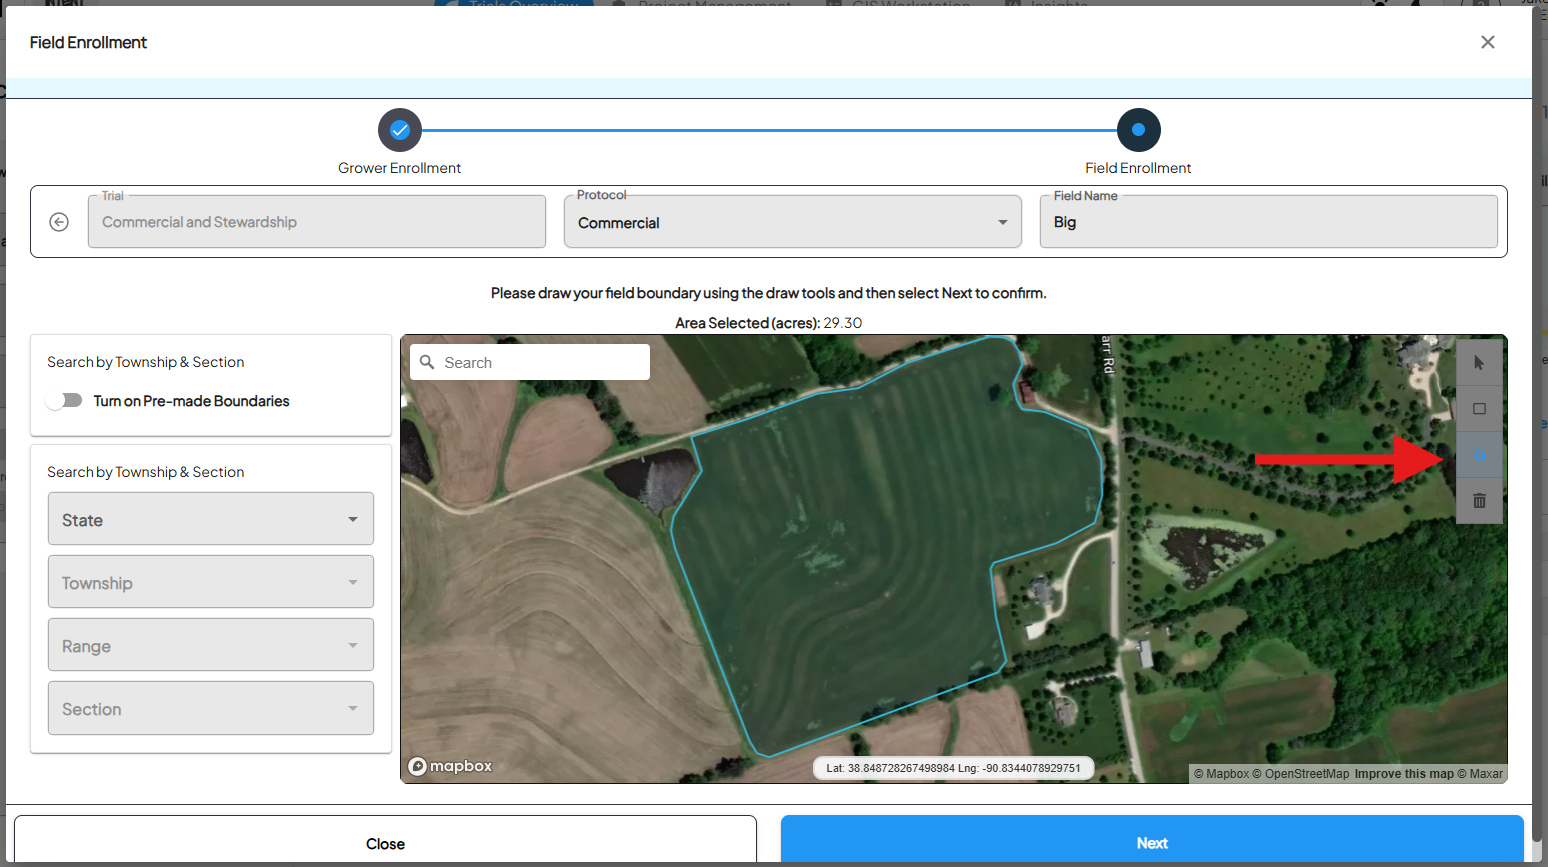](https://docs.prod.intent.ag/uploads/images/gallery/2024-12/screenshot-2024-12-10-142256.png)
- - - - - - Double clicking on a point you've created will give you the option to edit that point, allowing you to move it around.
- You can use the trash can icon to delete the boundary if you need to start over.
[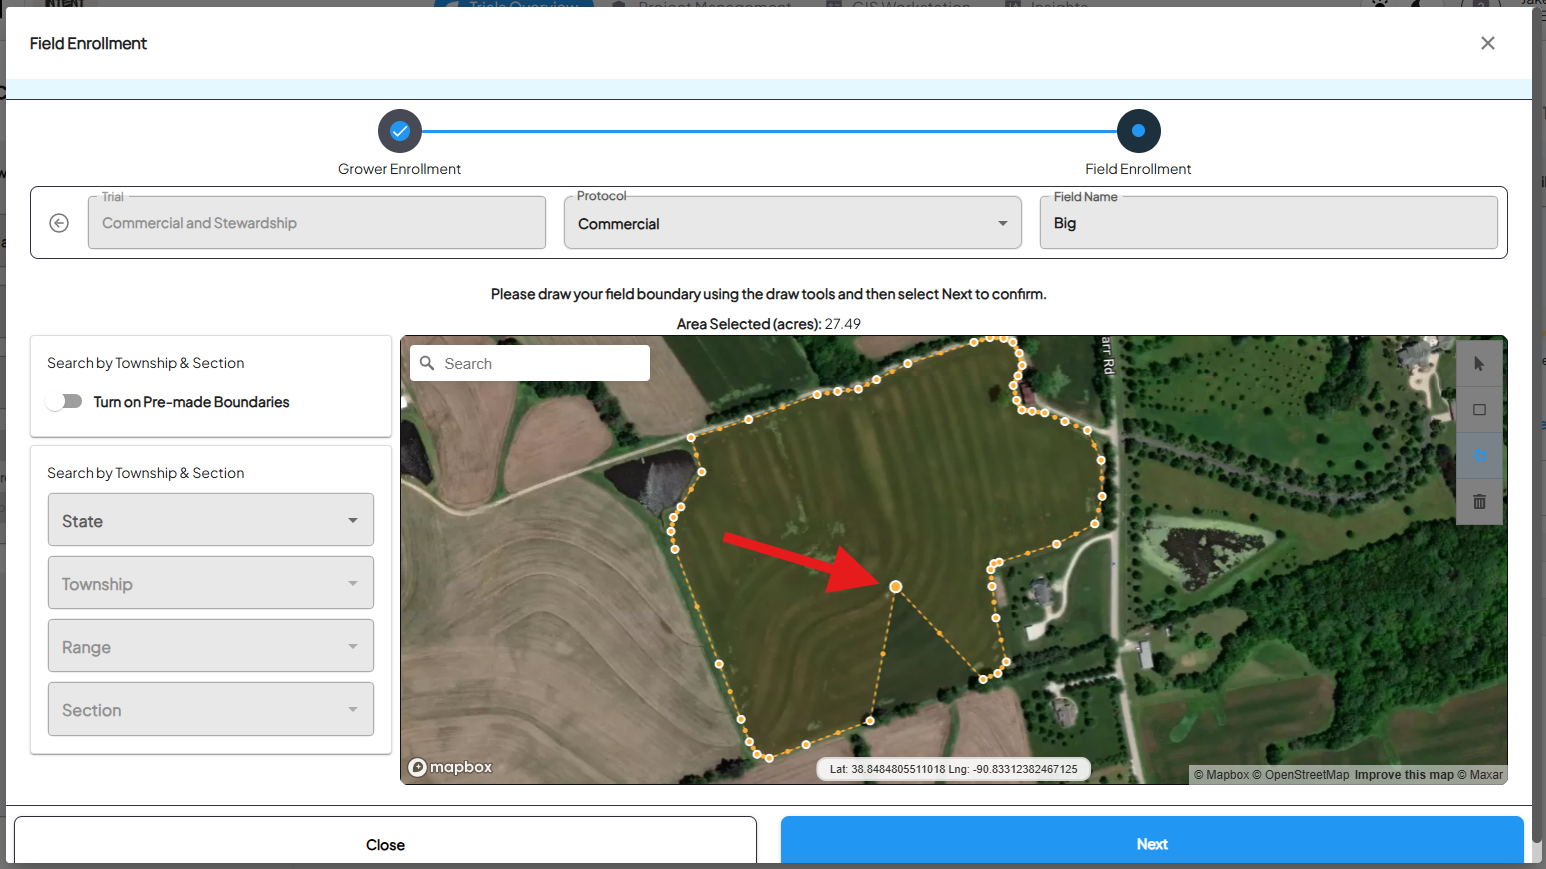](https://docs.prod.intent.ag/uploads/images/gallery/2024-12/screenshot-2024-12-10-142505.png)
- - - - - Once your boundary looks correct, clicking the **Next** button will enroll the field you've just created.
[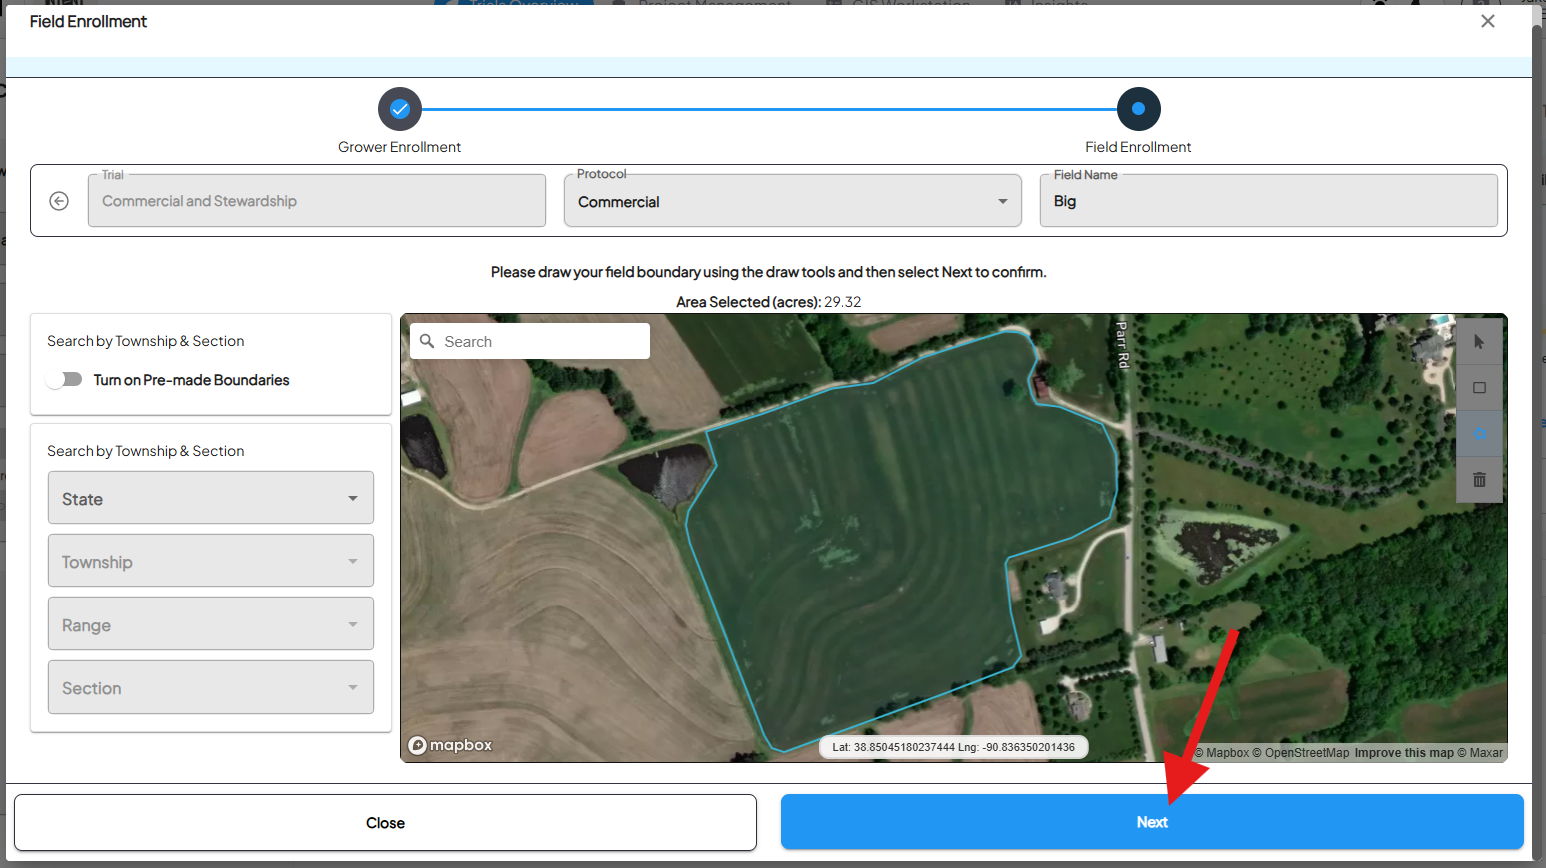](https://docs.prod.intent.ag/uploads/images/gallery/2024-12/screenshot-2024-12-10-142700.png)
- - - - - Select **Done** on the confirmation box to complete the field enrollment process.
[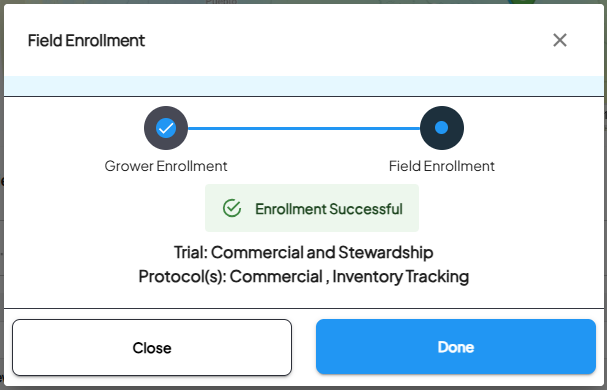](https://docs.prod.intent.ag/uploads/images/gallery/2024-12/screenshot-2024-12-10-145234.png)
2\. **Select a Pre-made Boundary**
- - The second option to create a field boundary is to select one or more pre-made boundaries, also known as Common Land Units (CLUs) in the US or Legal Land Description (LLDs) for Canada.
- Select **Create Using the Map**.
**[](https://docs.prod.intent.ag/uploads/images/gallery/2024-12/screenshot-2024-12-10-134057.png)**
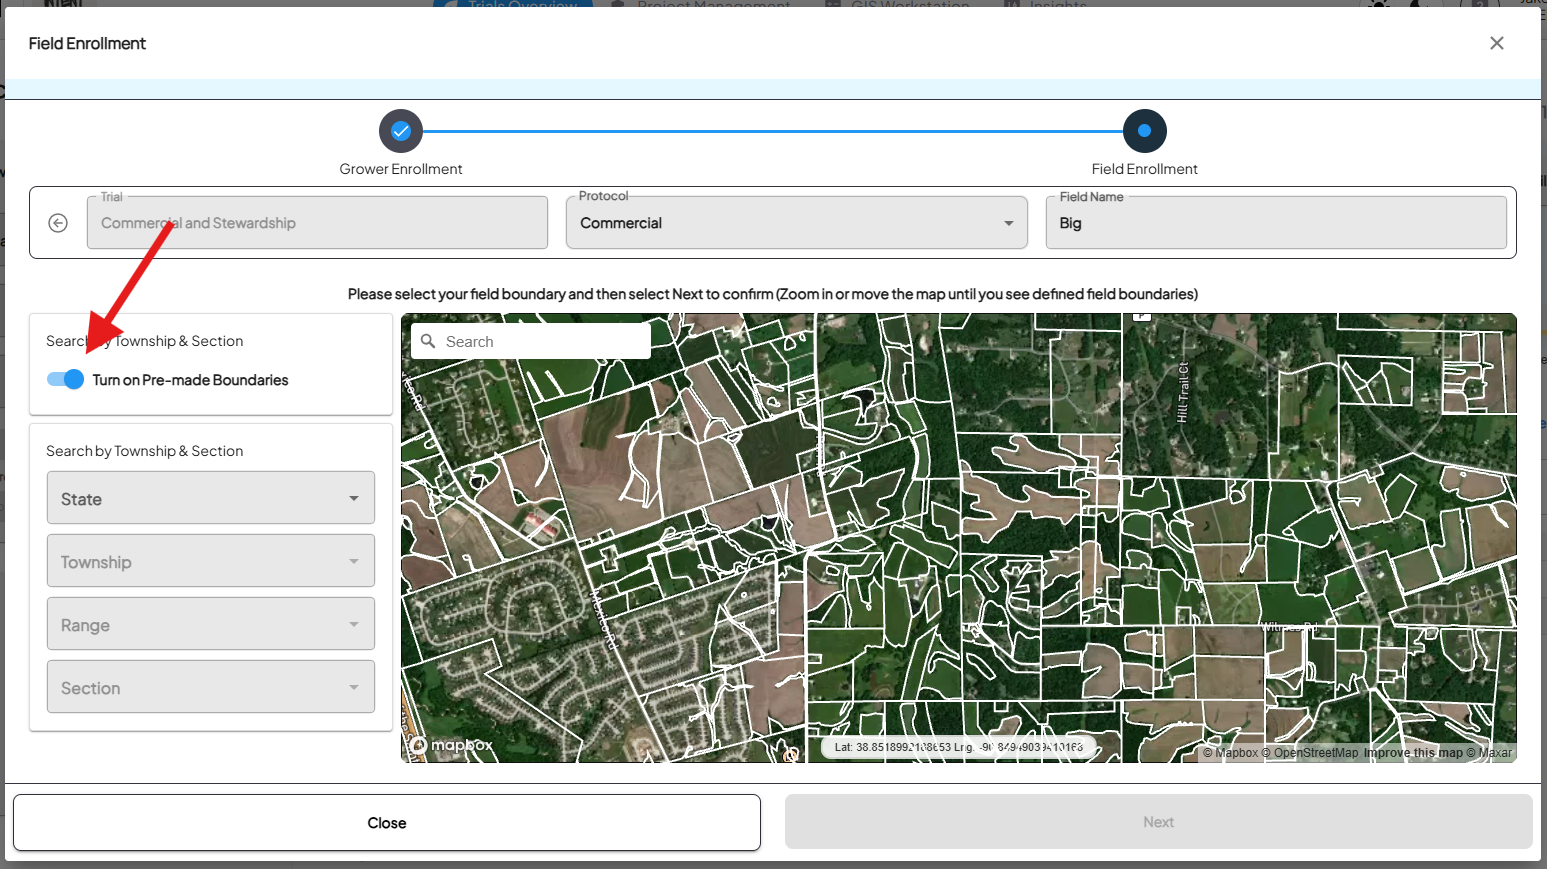
- - Click the **Turn on Pre-made Boundaries button to use these boundaries. You can use any of the previously mentioned search methods to find the location of your field.
[](https://docs.prod.intent.ag/uploads/images/gallery/2024-12/screenshot-2024-12-10-144002.png)
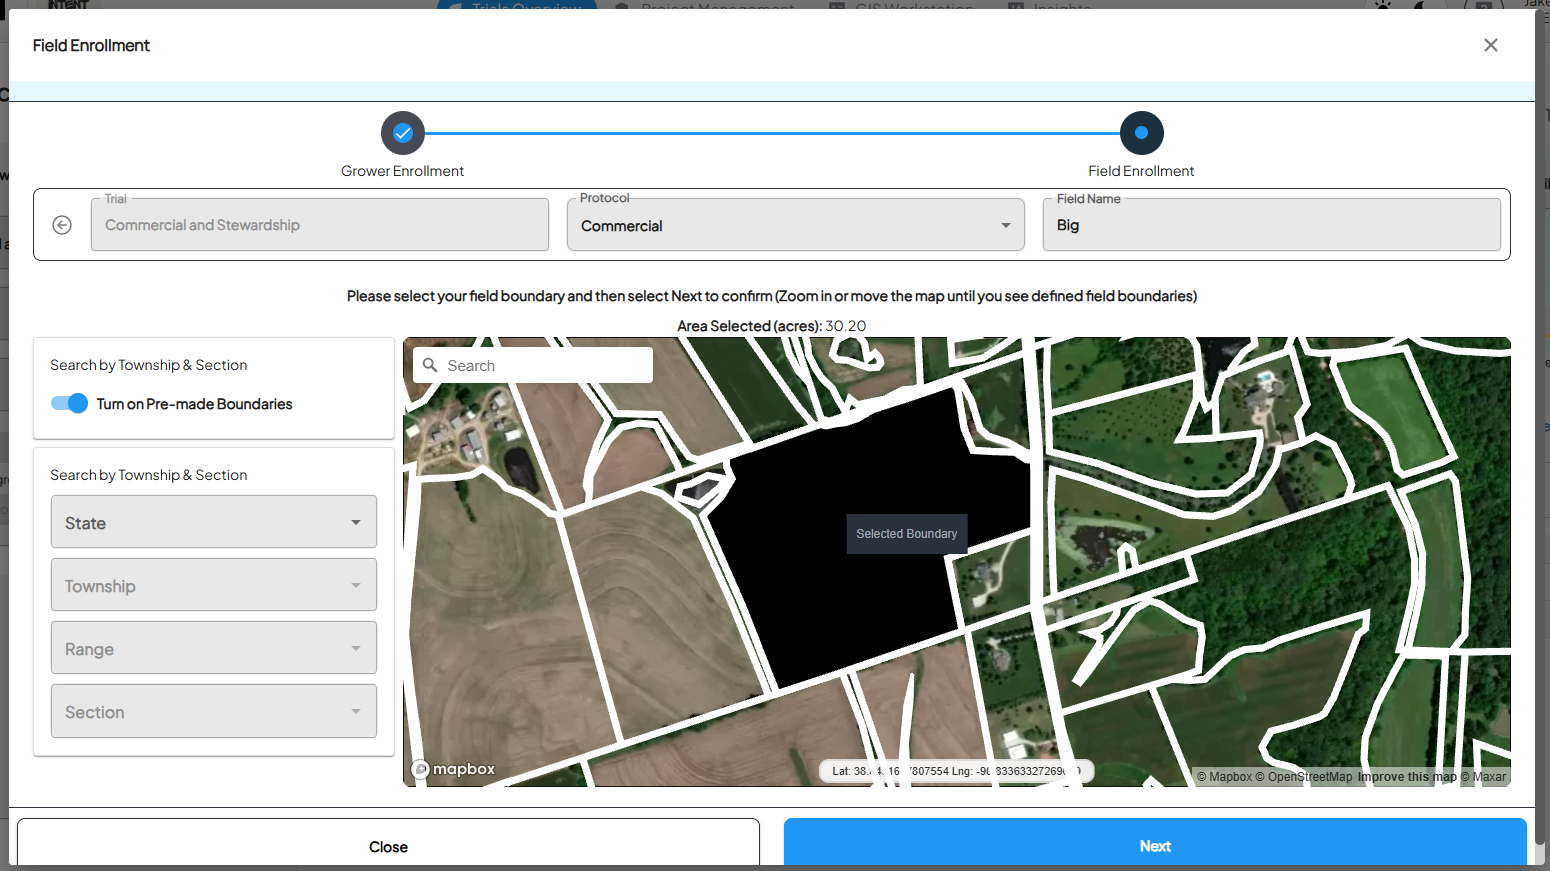
- - Scroll in on the map, and you should start to see the boundaries outlined in white. Clicking inside a boundary will select it. Clicking a second time will deselect it.
[](https://docs.prod.intent.ag/uploads/images/gallery/2024-12/screenshot-2024-12-10-144303.png)
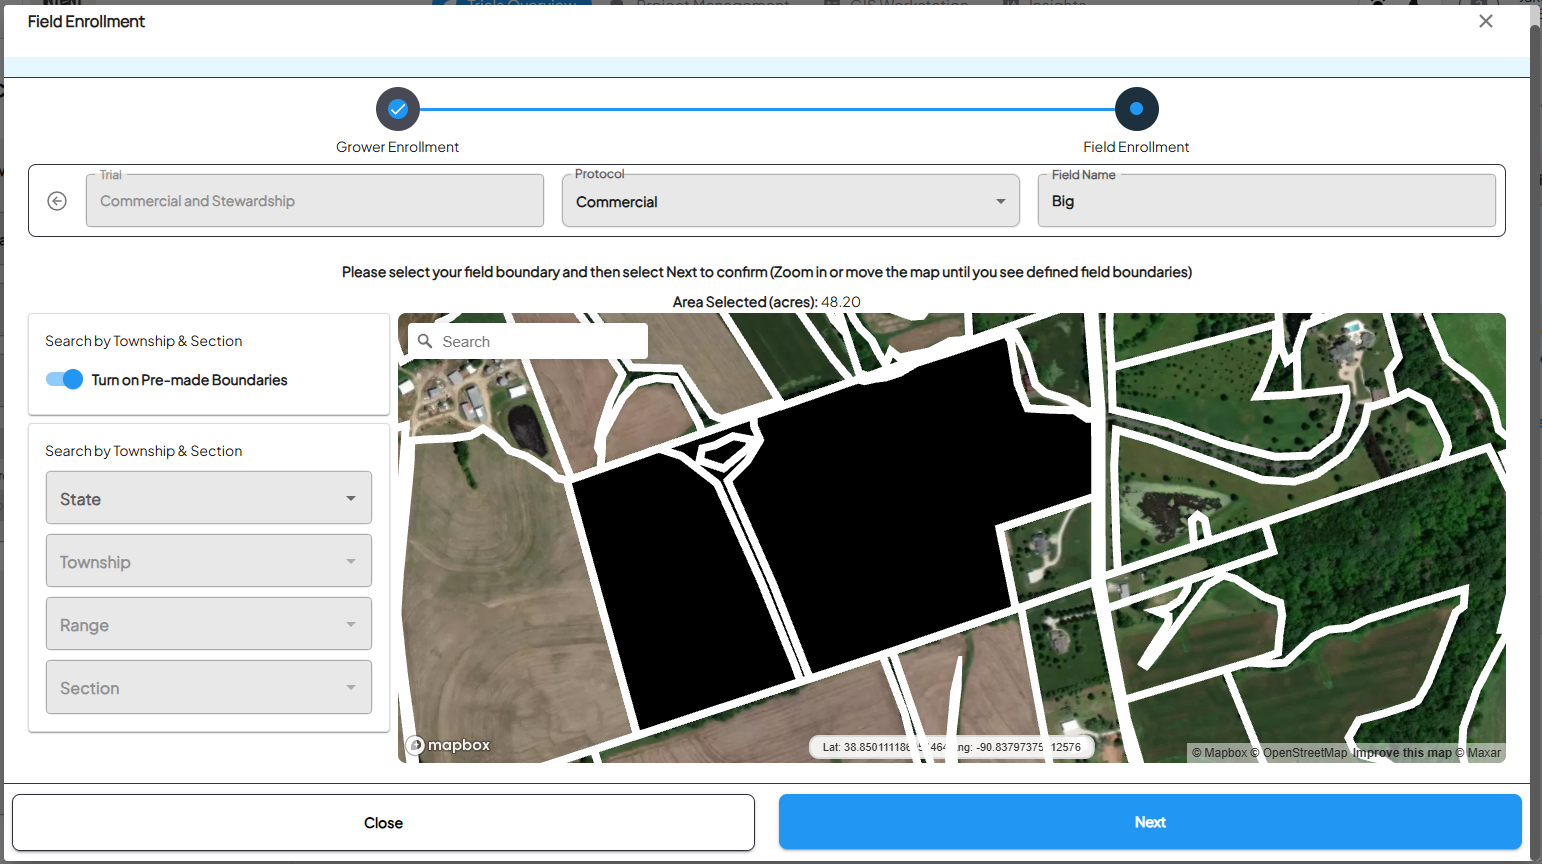
- - - - - Continue selecting boundaries until the shape of your field is complete. **Selected boundaries must be contiguous.**
**[](https://docs.prod.intent.ag/uploads/images/gallery/2024-12/screenshot-2024-12-10-144725.png)**
- - - - - Once your field looks correct, selecting the **Next** button will enroll the field you created.
- Click **Done** on the confirmation box to complete the enrollment process.
[](https://docs.prod.intent.ag/uploads/images/gallery/2024-12/screenshot-2024-12-10-145234.png)
3\. **Upload** **a Shapefile**
- The third boundary creation option is to upload a zipped **shapefile**.
Shapefiles are a popular file format for geographic information system (GIS) software.
A shapefile actually consists of a collection of files with the same filename but different extensions that work together. These files store different types of data:
- **.shp**: This file stores the geometry of the feature, which, in the case of a polygon shapefile, includes the coordinates of the vertices that make up the polygon boundaries.
- **.shx**: This is the index file that allows for efficient access to the geometry data stored in the .shp file.
- **.dbf**: This file is a dBASE table that stores attribute data or information about each feature in the shapefile. For polygons, this might include information such as the area's name, population, or any other relevant data.
- All of the above files are necessary, and need to be zipped into one file before uploading to INVISION.
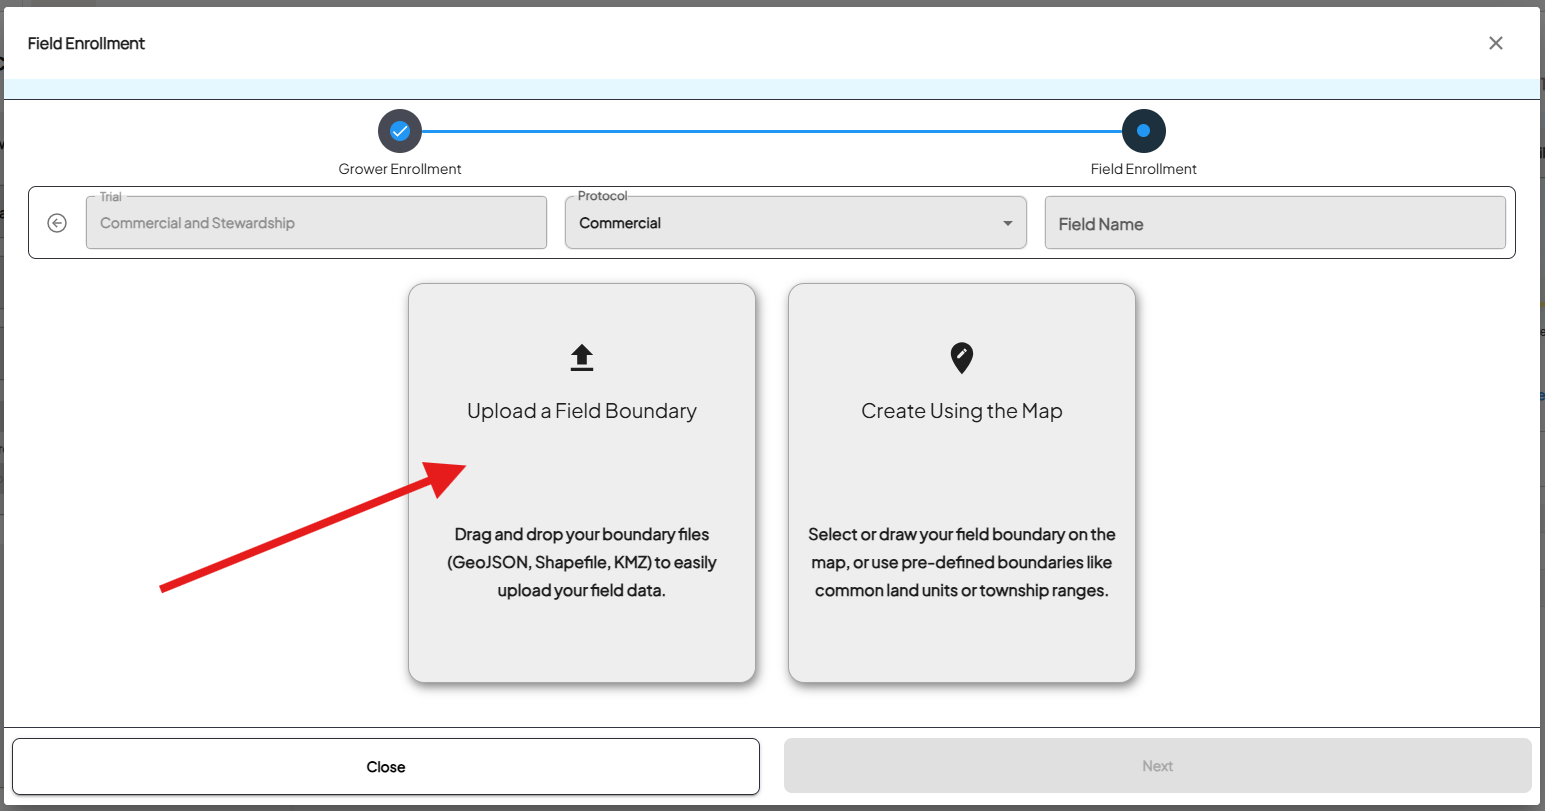
- Select **Upload a Field Boundary.**
[](https://docs.prod.intent.ag/uploads/images/gallery/2024-12/image.png)
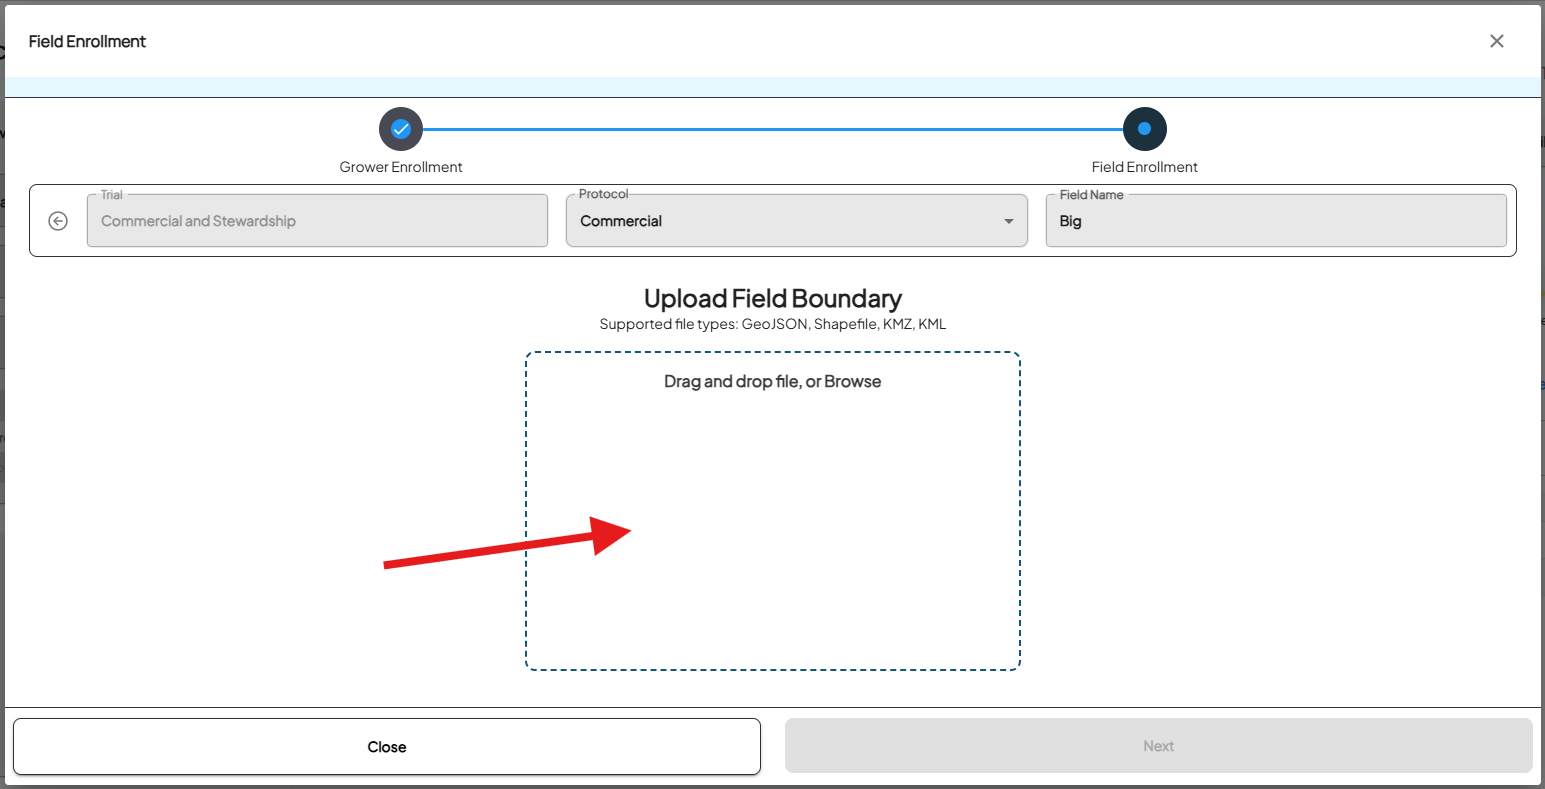
- You can click inside the dotted boundary, which will open the files available on your computer, and select the zipped shapefile. You can also drag and drop a file into the dotted boundary.
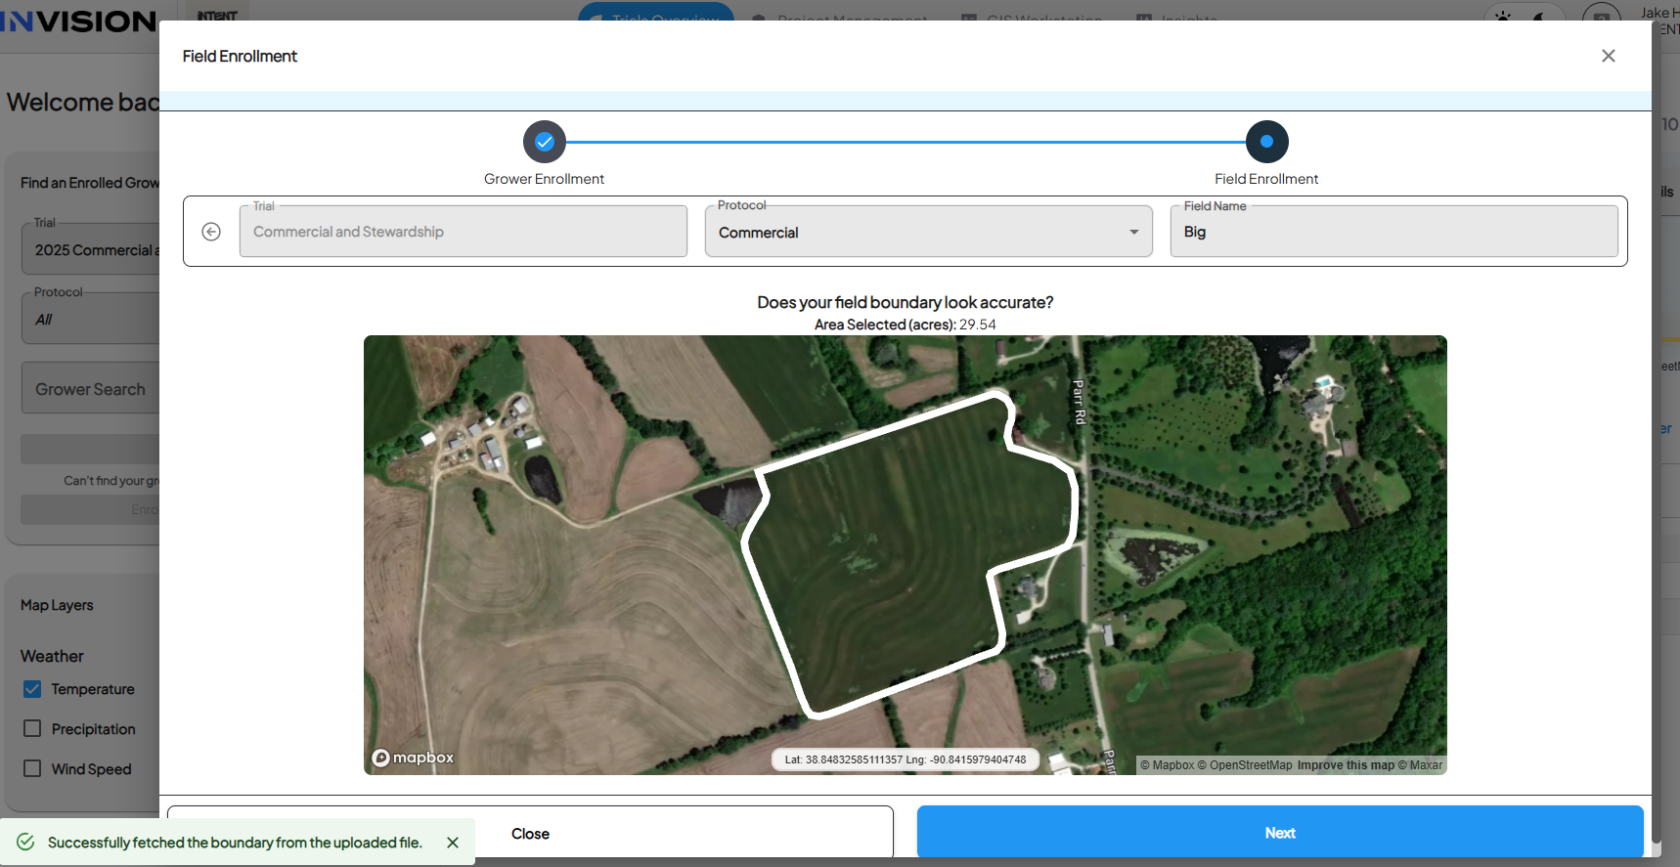
- Once the field boundary file is correctly uploaded, you will see a preview of the boundary on the map. **Ensure that it is the correct field.**
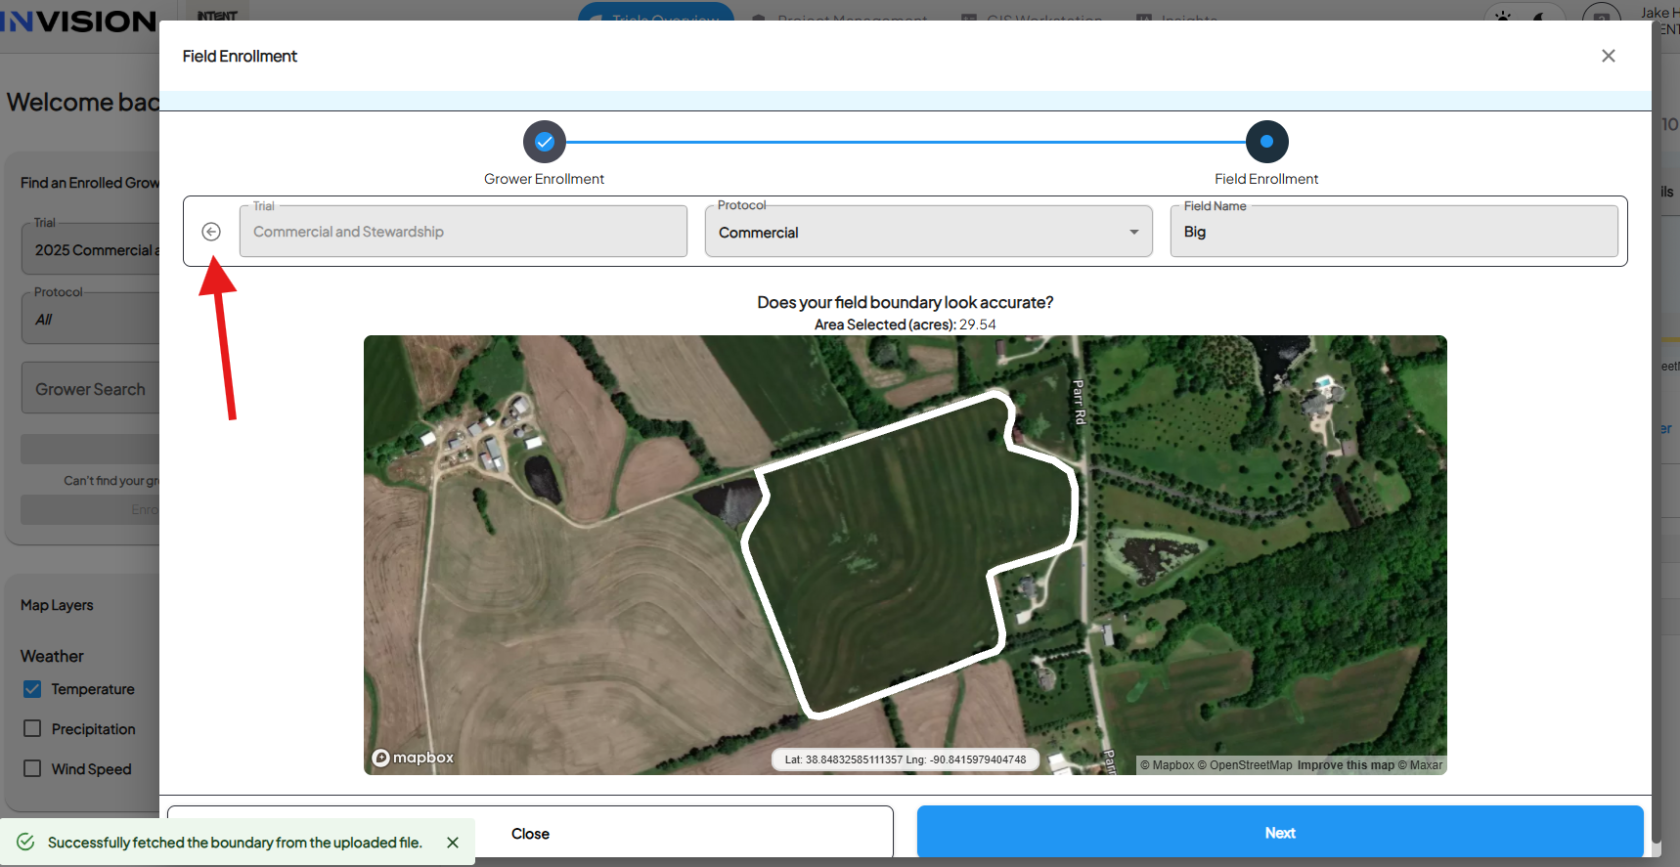
- If it happens to be the wrong field, selecting *UPLOAD* again will reset the page so that you can upload another file.
[](https://docs.prod.intent.ag/uploads/images/gallery/2024-12/UAuimage.png)
- Clicking the **Next** button will enroll that field.
- Click **Done** on the confirmation box to complete the enrollment process.
[](https://docs.prod.intent.ag/uploads/images/gallery/2024-12/screenshot-2024-12-10-145234.png)
---
##### **Standalone Field Enrollment**
If you need to enroll a field for a grower that is already enrolled, you can do so through the Enrollment Panel on the Trials Overview page. Follow the steps below to learn more.
1. **Login to INVISION**
- Head over to the [INVISION website](https://trials.prod.intent.ag/login) and login.
2. **Choose the Trial and Protocol**
- From the Trials Overview page, select the correct Trial and Protocol that the grower needs to be enrolled into using the *Find an Enrolled Grower* panel.
[](https://docs.prod.intent.ag/uploads/images/gallery/2024-03/screenshot-2024-03-08-134708.png)
3. **Open the Enrollment Panel**
- Once you've selected the trial/protocol click the **Enroll Grower / Add Fields** button at the bottom of the panel.
[](https://docs.prod.intent.ag/uploads/images/gallery/2024-03/screenshot-2024-03-08-144128.png)
4. **Find the Grower**
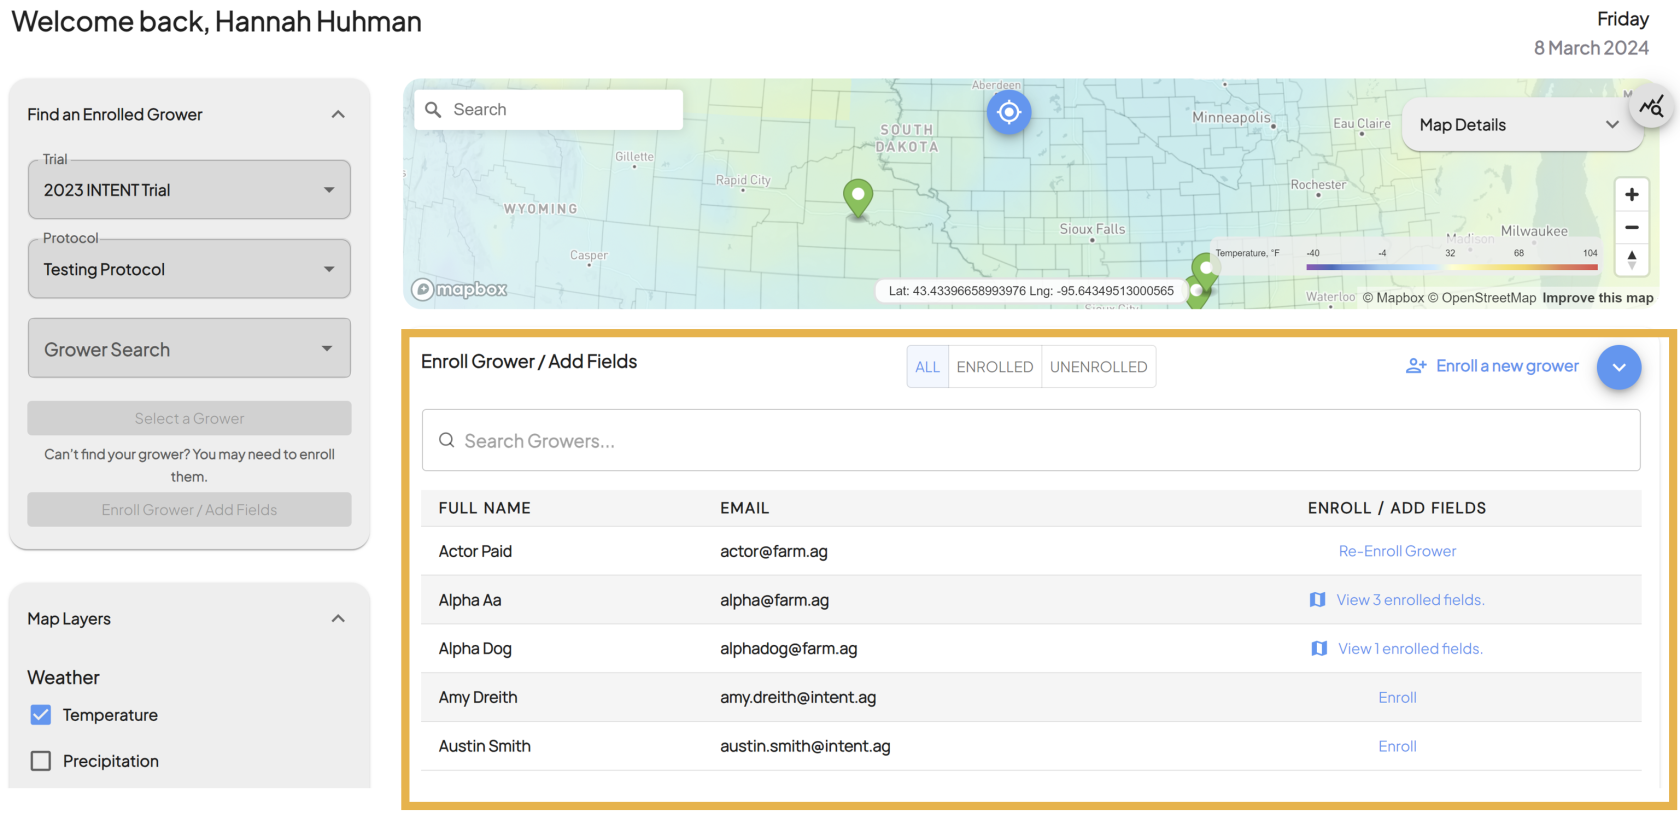
- This will open the Enrollment Panel.
[](https://docs.prod.intent.ag/uploads/images/gallery/2024-03/HEYimage.png)
- Find the grower in the Enrollment Panel that has the field you need to enroll.
- You can use the search bar at the top to search for the grower's name.
[](https://docs.prod.intent.ag/uploads/images/gallery/2024-03/screenshot-2024-03-12-085902.png)
- There are also three filters at the top to help find your grower more easily in the table:
[](https://docs.prod.intent.ag/uploads/images/gallery/2024-03/screenshot-2024-03-12-091847.png)
- **All:** This filter will show all growers, regardless of their enrollment status
- **Enrolled:** This filter will only show growers that are enrolled in the trial/protocol that are selected
- **Unenrolled:** This filter will only show growers that are *not* enrolled in the selected trial/protocol
- Select their enrollment status under the *ENROLL / ADD FIELDS* column of the table.
[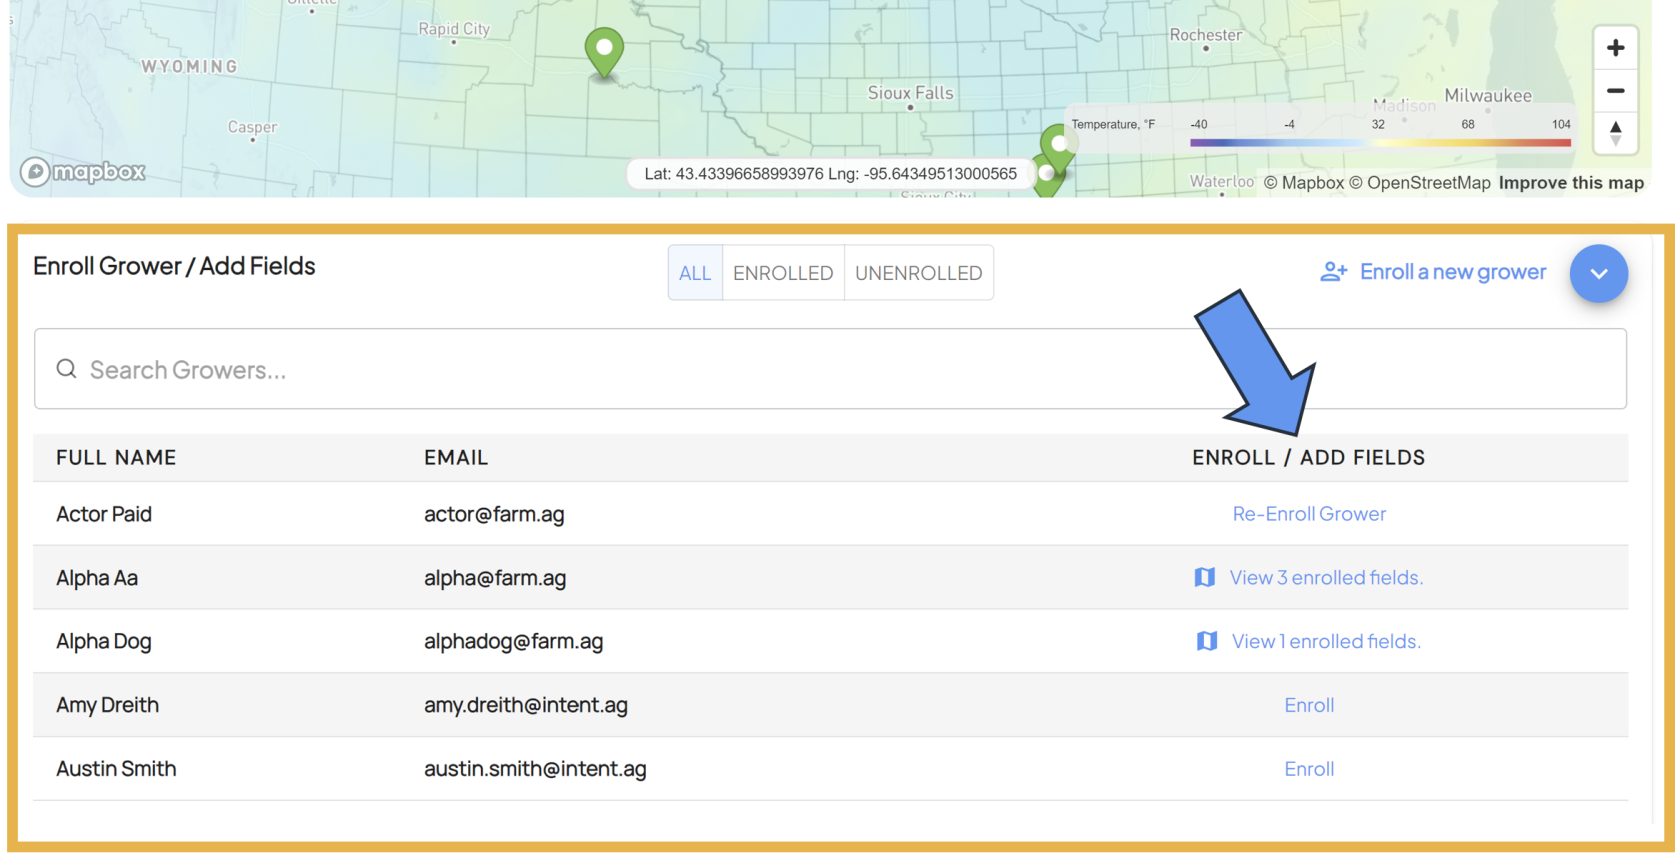](https://docs.prod.intent.ag/uploads/images/gallery/2024-03/CDdimage.png)
5. **Add or Create a Field**
- Selecting the enrollment status will open a new menu that lays out all fields that are enrolled for that grower, and the trial/protocol that they are enrolled into.
- To enroll a field, select the **Add New Field** button in the top right corner.
[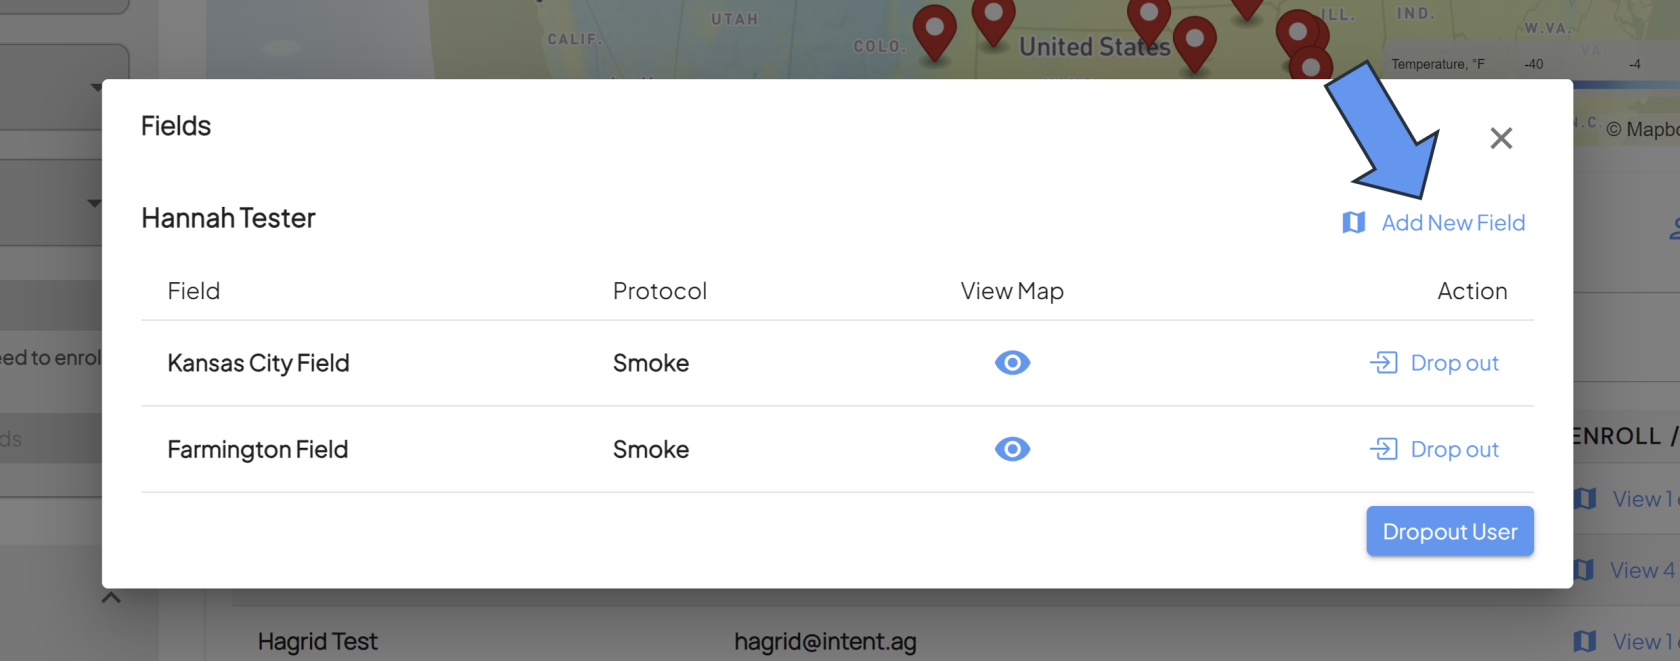](https://docs.prod.intent.ag/uploads/images/gallery/2024-03/wvuimage.png)
6. **Select Which Type of Field**
- A new window will pop up that will allow you to start field enrollment. At this point, you have two different options for enrolling a field:
- **Enroll a field that already exists in the system.**
- **Create a new field boundary and enroll that field.**
##### **Enrolling a Field That Already Exists in the System**
1. **Select A Previously Created Field**
- If you have enrolled fields in a trial before, you can select them from the **dropdown menu.**
- You do not need to redraw boundaries for fields that have already been created and enrolled in a previous trial.
[](https://docs.prod.intent.ag/uploads/images/gallery/2024-03/screenshot-2024-03-06-103950.png)
- **Check the Boundary**
- - After selecting one of your fields from the dropdown menu, check that the boundary is correct by viewing it on the map.
[](https://docs.prod.intent.ag/uploads/images/gallery/2024-03/screenshot-2024-03-06-104948.png)
- **Select Trial Tag (if applicable)**
- If your Trial uses Agency or Territory Codes, you will be able to select them from the Trial Tags dropdown.
[](https://docs.prod.intent.ag/uploads/images/gallery/2025-02/kwDimage.png)
- **Confirm and Enroll**
- If this is the correct field, hitting the **Next** button will enroll that field.
[](https://docs.prod.intent.ag/uploads/images/gallery/2024-03/screenshot-2024-03-06-105053.png)
- - You should then see a confirmation screen. Click **Done** to complete the enrollment process.
[](https://docs.prod.intent.ag/uploads/images/gallery/2024-03/screenshot-2024-03-06-105228.png)
##### **Enrolling a New Field**
1. **Create A Field Boundary**
- To start enrolling your field, you click **Create New** beside the dropdown. **[](https://docs.prod.intent.ag/uploads/images/gallery/2024-03/screenshot-2024-03-06-111509.png)**
- **Name Your Field**
- Choose a unique name for your field and enter it into the *Field Name* box.
[](https://docs.prod.intent.ag/uploads/images/gallery/2024-12/screenshot-2024-12-10-125736.png)
- - **Select Trial Tag (if applicable)**
- If your Trial uses Agency or Territory Codes, you will be able to select them from the Trial Tags dropdown.
[](https://docs.prod.intent.ag/uploads/images/gallery/2025-02/JBDimage.png)
- - **Decide Which Boundary Creation Method to Use**
- From here, you have three options to create your field boundary:
1. **Draw the Boundary**
- Select **Create Using the Map**
**[](https://docs.prod.intent.ag/uploads/images/gallery/2024-12/screenshot-2024-12-10-134057.png)**
- - - - - You can use the search bar to navigate to the area on the map where your field is located.
[](https://docs.prod.intent.ag/uploads/images/gallery/2024-12/screenshot-2024-12-10-134738.png)
- - - - - You can also search by State-Township-Range-Section.
[](https://docs.prod.intent.ag/uploads/images/gallery/2024-12/screenshot-2024-12-10-140407.png)
- - - - - Once you're in the correct area, you have two different drawing tools available to you.
- - The *rectangular polygon tool* will create a rectangular polygon shape as you drag your mouse.
[](https://docs.prod.intent.ag/uploads/images/gallery/2024-12/screenshot-2024-12-10-141729.png)
- - - - - - - The *star shaped polygon* *tool* will allow you to drop connected points to create a polygon. This tool provides more control over the shape of the field boundary you create.
[](https://docs.prod.intent.ag/uploads/images/gallery/2024-12/screenshot-2024-12-10-142256.png)
- - - - - - Double clicking on a point you've created will give you the option to edit that point, allowing you to move it around.
- You can use the trash can icon to delete the boundary if you need to start over.
[](https://docs.prod.intent.ag/uploads/images/gallery/2024-12/screenshot-2024-12-10-142505.png)
- - - - - Once your boundary looks correct, clicking the **Next** button will enroll the field you've just created.
[](https://docs.prod.intent.ag/uploads/images/gallery/2024-12/screenshot-2024-12-10-142700.png)
- - - - - Select **Done** on the confirmation box to complete the field enrollment process.
[](https://docs.prod.intent.ag/uploads/images/gallery/2024-12/screenshot-2024-12-10-145234.png)
2\. **Select a Pre-made Boundary**
- - The second option to create a field boundary is to select one or more pre-made boundaries, also known as Common Land Units (CLUs) in the US or Legal Land Description (LLDs) for Canada.
- Select **Create Using the Map**.
**[](https://docs.prod.intent.ag/uploads/images/gallery/2024-12/screenshot-2024-12-10-134057.png)**
- - Click the **Turn on Pre-made Boundaries button to use these boundaries. You can use any of the previously mentioned search methods to find the location of your field.
[](https://docs.prod.intent.ag/uploads/images/gallery/2024-12/screenshot-2024-12-10-144002.png)
- - Scroll in on the map, and you should start to see the boundaries outlined in white. Clicking inside a boundary will select it. Clicking a second time will deselect it.
[](https://docs.prod.intent.ag/uploads/images/gallery/2024-12/screenshot-2024-12-10-144303.png)
- - - - - Continue selecting boundaries until the shape of your field is complete. **Selected boundaries must be contiguous.**
**[](https://docs.prod.intent.ag/uploads/images/gallery/2024-12/screenshot-2024-12-10-144725.png)**
- - - - - Once your field looks correct, selecting the **Next** button will enroll the field you created.
- Click **Done** on the confirmation box to complete the enrollment process.
[](https://docs.prod.intent.ag/uploads/images/gallery/2024-12/screenshot-2024-12-10-145234.png)
3\. **Upload** **a Shapefile**
- The third boundary creation option is to upload a zipped **shapefile**.
Shapefiles are a popular file format for geographic information system (GIS) software.
A shapefile actually consists of a collection of files with the same filename but different extensions that work together. These files store different types of data:
- **.shp**: This file stores the geometry of the feature, which, in the case of a polygon shapefile, includes the coordinates of the vertices that make up the polygon boundaries.
- **.shx**: This is the index file that allows for efficient access to the geometry data stored in the .shp file.
- **.dbf**: This file is a dBASE table that stores attribute data or information about each feature in the shapefile. For polygons, this might include information such as the area's name, population, or any other relevant data.
- All of the above files are necessary, and need to be zipped into one file before uploading to INVISION.
- Select **Upload a Field Boundary.**
[](https://docs.prod.intent.ag/uploads/images/gallery/2024-12/image.png)
- You can click inside the dotted boundary, which will open the files available on your computer, and select the zipped shapefile. You can also drag and drop a file into the dotted boundary.

- Once the field boundary file is correctly uploaded, you will see a preview of the boundary on the map. **Ensure that it is the correct field.**

- If it happens to be the wrong field, selecting *UPLOAD* again will reset the page so that you can upload another file.
[](https://docs.prod.intent.ag/uploads/images/gallery/2024-12/UAuimage.png)
- Clicking the **Next** button will enroll that field.
- Click **Done** on the confirmation box to complete the enrollment process.
[](https://docs.prod.intent.ag/uploads/images/gallery/2024-12/screenshot-2024-12-10-145234.png)
For additional help, follow along with this video demonstrating how to enroll a new field for a grower:
# How To Enroll a Field - For Growers
#### **Guide For Growers: How to Enroll a Field**
In this section, we will be showing **Growers** how to enroll their fields in a trial. If an admin has enrolled you as a **Grower** in a trial, you need to enroll your field to complete the enrollment process.
##### **Enrolling a Field That Already Exists in the System**
1. **Login to INVISION**
- To start enrolling your field, you need to login to [**INVISION**](https://trials.prod.intent.ag/login), where a window will pop up so that you can enroll your field.
**[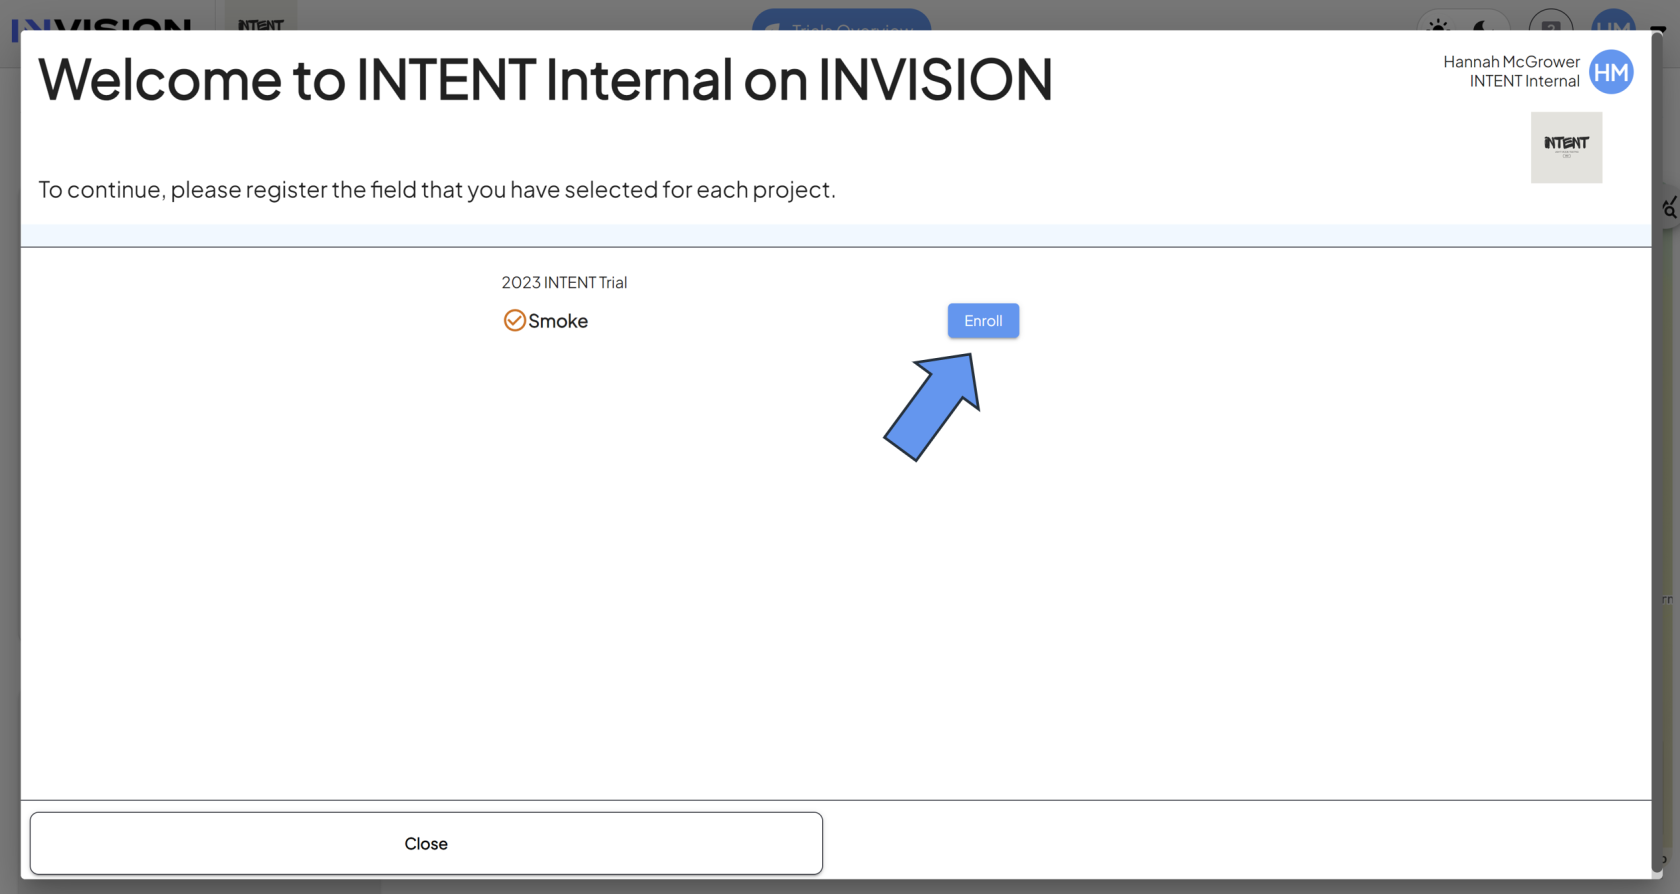](https://docs.prod.intent.ag/uploads/images/gallery/2024-03/screenshot-2024-03-06-103852.png)**
- Select the **Enroll** button to continue.
2. **Select A Previously Created Field**
- If you have enrolled fields in a trial before, you can select them from the **dropdown menu.**
- You do not need to redraw boundaries for fields that have already been created and enrolled in a previous trials.
[](https://docs.prod.intent.ag/uploads/images/gallery/2024-03/screenshot-2024-03-06-103950.png)
3. **Check the Boundary**
- After selecting one of your fields from the dropdown menu, check that the boundary is correct by viewing it on the map.
[](https://docs.prod.intent.ag/uploads/images/gallery/2024-03/screenshot-2024-03-06-104948.png)
4. **Confirm and Enroll**
- If this is the correct field, hitting the **Next** button will enroll that field.
[](https://docs.prod.intent.ag/uploads/images/gallery/2024-03/screenshot-2024-03-06-105053.png)
- You should then see a confirmation screen. Click **Done** to complete the enrollment process.
[](https://docs.prod.intent.ag/uploads/images/gallery/2024-03/screenshot-2024-03-06-105228.png)
##### **Enrolling a New Field**
1. **Login to INVISION**
- If you need to enroll a **new field**, you first need to login to [**INVISION**](https://trials.prod.intent.ag/login), where a window will pop up so that you can enroll your field.
- Click **Enroll** to continue.
[](https://docs.prod.intent.ag/uploads/images/gallery/2024-03/screenshot-2024-03-06-103852.png)
- To start enrolling your field, you click **Create New** beneath the dropdown.
[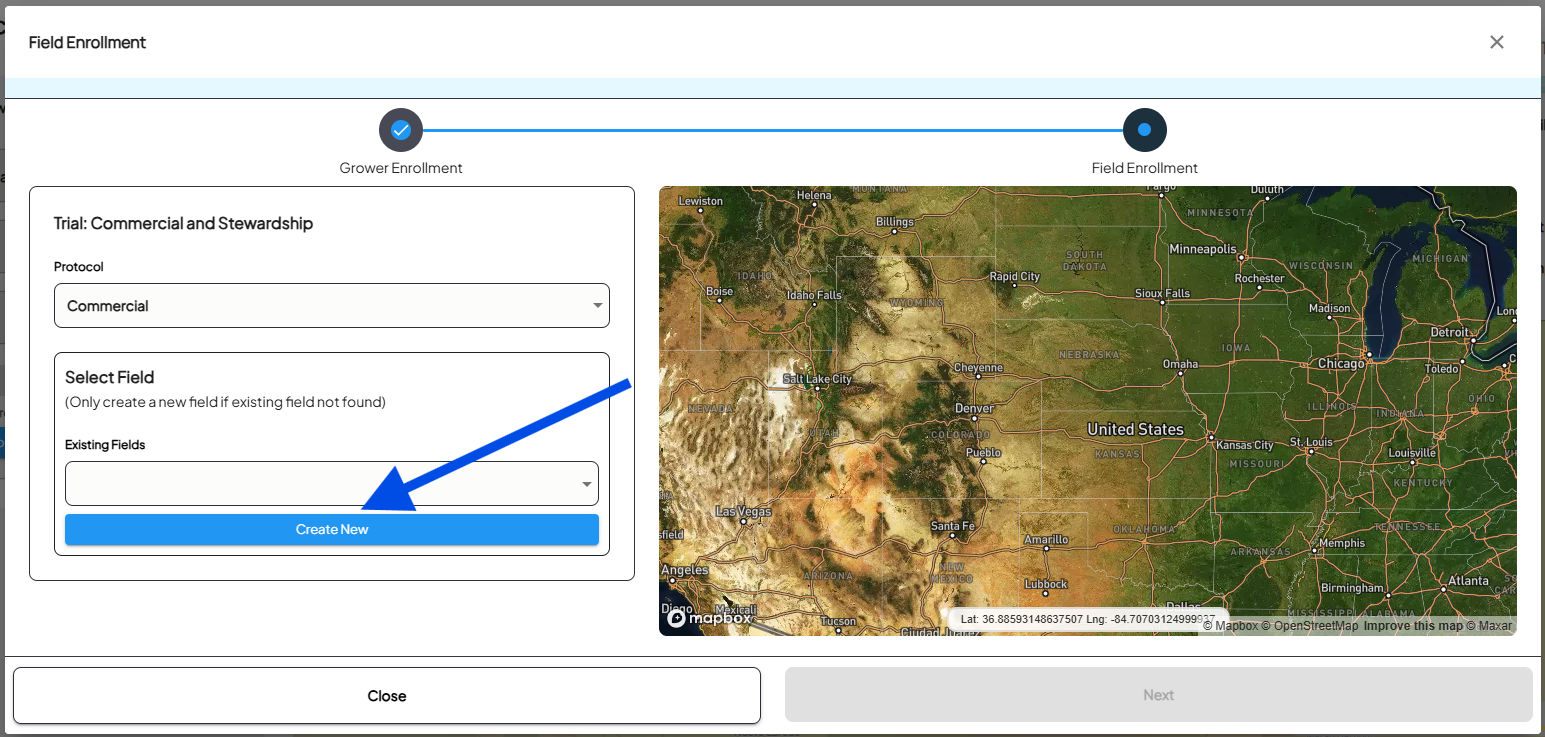](https://docs.prod.intent.ag/uploads/images/gallery/2024-12/screenshot-2024-12-10-124433.png)
2. **Name Your Field**
- Choose a unique name for your field and enter it into the *Field Name* box.
[](https://docs.prod.intent.ag/uploads/images/gallery/2024-12/screenshot-2024-12-10-125736.png)
3. **Decide Which Boundary Creation Method to Use**
- From here, you have three options to create your field boundary:
1. **Draw the Boundary**
- Select **Create Using the Map[](https://docs.prod.intent.ag/uploads/images/gallery/2024-12/screenshot-2024-12-10-134057.png)**
- Use the search bar to navigate to the area on the map where your field is located.
[](https://docs.prod.intent.ag/uploads/images/gallery/2024-12/screenshot-2024-12-10-134738.png)
- You can also search by State-Township-Range-Section.[](https://docs.prod.intent.ag/uploads/images/gallery/2024-12/screenshot-2024-12-10-140407.png)
- Once you're in the correct area, you have two different drawing tools available to you.
- The *rectangular polygon tool* will create a rectangular polygon shape as your drag your mouse.
[](https://docs.prod.intent.ag/uploads/images/gallery/2024-12/screenshot-2024-12-10-141729.png)
- The *star shaped polygon* *tool* will allow you to drop connected points to create a polygon.
[](https://docs.prod.intent.ag/uploads/images/gallery/2024-12/screenshot-2024-12-10-142256.png)
- This tool gives you more control over the shape of the field boundary you create.
- Double clicking on a point you've created will give you the option to edit that point, allowing you to move it around.
[](https://docs.prod.intent.ag/uploads/images/gallery/2024-12/screenshot-2024-12-10-142505.png)
- You can use the trash can icon to delete the boundary if you need to start over.
- Once your boundary looks correct, clicking the **Next** button will enroll the field you've just created.
[](https://docs.prod.intent.ag/uploads/images/gallery/2024-12/screenshot-2024-12-10-142700.png)
- Select **Done** on the confirmation box to complete the field enrollment process.
[](https://docs.prod.intent.ag/uploads/images/gallery/2024-03/screenshot-2024-03-06-105228.png)
2. **Select a Pre-made Boundary**
- The second option to create a field boundary is to select one or more pre-made boundaries, also known as Common Land Units (CLUs) in the US or Legal Land Description (LLDs) for Canada.
- Select **Create Using the Map[](https://docs.prod.intent.ag/uploads/images/gallery/2024-12/screenshot-2024-12-10-134057.png)**
- Click the **Turn on Pre-made Boundaries button to use these boundaries. You can use any of the previously mentioned search methods to find the location of your field.
[](https://docs.prod.intent.ag/uploads/images/gallery/2024-12/screenshot-2024-12-10-144002.png)
- Scroll in on the map, and you should start to see the boundaries outlined in white. Clicking inside a boundary will select it. Clicking a second time will deselect it.
[](https://docs.prod.intent.ag/uploads/images/gallery/2024-12/screenshot-2024-12-10-144303.png)
- Continue selecting boundaries until the shape of your field is complete. **Selected boundaries must be contiguous. [](https://docs.prod.intent.ag/uploads/images/gallery/2024-12/screenshot-2024-12-10-144725.png)**
- Once your field looks correct, selecting the **Next** button will enroll the field you created
- Click **Done** on the confirmation box to complete the enrollment process.[](https://docs.prod.intent.ag/uploads/images/gallery/2024-12/screenshot-2024-12-10-145234.png)
3. **Upload a Shapefile**
- The third boundary creation option is to upload a zipped **shapefile**.
Shapefiles are a popular file format for geographic information system (GIS) software.
A shapefile actually consists of a collection of files with the same filename but different extensions that work together. These files store different types of data:
- **.shp**: This file stores the geometry of the feature, which, in the case of a polygon shapefile, includes the coordinates of the vertices that make up the polygon boundaries.
- **.shx**: This is the index file that allows for efficient access to the geometry data stored in the .shp file.
- **.dbf**: This file is a dBASE table that stores attribute data or information about each feature in the shapefile. For polygons, this might include information such as the area's name, population, or any other relevant data.
- All of the above files are necessary and need to be zipped into one file before uploading to INVISION.
- - - - Select **Upload a Field Boundary**
[](https://docs.prod.intent.ag/uploads/images/gallery/2024-12/image.png)
- You can click inside the dotted boundary, which will open the files available on your computer, and select the zipped shapefile. You can also drag and drop a file into the dotted boundary. [](https://docs.prod.intent.ag/uploads/images/gallery/2024-12/KIbimage.png)
- Once the field boundary file is correctly uploaded, you will see a preview of the boundary on the map. **Ensure that it is the correct field.**
[](https://docs.prod.intent.ag/uploads/images/gallery/2024-12/9Znimage.png)
- If it happens to be the wrong field, clicking the back button again will reset the page so that you can upload another file. [](https://docs.prod.intent.ag/uploads/images/gallery/2024-12/UAuimage.png)
- Clicking the **Next** button will enroll that field.
- Click **Done** on the confirmation box to complete the enrollment process
For additional help, follow along with this video demonstrating how a grower can enroll their field in a trial: