Project Management
- Understanding the Project Management Page
- How to Add Users to a Project
- Available Roles and How to Assign Them
- How To Create a New Trial
- How To Create a Trial Protocol
- How To Add Field Data Questions to a Protocol Step
- Project Management - Introducing Protocol Season Start Dates
- How to Import Protocol Steps for Faster Trial Setup in INVISION
Understanding the Project Management Page
Guide to Understanding the Project Management Tab
The Project Management tab of the INVISION Platform is designed to give users access to all the tools they need to design and manage a trial. It's divided into several sections, outlined below.
Users
The Users section of Project Management is used to add users, edit user profiles, and to assign permissions.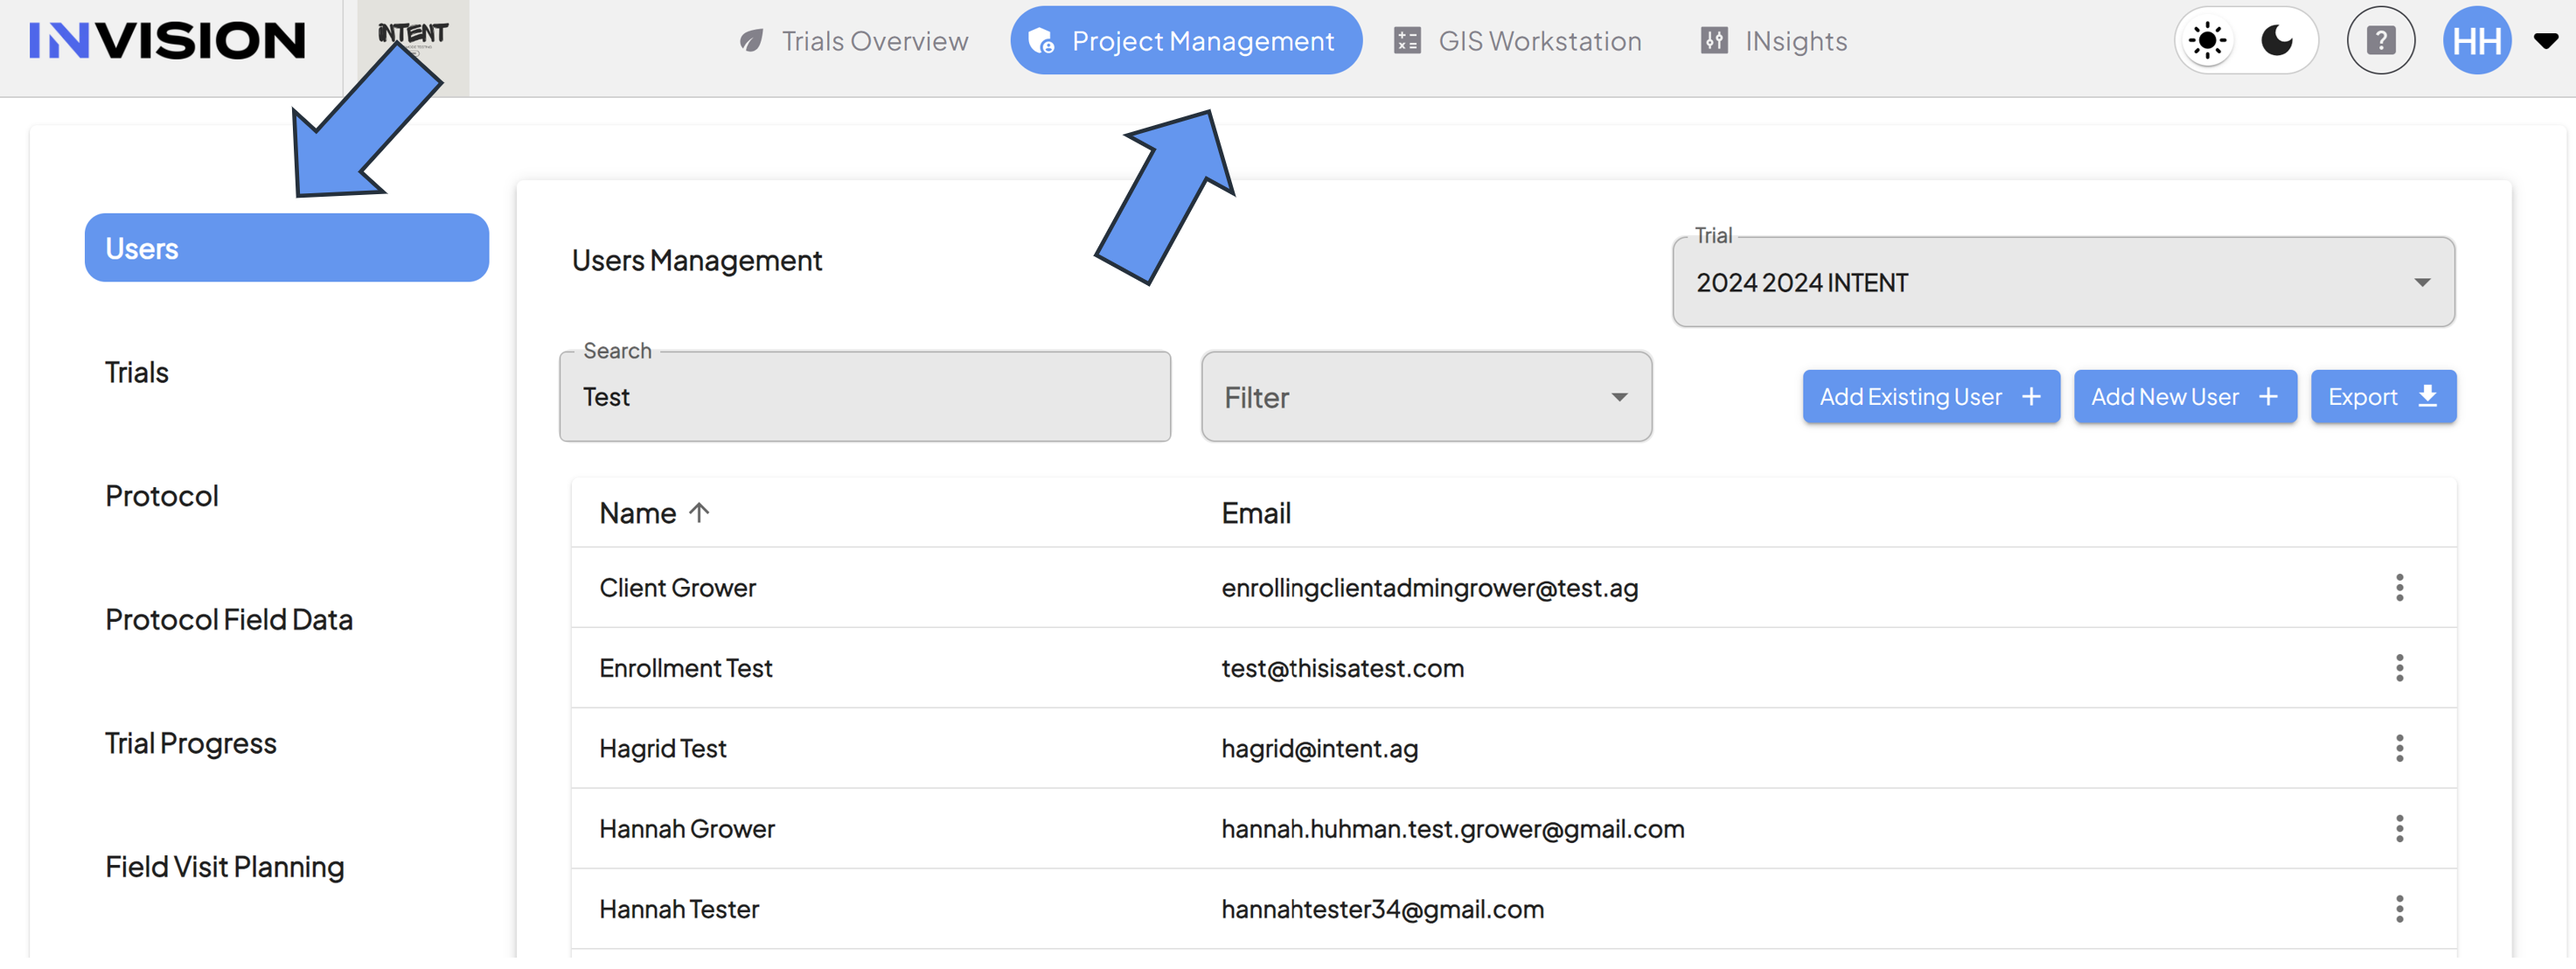
Components of the User Section
- User Management
- Function: Displays a table containing users based on trial selection, search results, and/or specific filters that are applied.
- Trial Selection
- Function: Use this dropdown menu to see users associated with a specific trial.
- Search:
- Function: Search for users using first/last name or email address.
- Filter:
- Function: Use this filter to find users that have been assigned specific roles.
- Add Existing User:
- Function: Use this option to add users to a trial that you know are already in our system. For example, you would use this button to add a user from a previous trial to a new trial.
- Add New Users:
- Function: Use this option to add completely new users to a trial.
- Export:
- Function: Selecting this button will download a .csv file with all users, their contact information, and their role in our system.
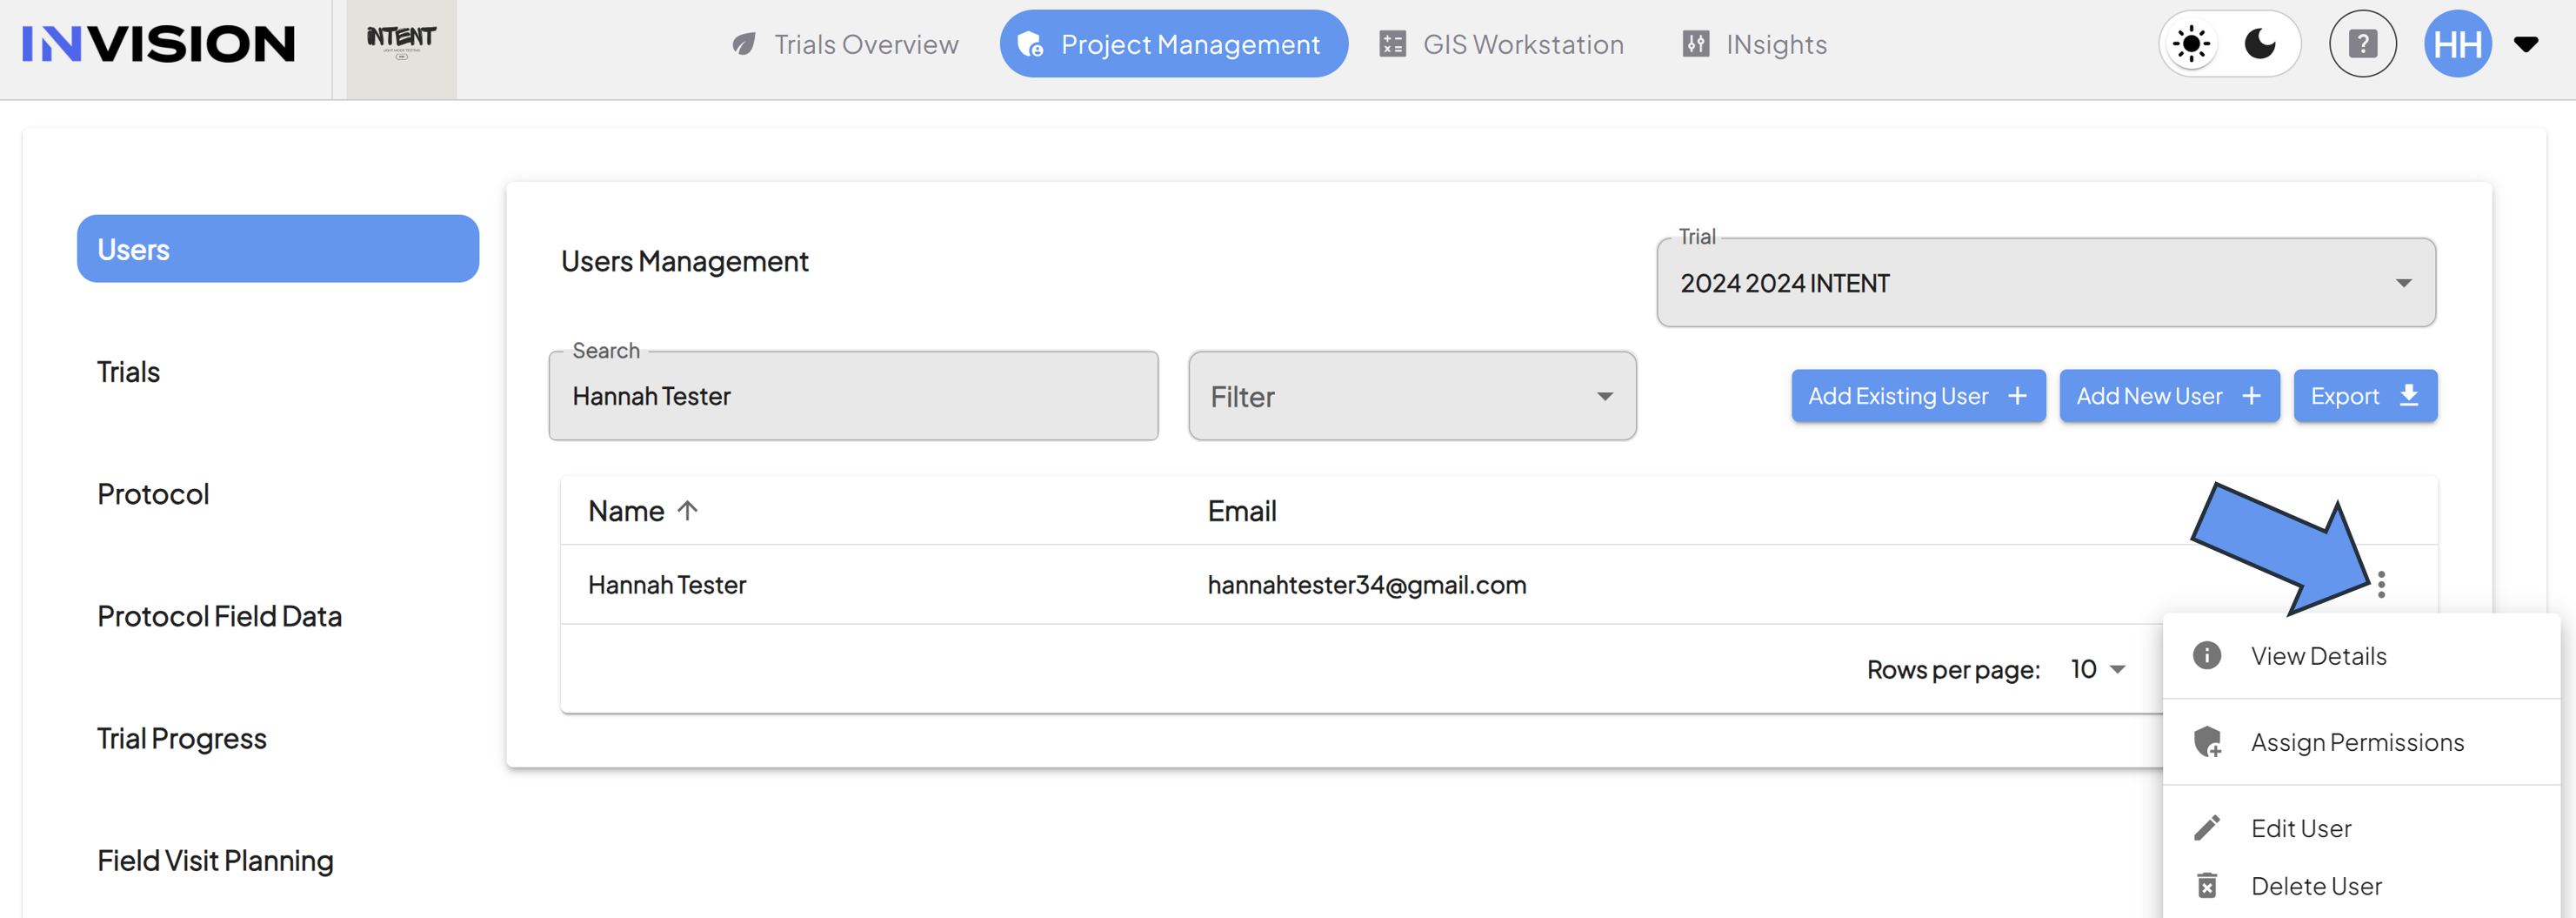
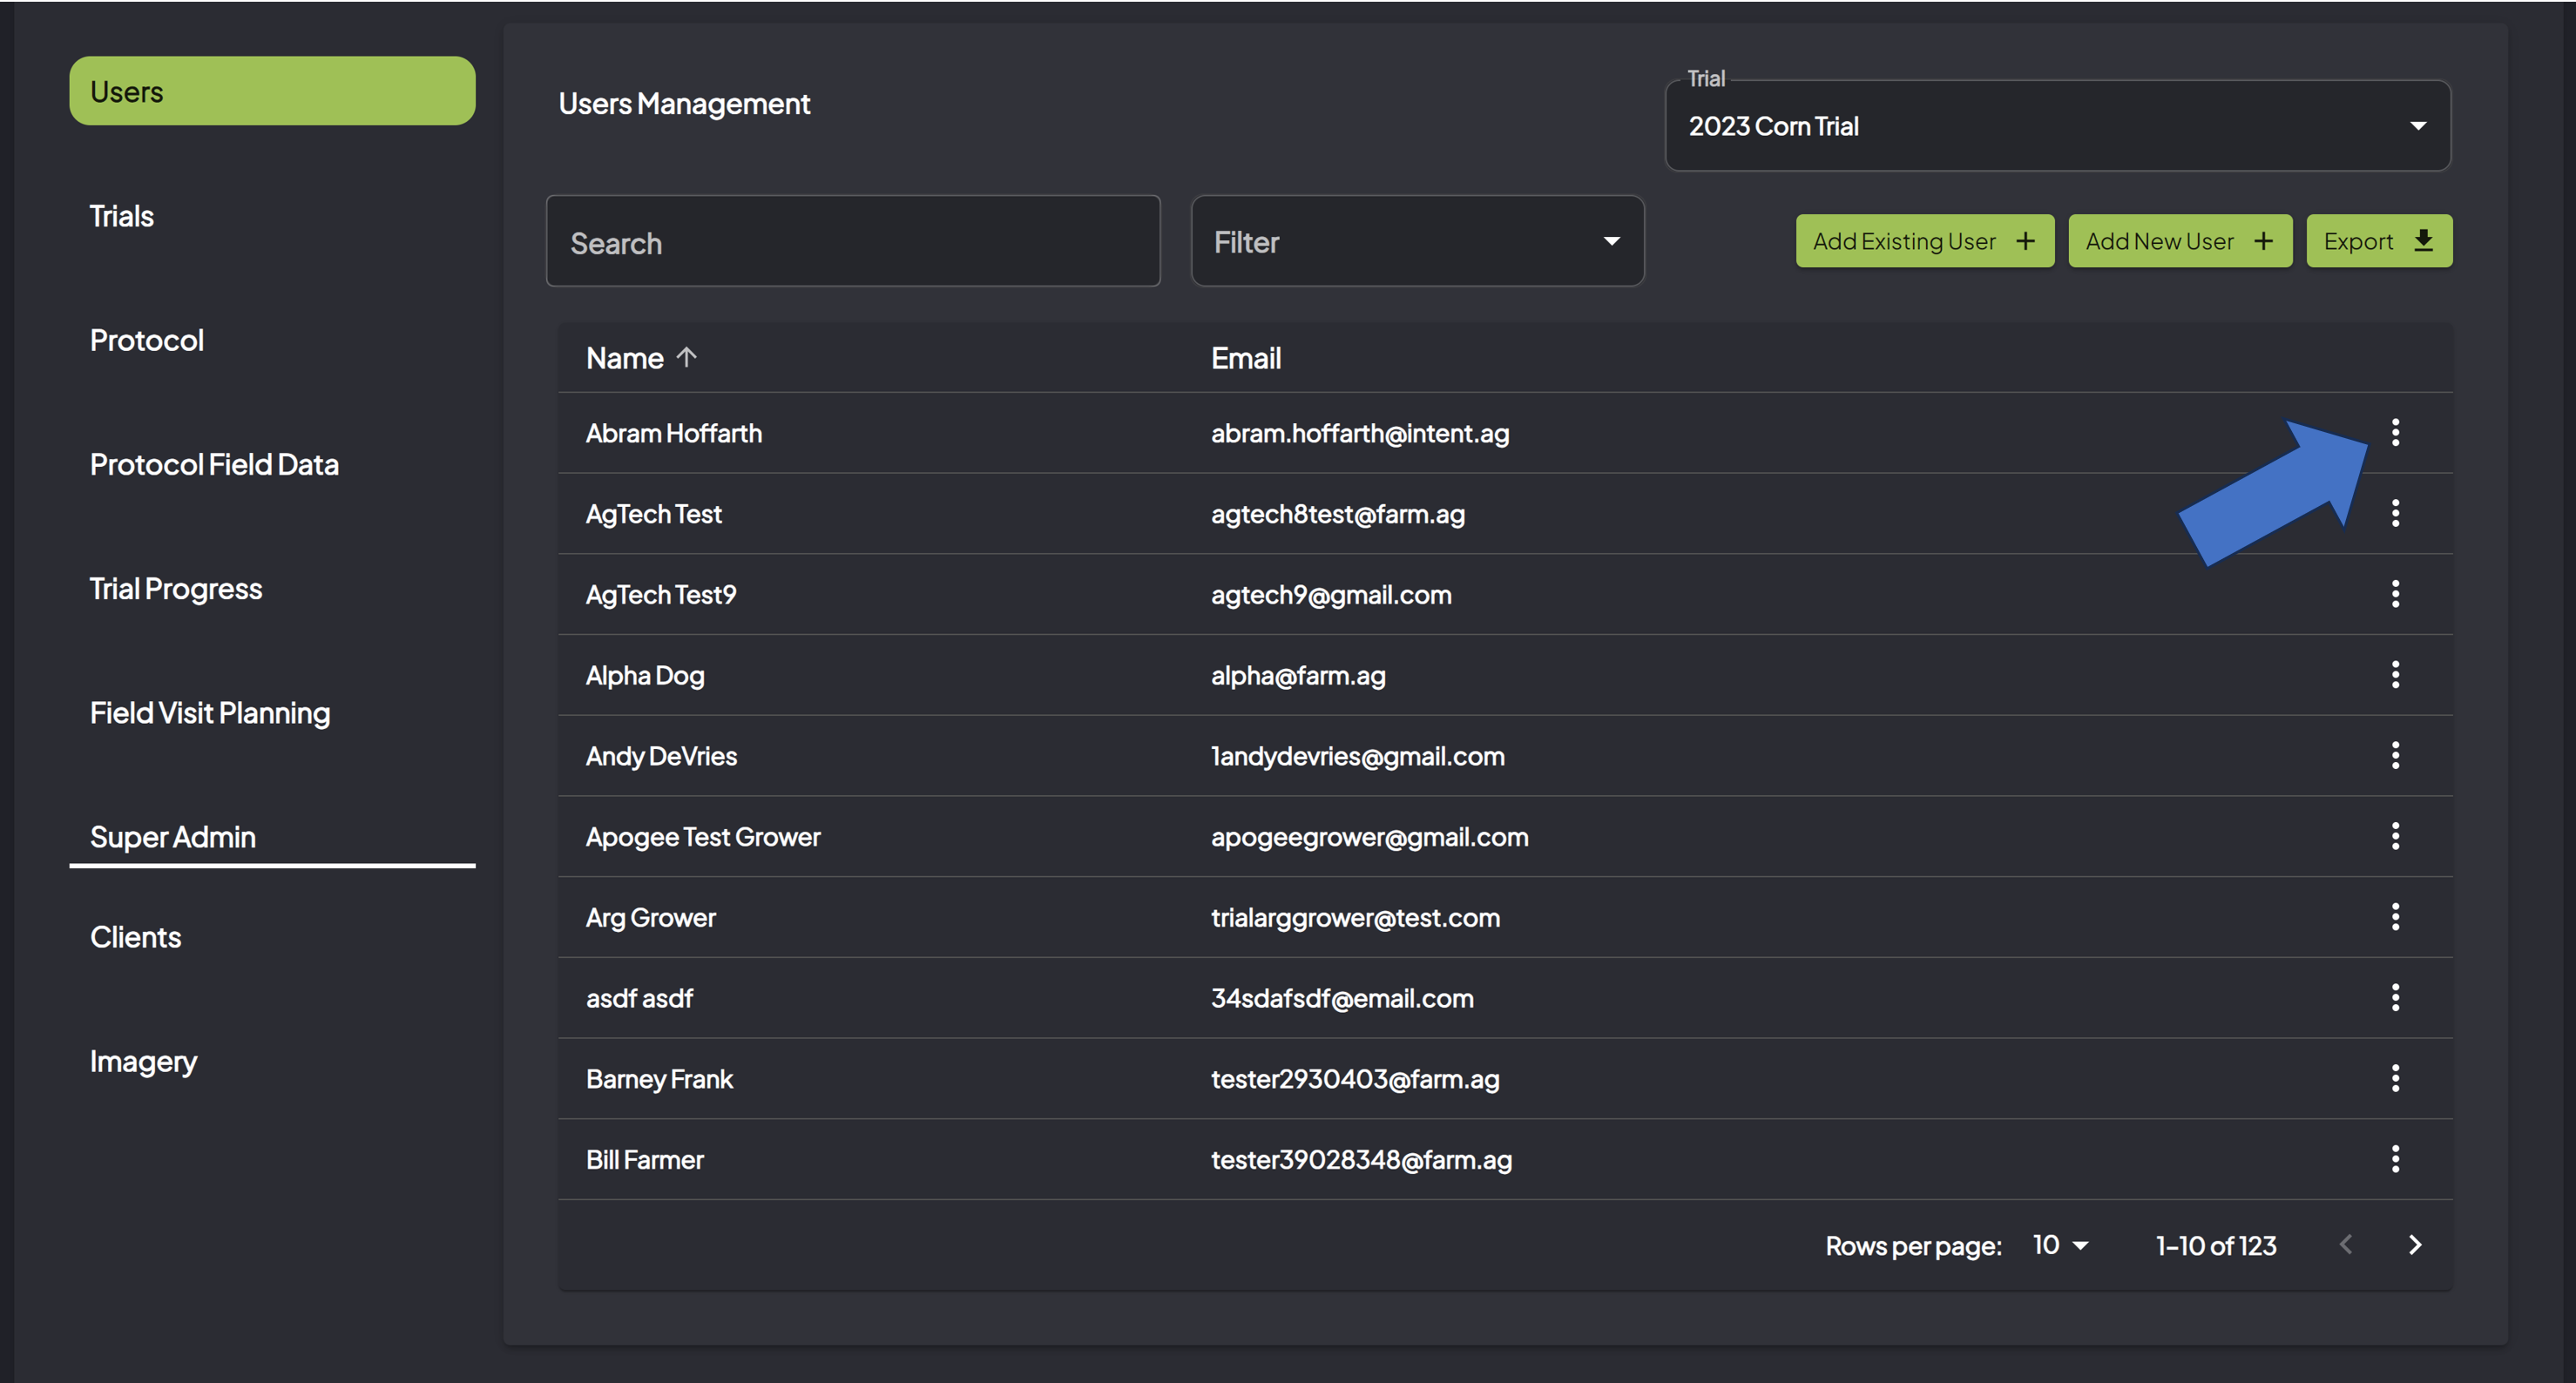
- User Profile:
- Location: Select the three dots to the right of the user's email to pull up a menu.

- Function: This menu provides access to the following:
- User Details
- Assign Permissions
- Edit User
- Delete User
- Location: Select the three dots to the right of the user's email to pull up a menu.
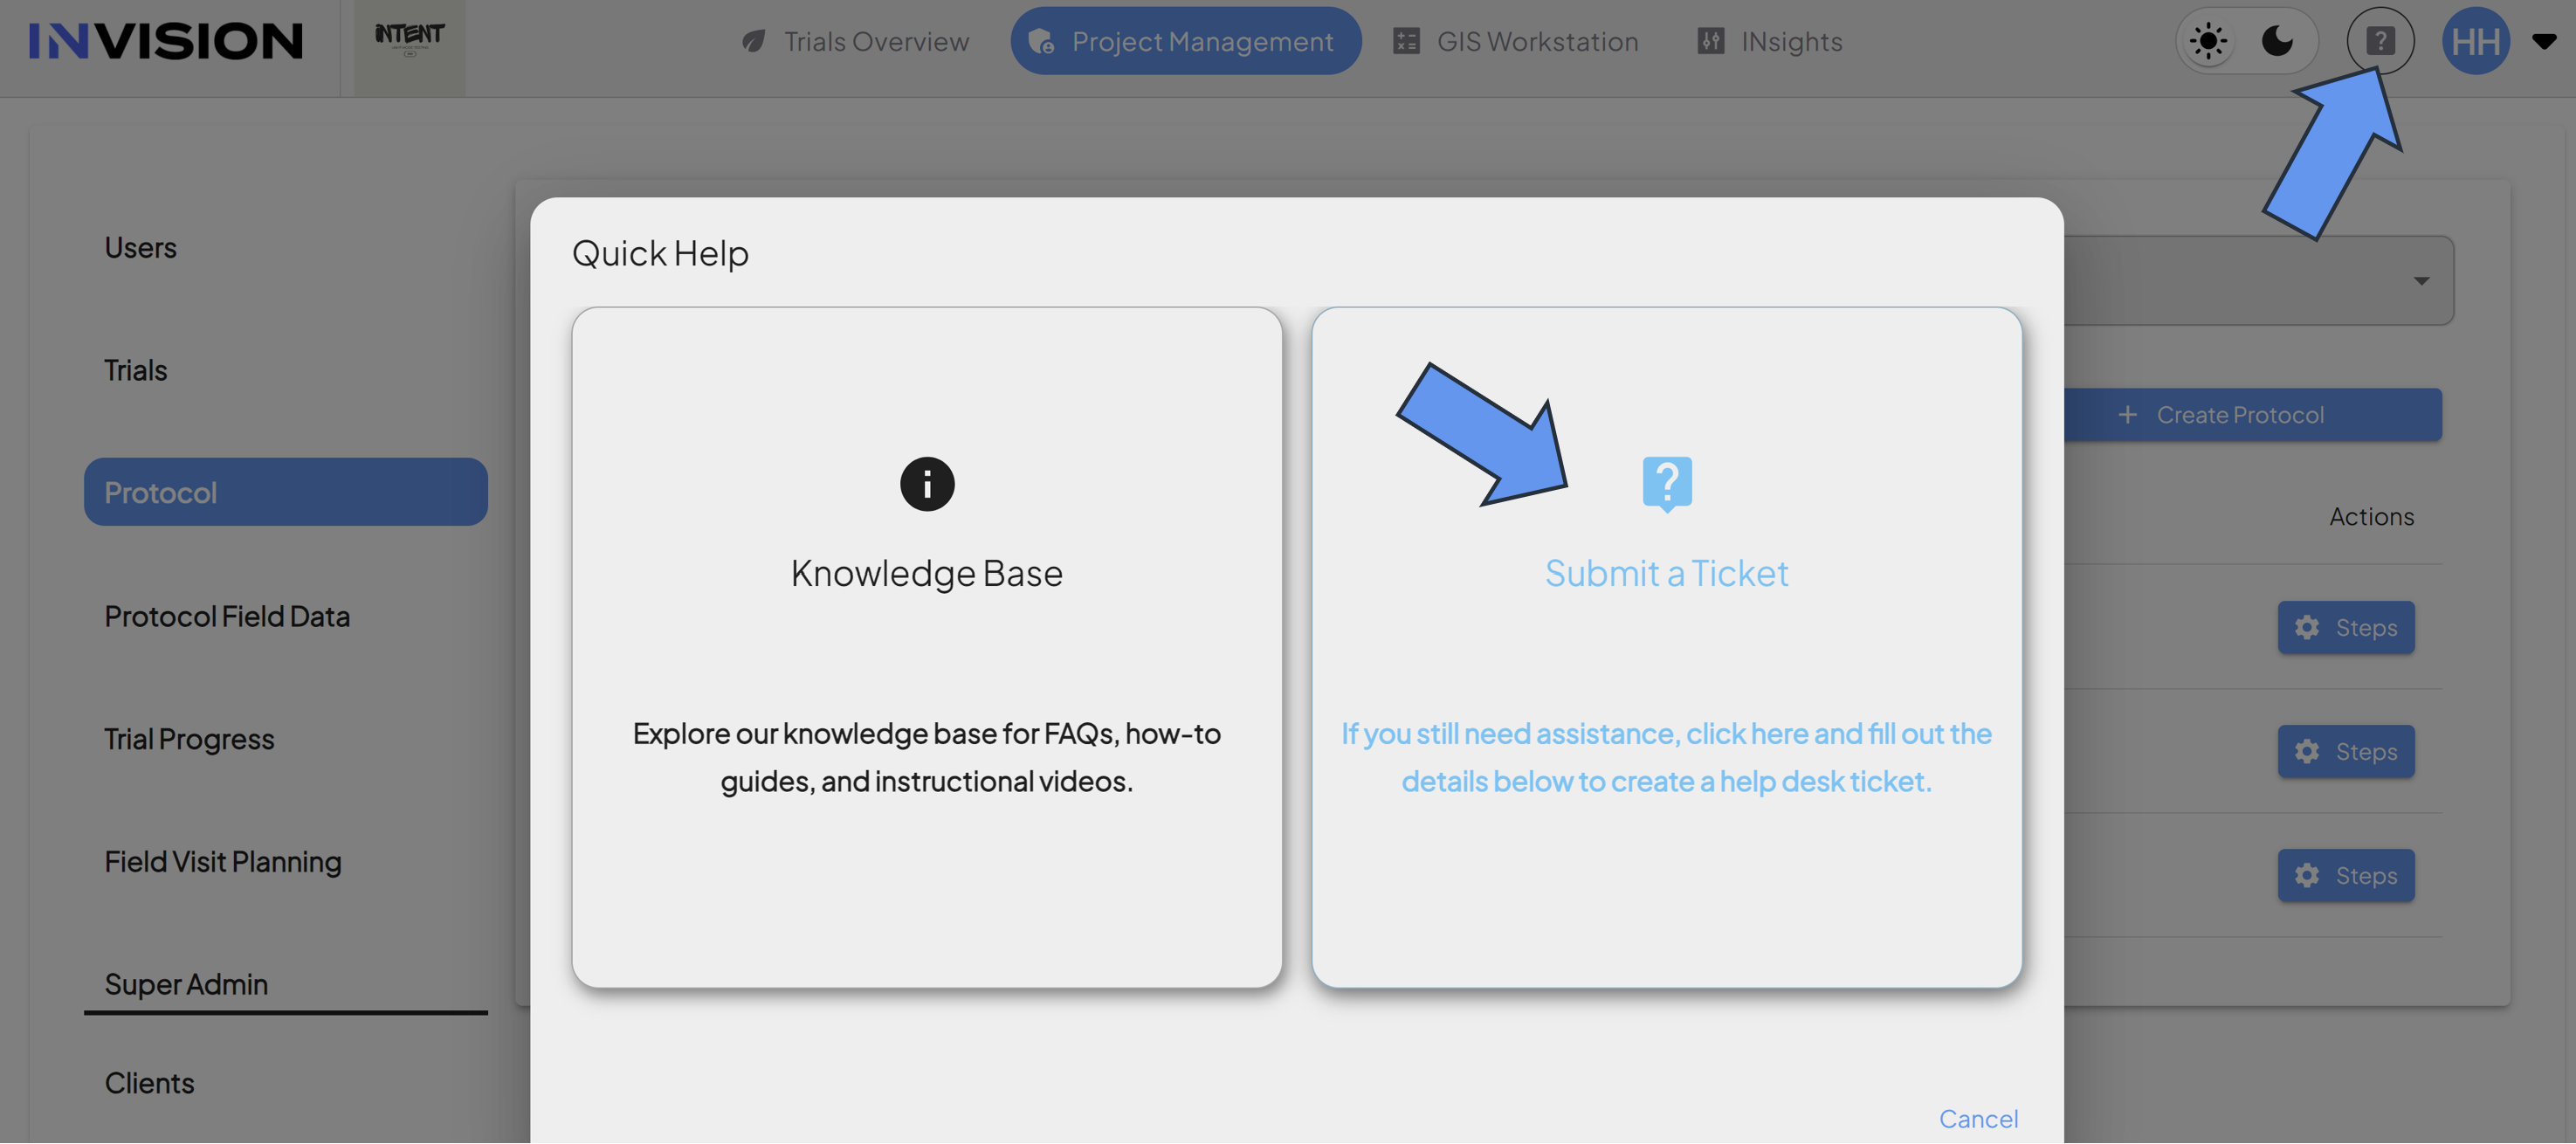
To see a list of all the available roles and how to assign them, check out our Guide to Understanding Roles in the INVISION Platform.
Trials
A Trial is an experiment conducted on an agricultural field to test one or multiple products, such as fertilizer, fungicide, insecticide, etc.
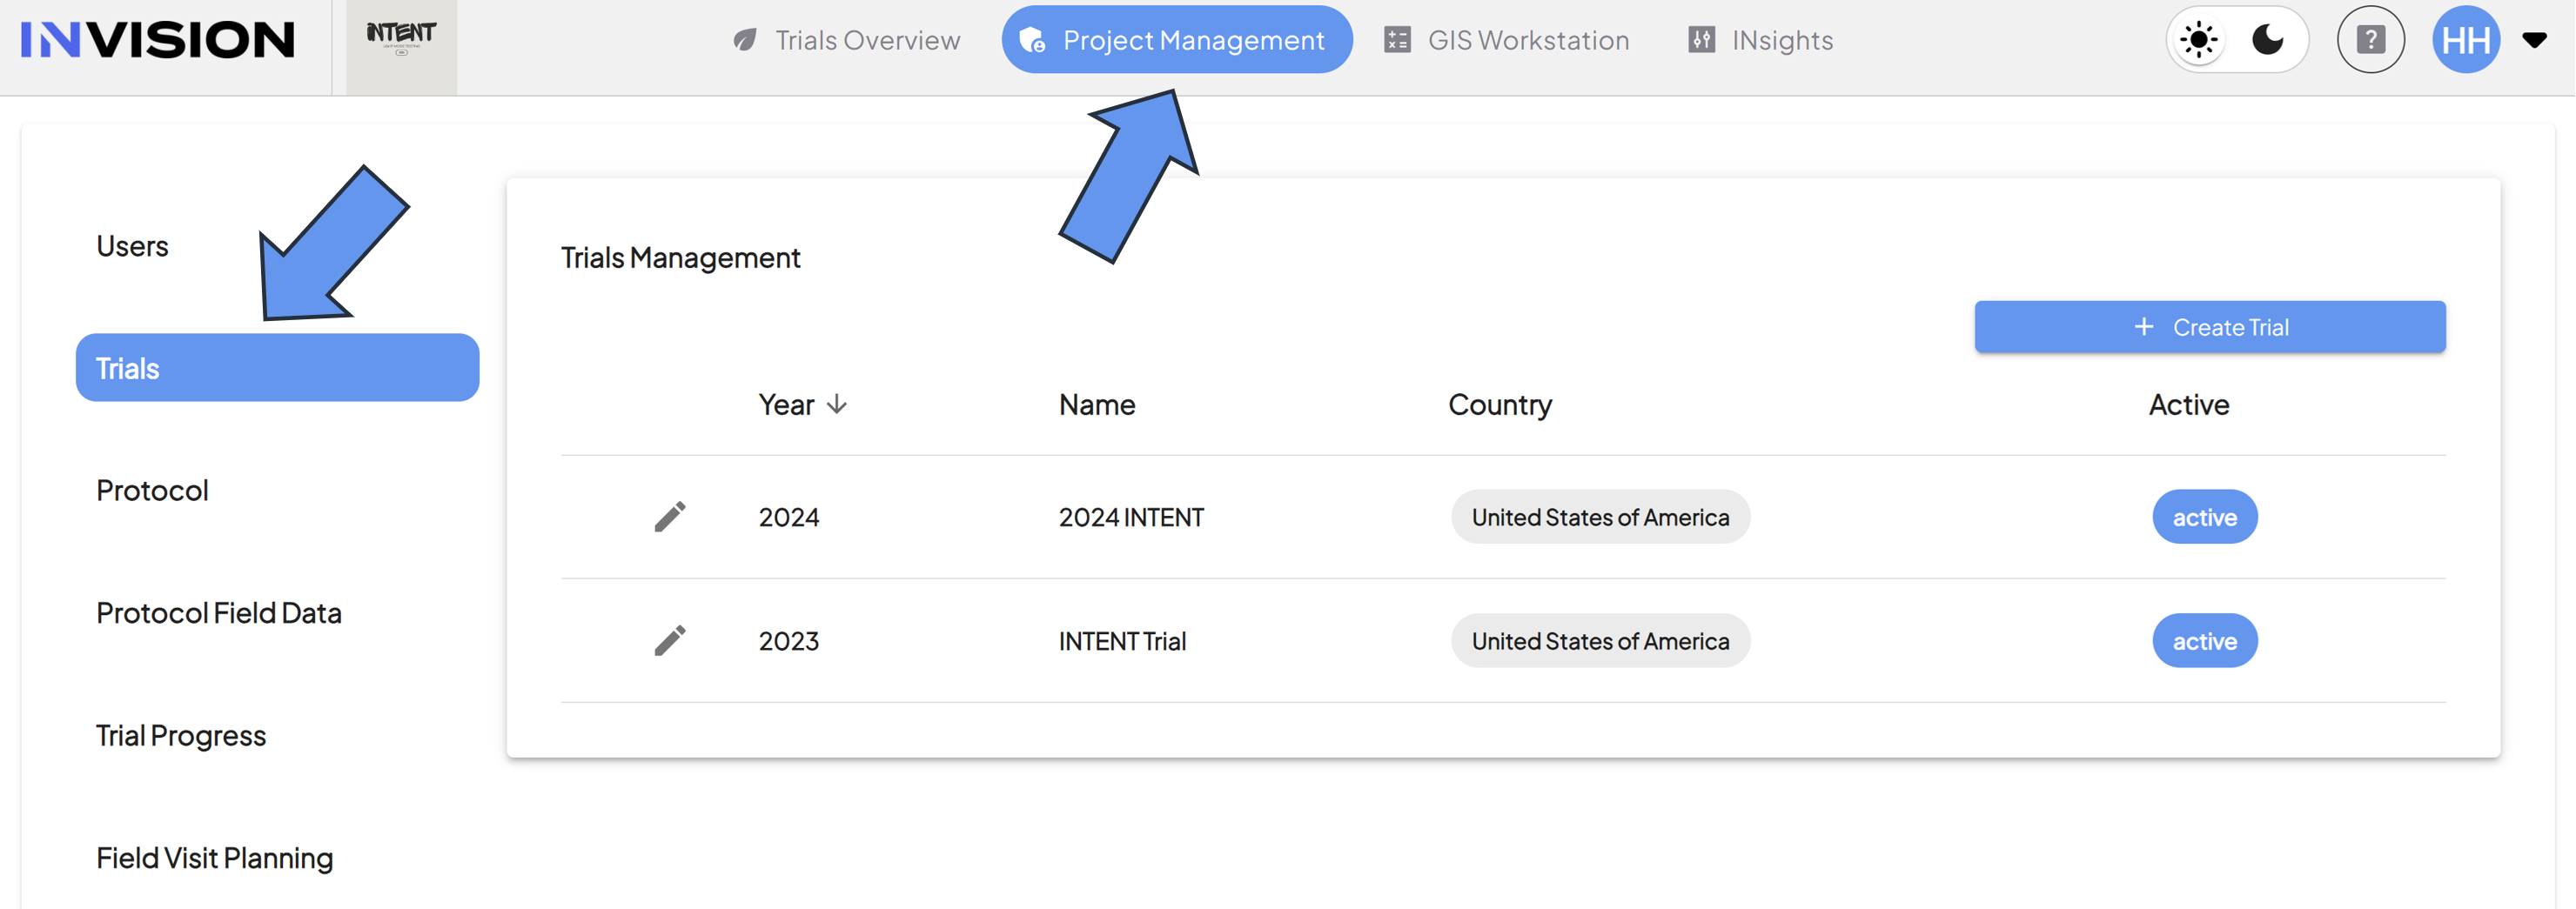
Components of the Trials Section
- Trials Management
- Function: Displays a table containing all trials created for your active client.
- Create Trial
- Function: Selecting this button will allow you to start the process of creating a trial.
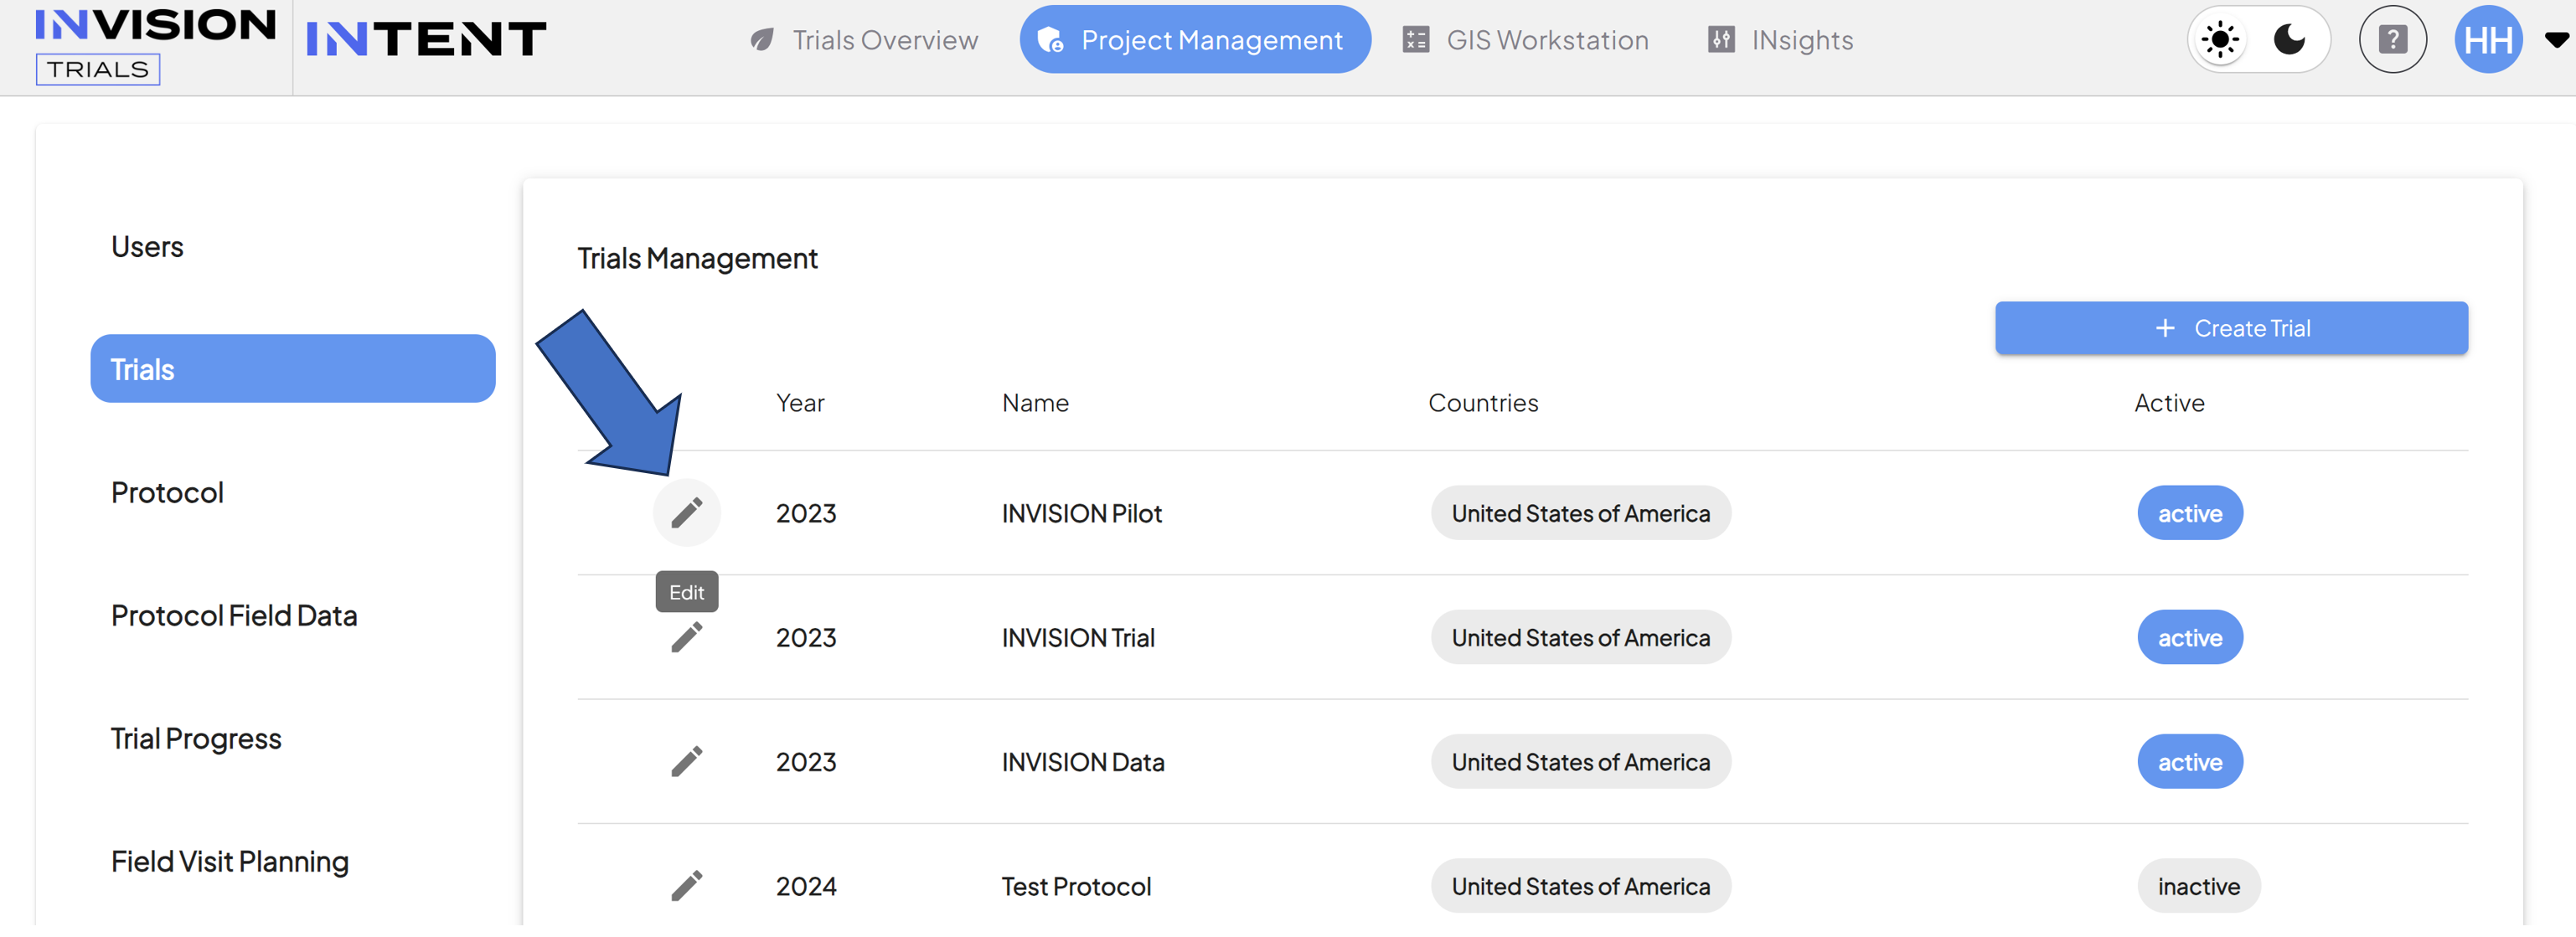
- Edit Trial
- Function: Select the pencil on the far left in the table to edit that trial.
To learn more about Trial creation, check out our Guide to Creating a New Trial.
Protocol
A protocol is a series of steps that need to be carried out to complete the Trial experiment. A protocol is specific to both a single trial and a single crop, but trials can have multiple protocols. Protocols can have both mandatory and optional steps.
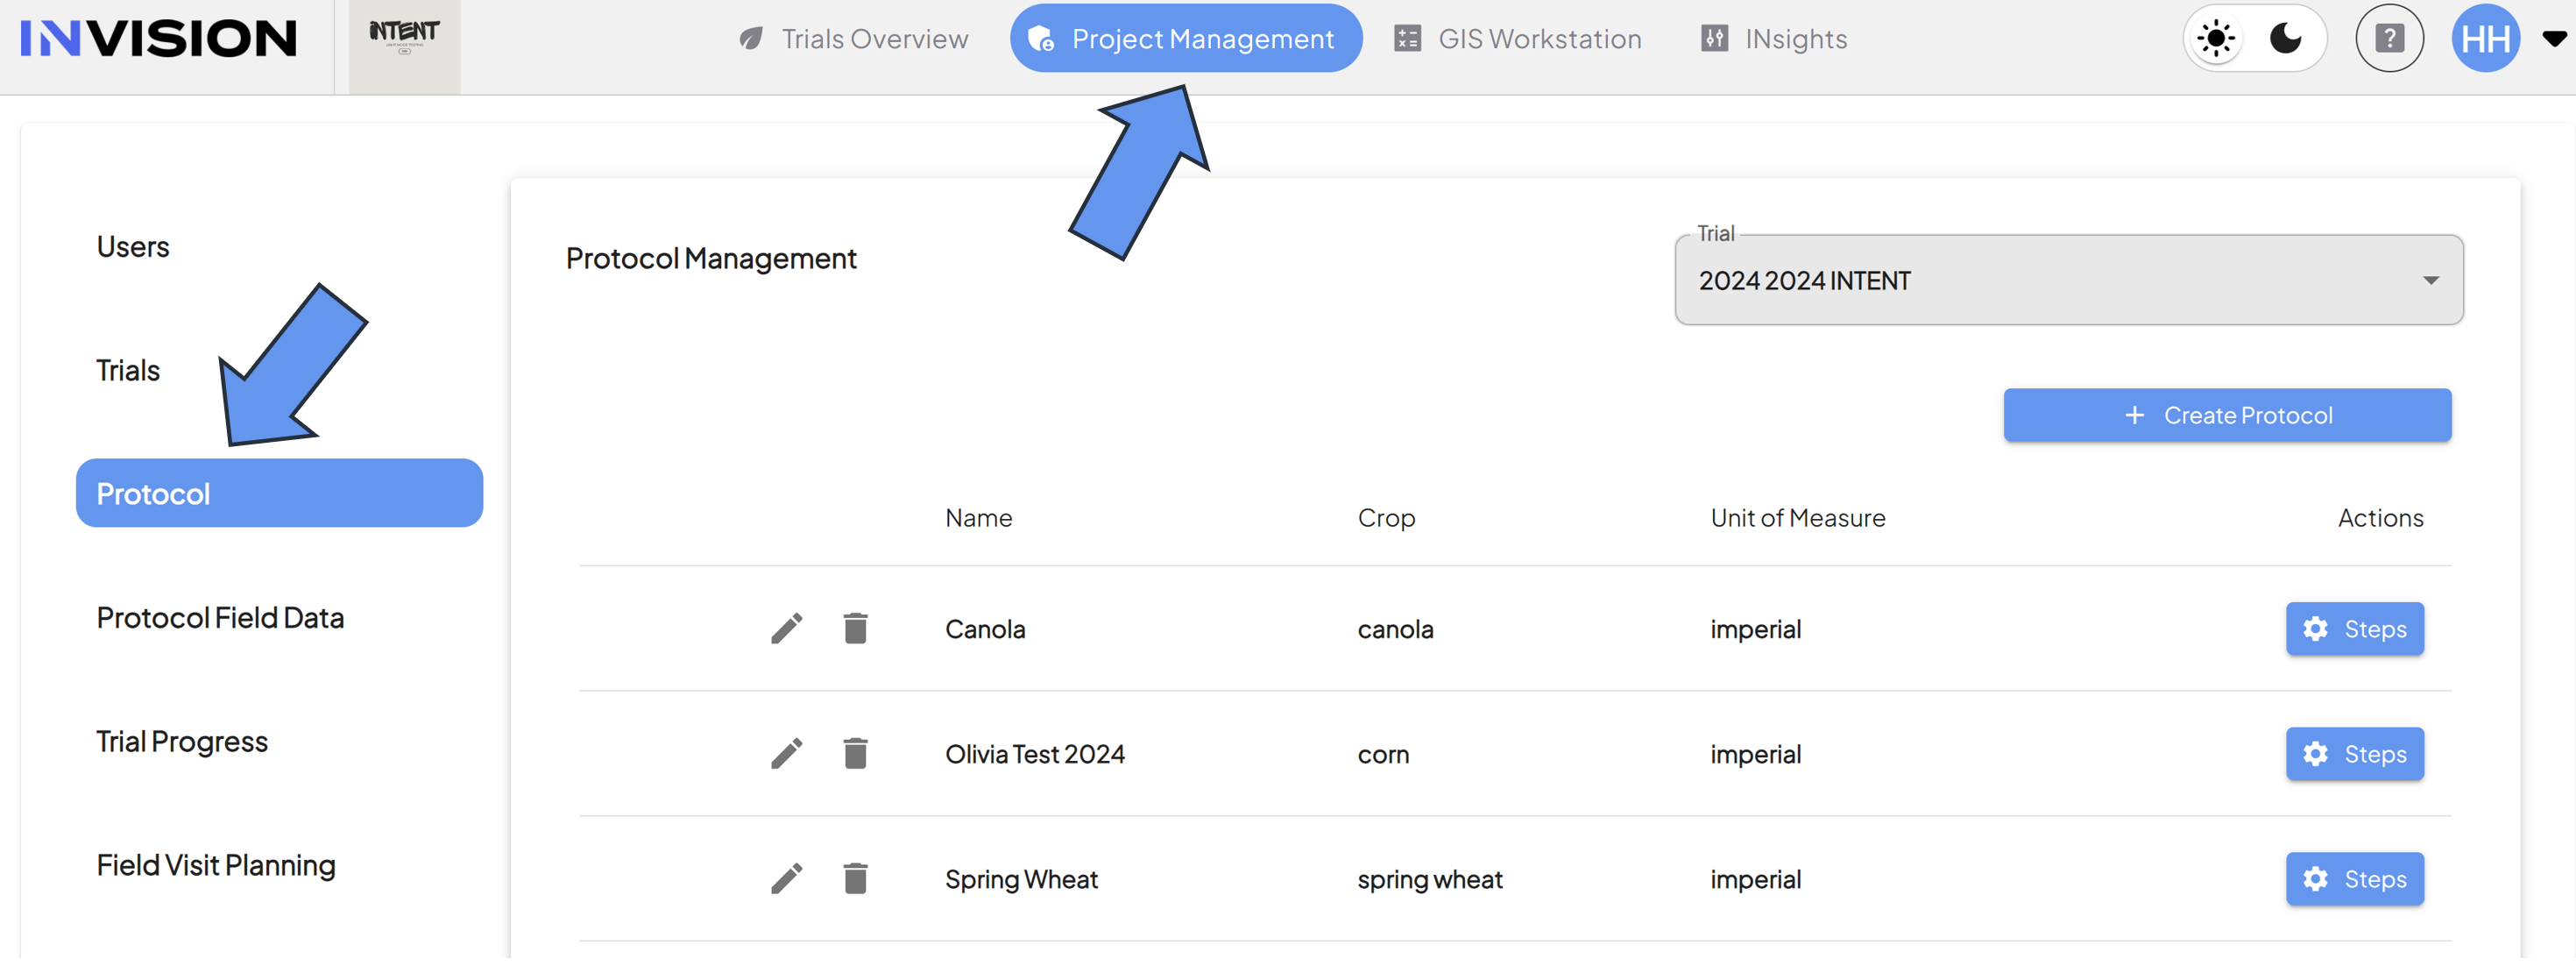
Components of the Protocol Section
- Protocol Management:
- Function: Displays a table containing all available protocols that have been created, based on the trial selection.
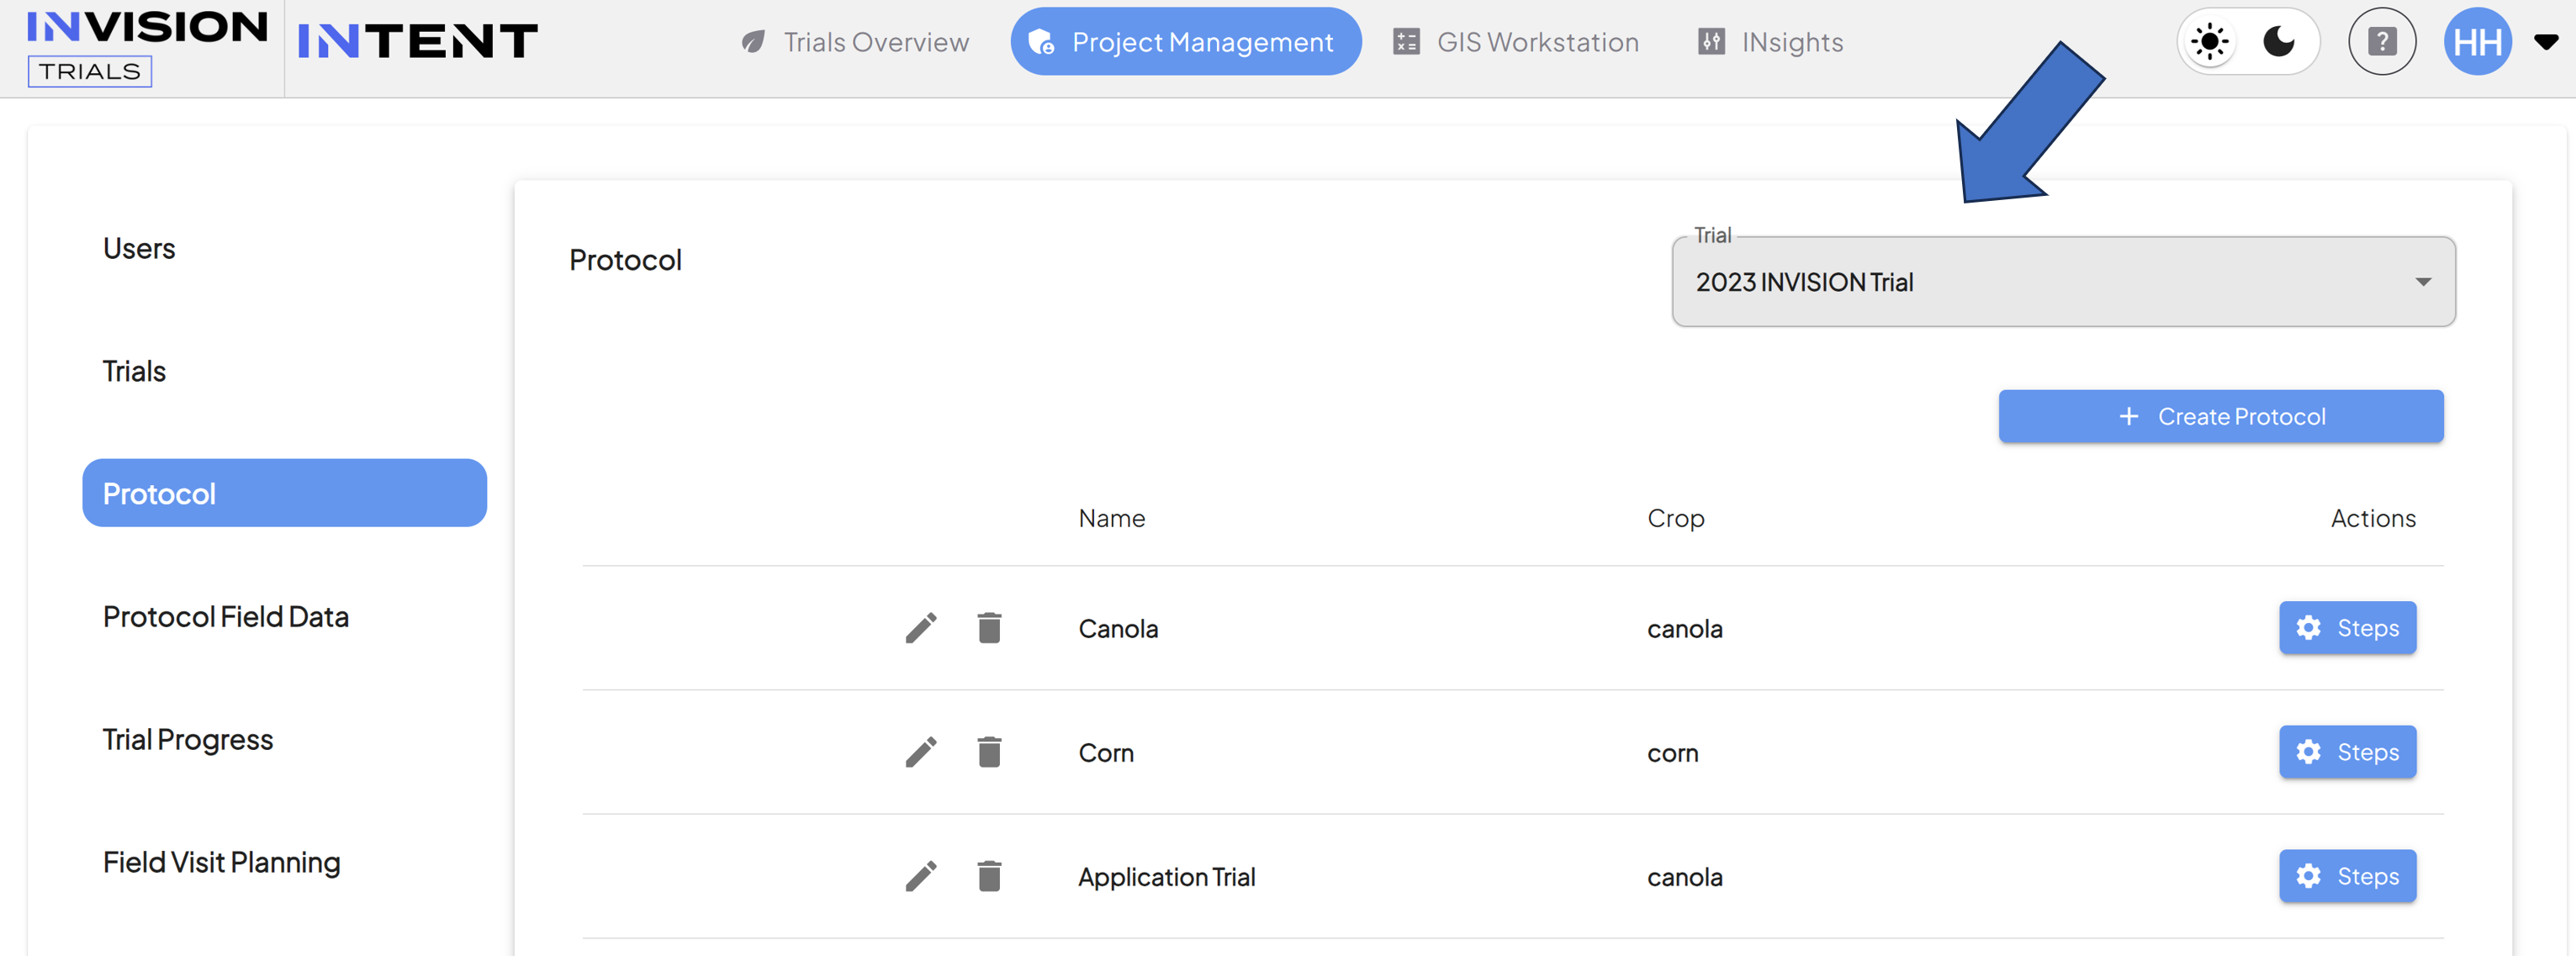
- Trial Selection:
- Function: Use this dropdown menu to see protocols associated with a specific trial.
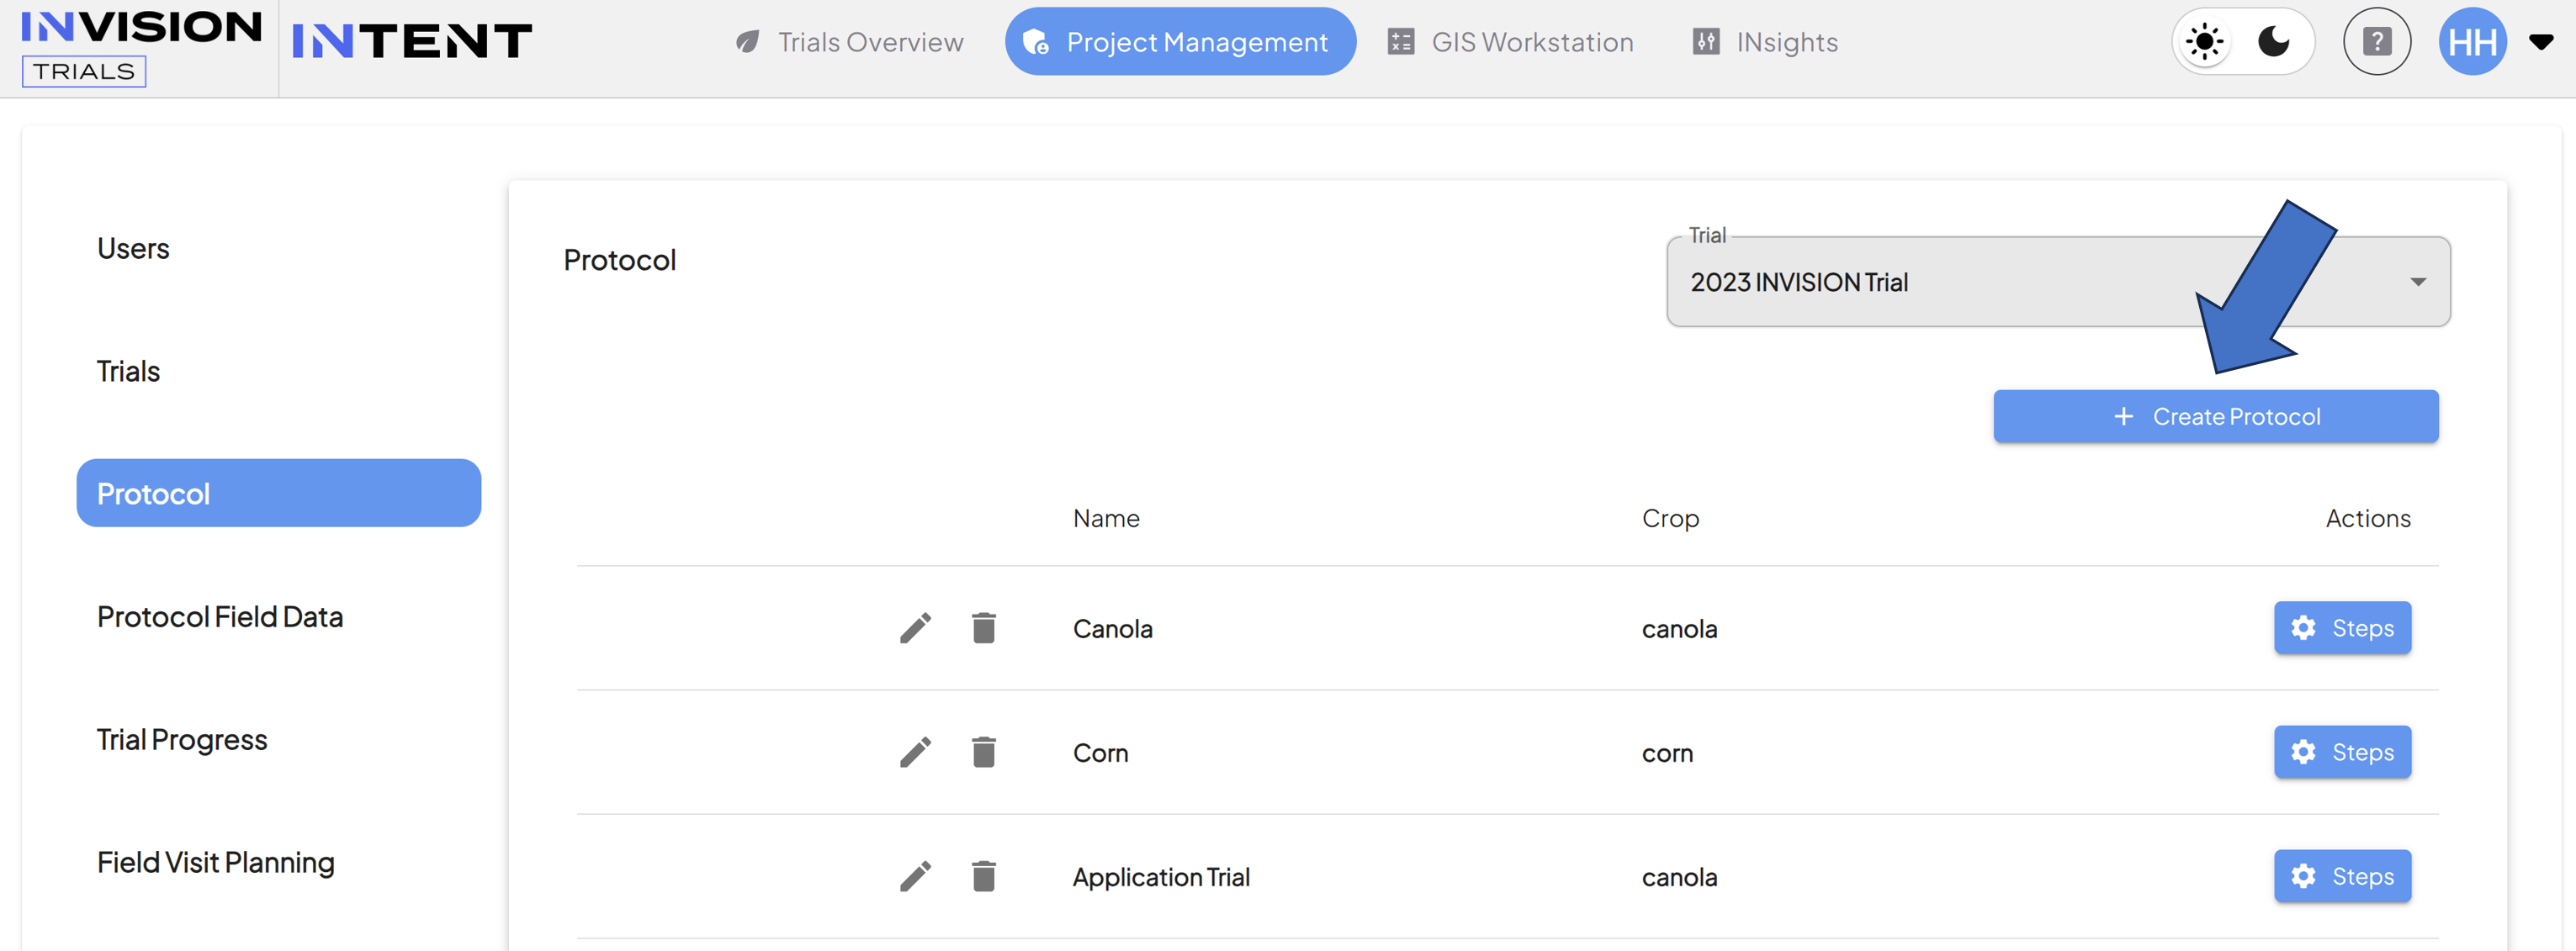
- Create Protocol:
- Function: Selecting this button will allow you to start the protocol creation process.
- Protocol Steps:
- Function:
- Edit Protocol:
- Function: Select the pencil icon on the far left of the table to edit that protocol.
- Delete Protocol:
- Function: Select the trash can icon on the left side of the table to delete that protocol.
- Protocols cannot be deleted once data is associated to it. If you need assistance, submit a help desk request, or connect with your point of contact at INTENT.

- Protocols cannot be deleted once data is associated to it. If you need assistance, submit a help desk request, or connect with your point of contact at INTENT.
- Function: Select the trash can icon on the left side of the table to delete that protocol.
To learn more about Protocol creation, check out our Guide To Creating a Trial Protocol.
Protocol Field Data
Setting up protocol field data is a way to set up questions for a field visit, or collect extra information you need from growers about any of the protocol steps you've set up. For example, if you have a set of questions your grower needs to fill out in relation to the planting step, you can set that up in the Protocol Field Data section of Project Management.

Components of the Protocol Field Data Section
- Protocol Field Data Management:
- Function: Expandable sections for each protocol step created in the selected trial and protocol.
- Trial Selection:
- Function: Use this dropdown menu to select the trial you want to add protocol field data for.
- Protocol Selection:
- Function: Use this dropdown menu to see the protocols associated with a specific trial.
- Protocol Steps:
- Function: Each step expands so that you can add questions for growers or edit question that have already been created.
To learn more about add protocol field data, check out our guide on How To Add Field Data Questions to a Protocol Step.
Trial Progress
The Trial Progress section of Project Management is designed to be a tool for admins to closely keep track of the progress of all of their trials. It has a variety of of filters, as well as an option to export the data you want to see as a CSV file.
Components of the Trial Progress Section
- Trial Progress Management:
- Function: Displays a table that provides all protocol steps and the dates they were completed, organized by growers.
- Optional: Some columns are editable, allowing admins to manually enter in specific dates.
- Function: Displays a table that provides all protocol steps and the dates they were completed, organized by growers.
- Trials Selection:
- Function: Use this dropdown menu to filter the table to only display data associated with the selected trial.
- Optional Filters:
- Protocol: Use this dropdown menu to filter the table to only display data associated with the selected protocol.
- Grower: Use this dropdown menu to filter the table to only display data associated with the selected grower.
- Years:
- Function: Use this dropdown menu to filter the table to only display data associated with the selected year.
- Show Dropouts:
- Function: Use this toggle to show or hide grower's that have been dropped out of their trial/protocol.
To learn more about the Trial Progress table, check out our guide on How to View and Export Trial Progress.
Field Visit Planning
Field Visit Planning
Components of the Field Visit Planning Section
- Field Visit Management
- Trials Selection:
- Crop Selection:
- Grower Selection:
- Assignee Selection:
- Optimal Start Date:
- Optimal End Date:
- Growth Stage Selection:
- Years:
- Show Dropouts
- View Selection
Components of Field Visit Planning
How to Add Users to a Project
Guide to Adding Users to a Project
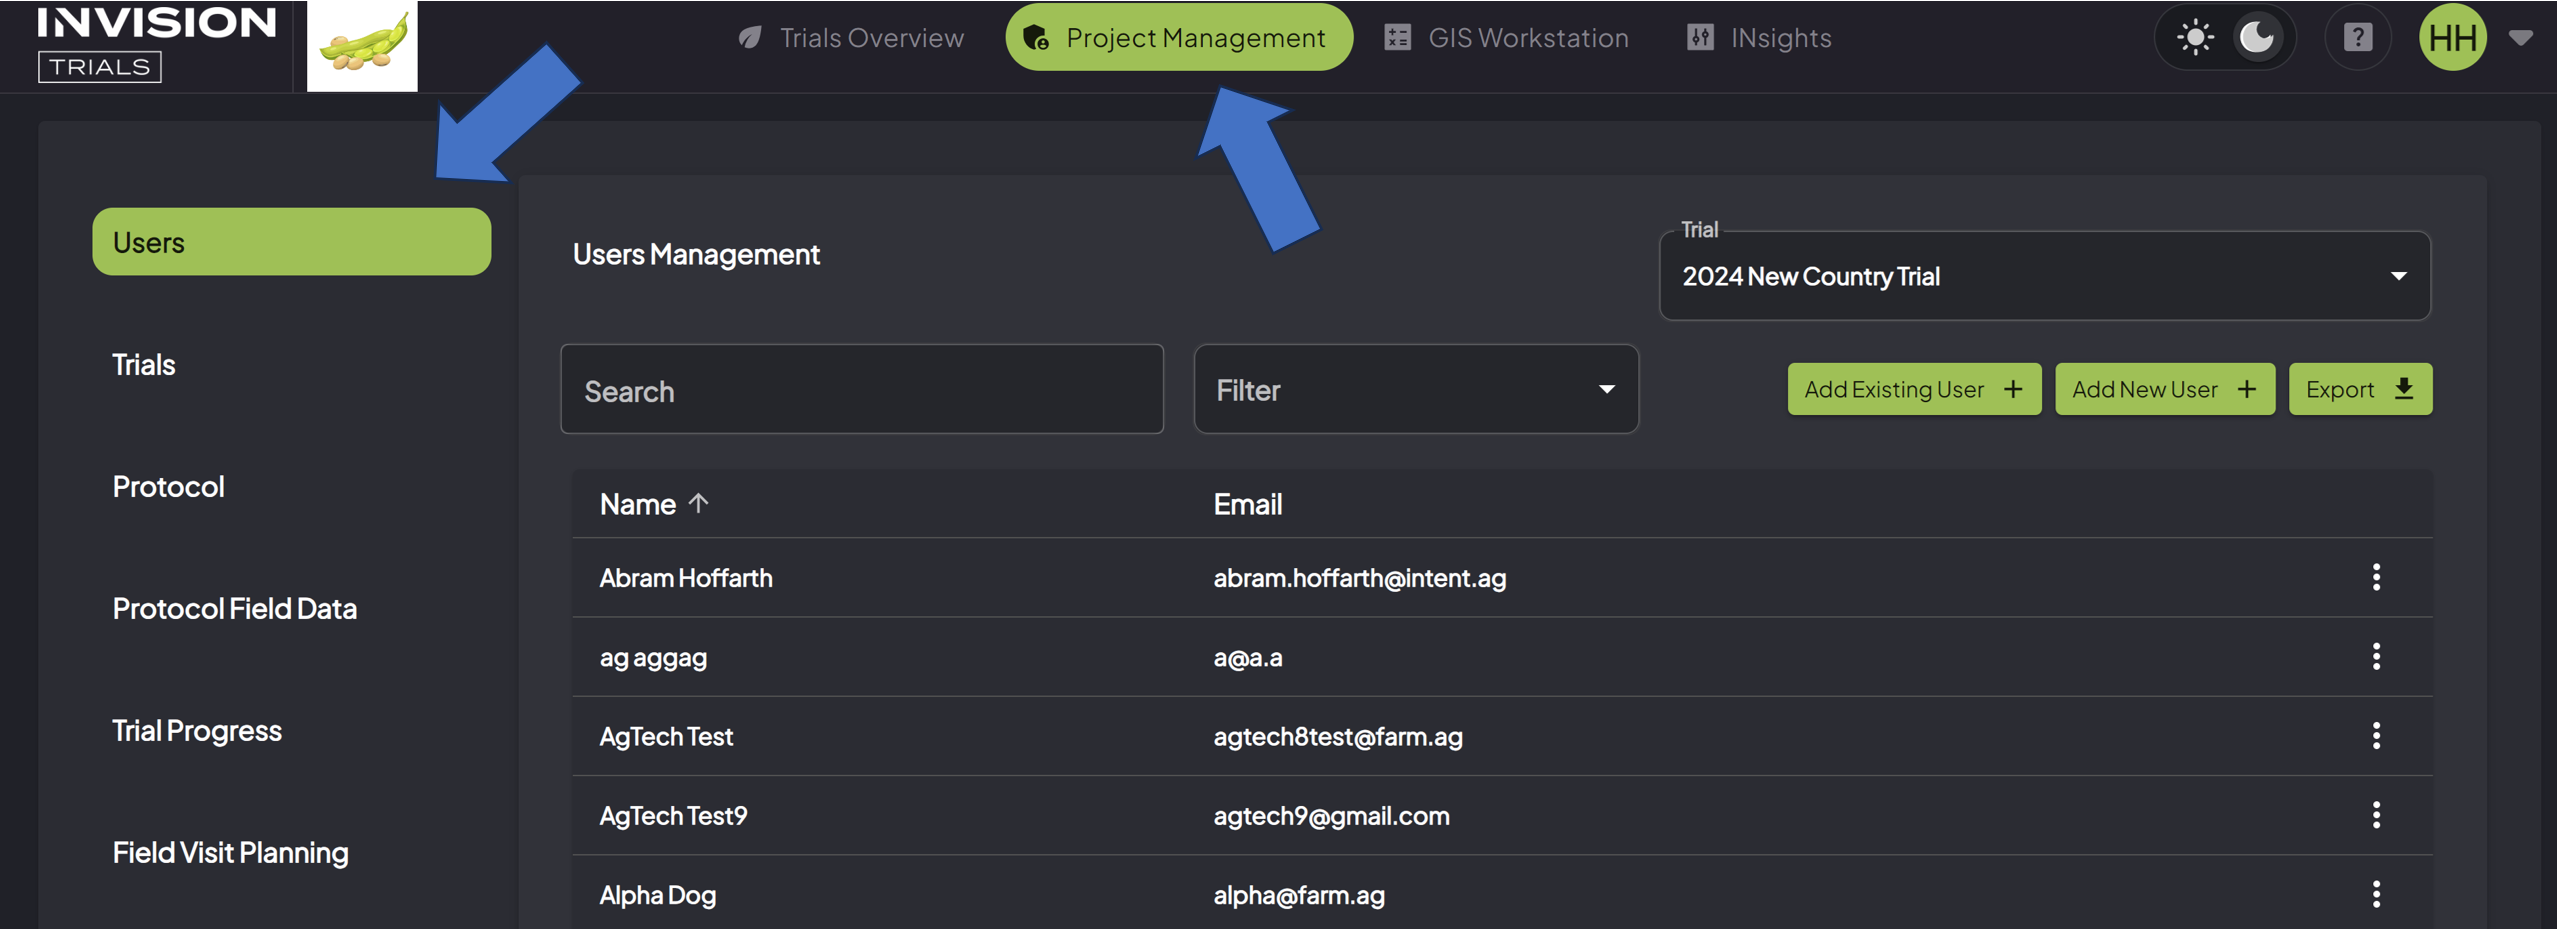
- Navigate to the Users section of the Project Management tab
-
From the Admin tab, select Users from the left panel.

-
-
Select the Trial
-
Choose the correct Trial from the drop-down box.
-
-
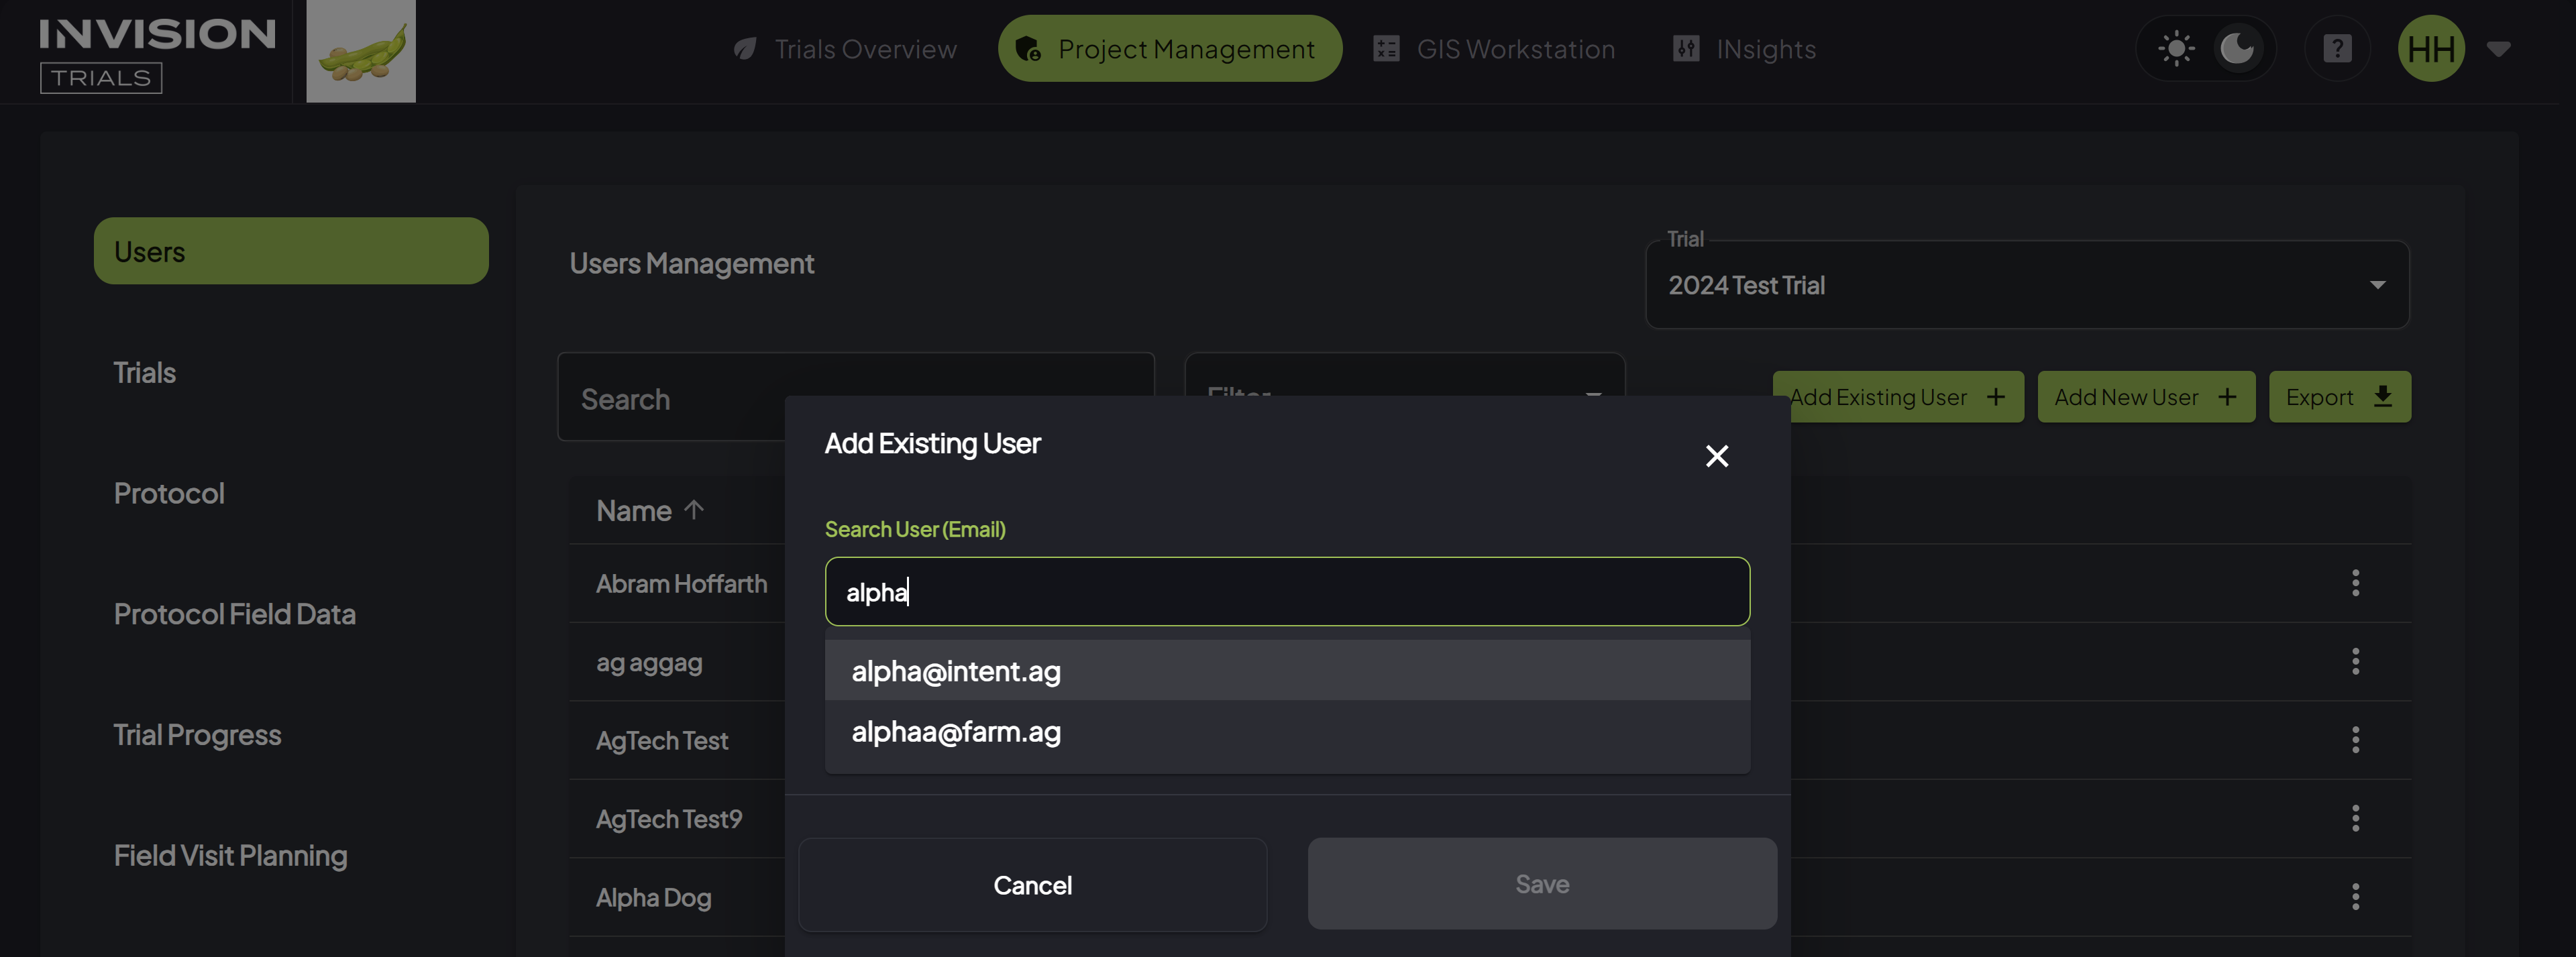
Add Existing User
-
Choose Add Existing User if you know the user is already in the INVISION system.
-
The Add Existing User button will give access to a list of all existing users in your system.
- Search for the user by typing their email in the search bar.

- Once you find them, select the email and click the Save button.
-
-
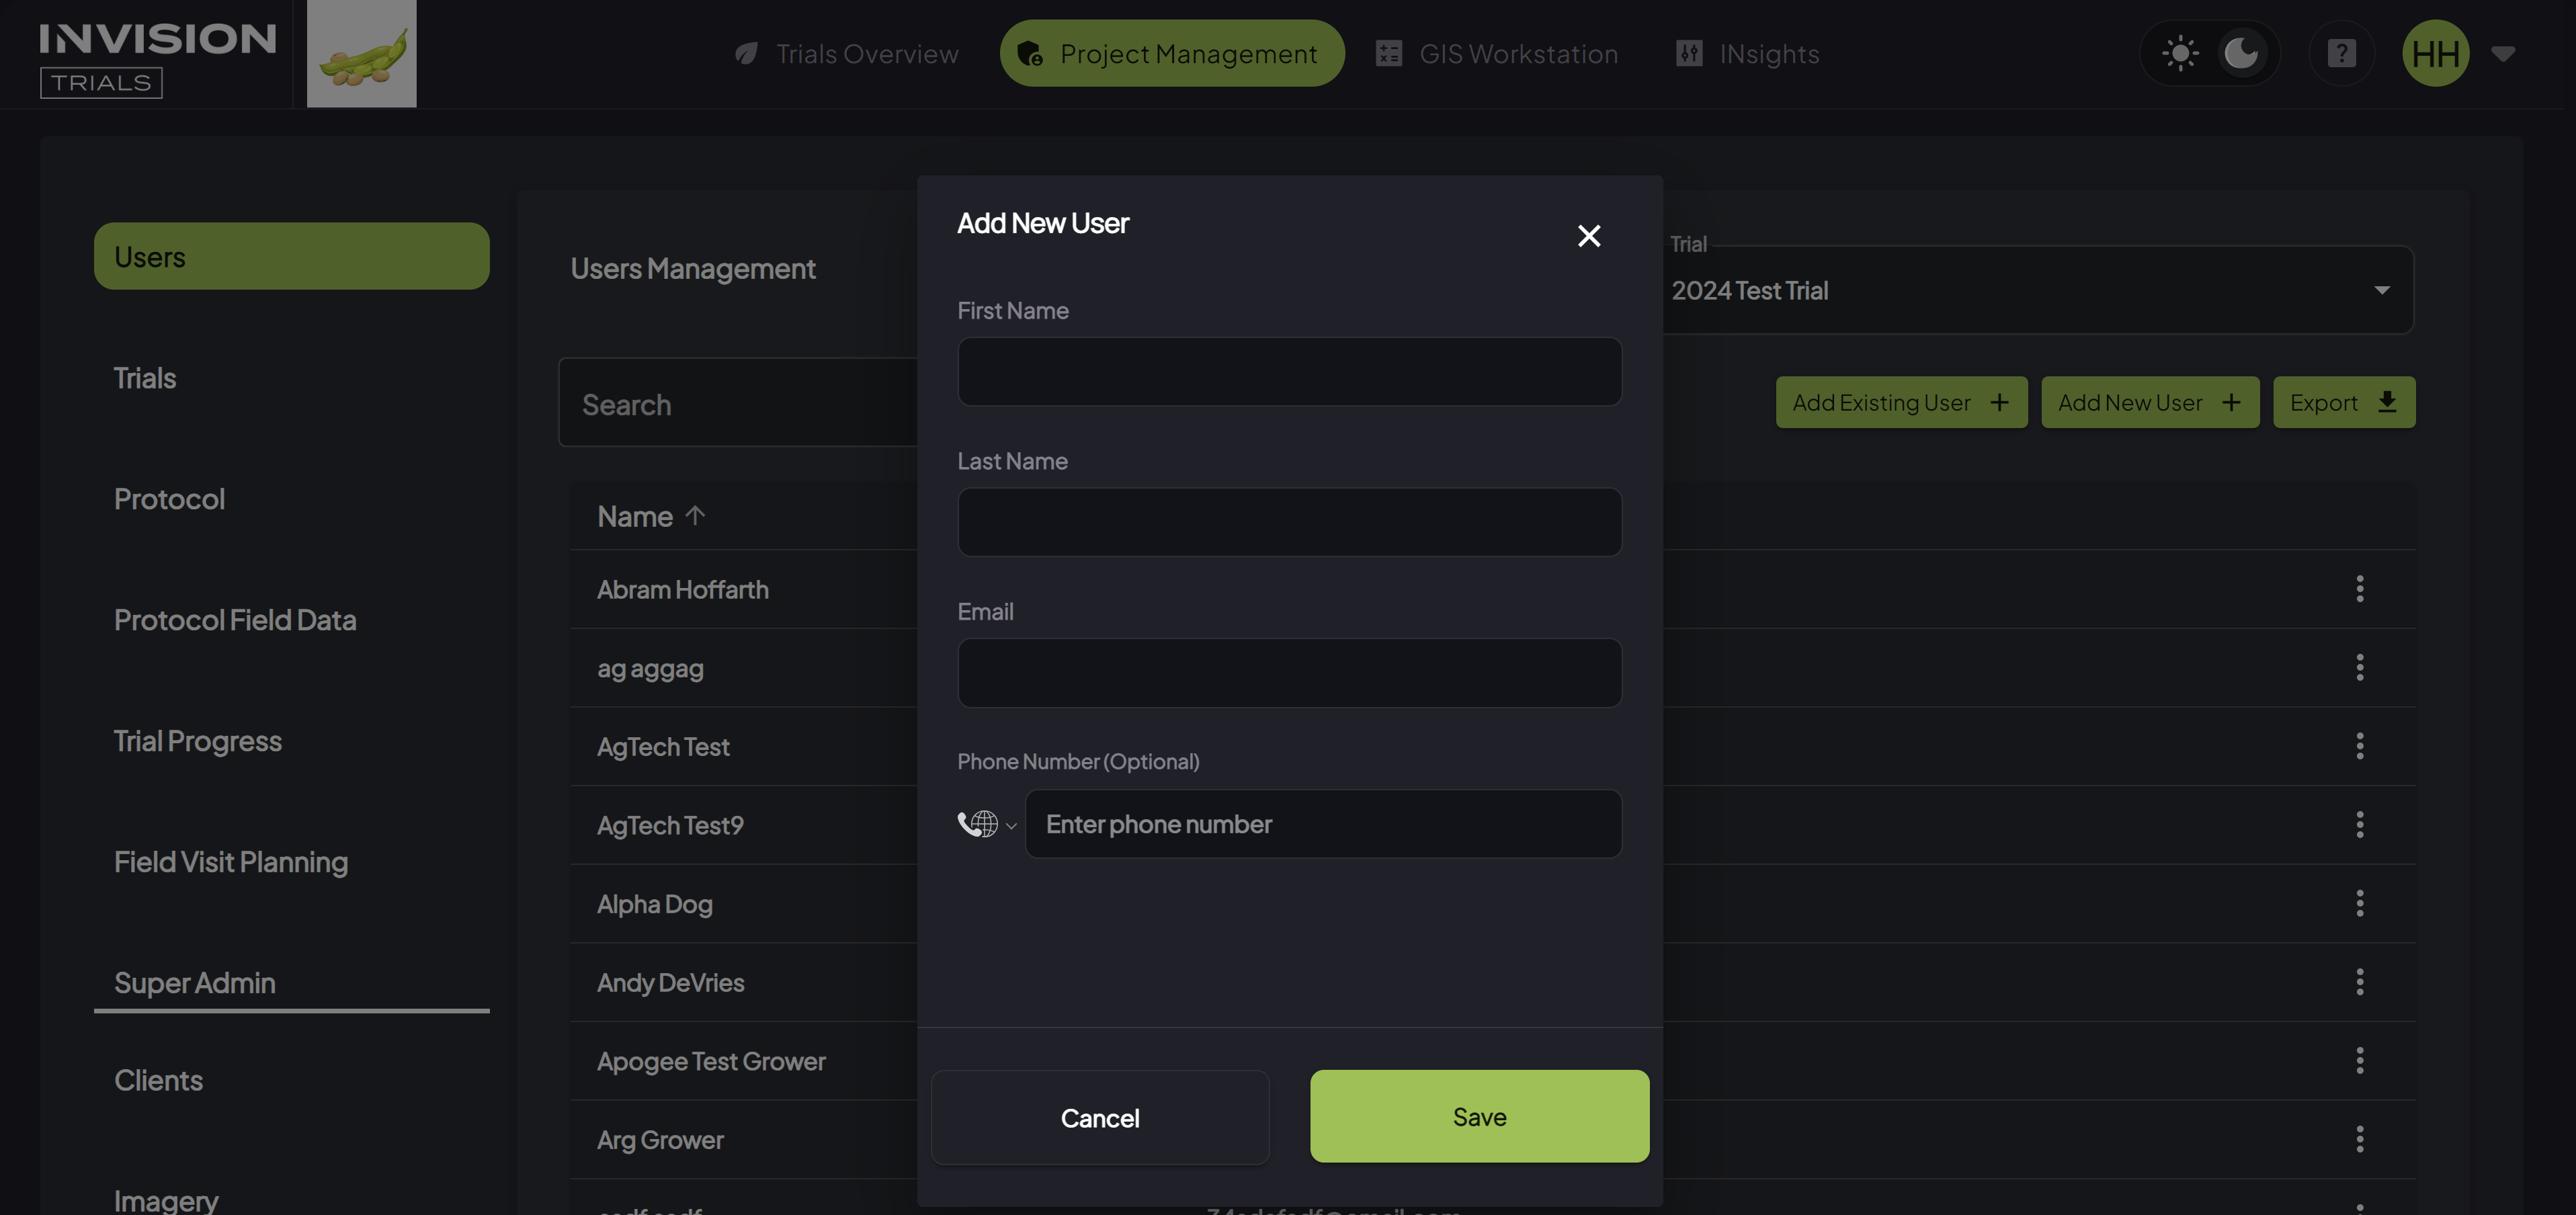
Add New User
- Choose Add New User if you need to add someone to the INVISION system that's never used it before.
-
The Add New User button will pull up a window where you will enter the new user’s details.

- Fill out the user's details, and click Save.
By following these steps, you'll successfully add users to your project, giving them access to the INVISION platform and an opportunity to begin managing and standardizing geospatial agronomic data for your agricultural trials.
For additional help, follow along with this video demonstrating how to add users to a project:
Available Roles and How to Assign Them
Guide to Understanding Roles in the INVISION Platform
Every user needs to be assigned one or more role(s) to use the INVISION platform. These roles control what a user can and cannot see, and can provides access to certain privileges. The following is a list of all the available roles that can be assigned to users in INVISION. All permissions are stackable, there are no distinct levels or hierarchy.
- Client-Admin: Full INVISION access with the pre-created client
- Trial-Admin: Full Trials Overview & Project Management access to specific trails
- Trial-Manager: Partial Trial Overview access, no Project Management access
- Trial-Grower: FIeld owners with participation access to enrolled trials
- Trial-Operative: Similar to Trial-Grower, but can complete actions for other fields that have been assigned to them
- Trial-Field-Worker: For carrying out field visits using the INVISION mobile app
- Imagery-Admin: For ordering imagery
- Trial-Analytics-Admin: For editing trial areas and approving/unapproving trial results
Roles can be assigned through the Users section of the Project Management tab.
- Navigate to the Users section of the Project Management tab.
- From the Admin tab, select Users from the left panel.

- From the Admin tab, select Users from the left panel.
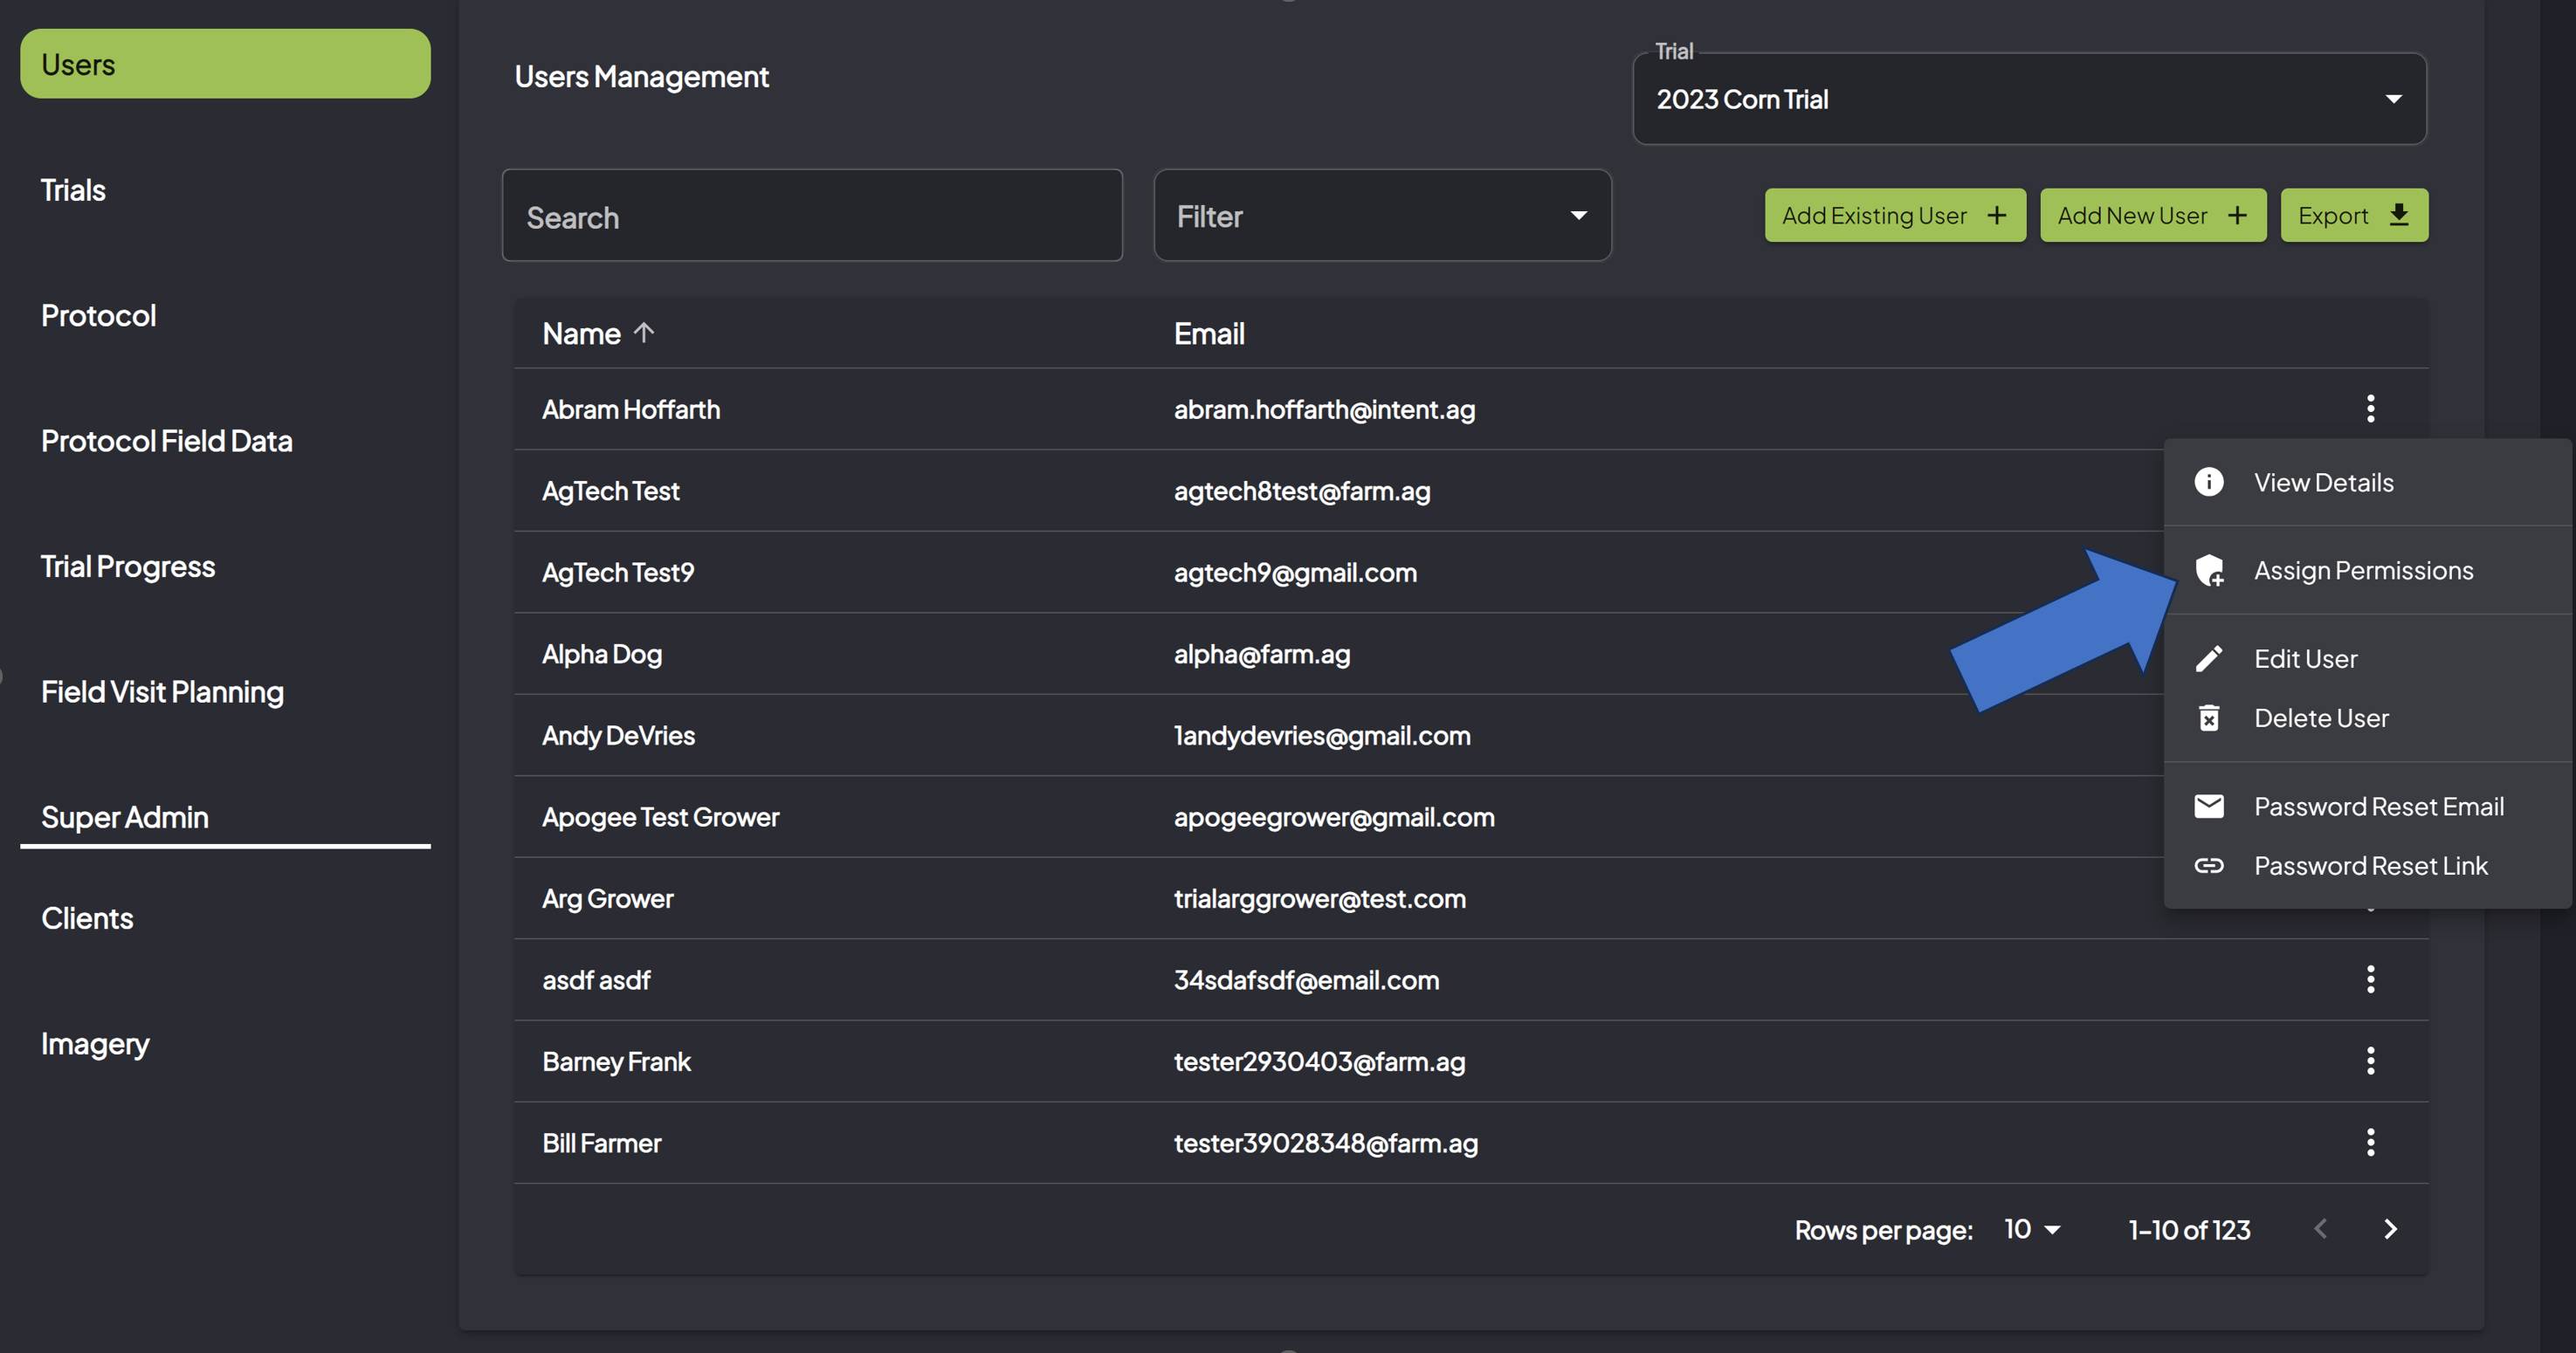
- Access the User's Details
- Select the three dots next to the user that needs a role assigned.

- Select the three dots next to the user that needs a role assigned.
- Select Assign Permissions.
- A menu will pop up with different options, select the Assign Permissions option.

- A menu will pop up with different options, select the Assign Permissions option.
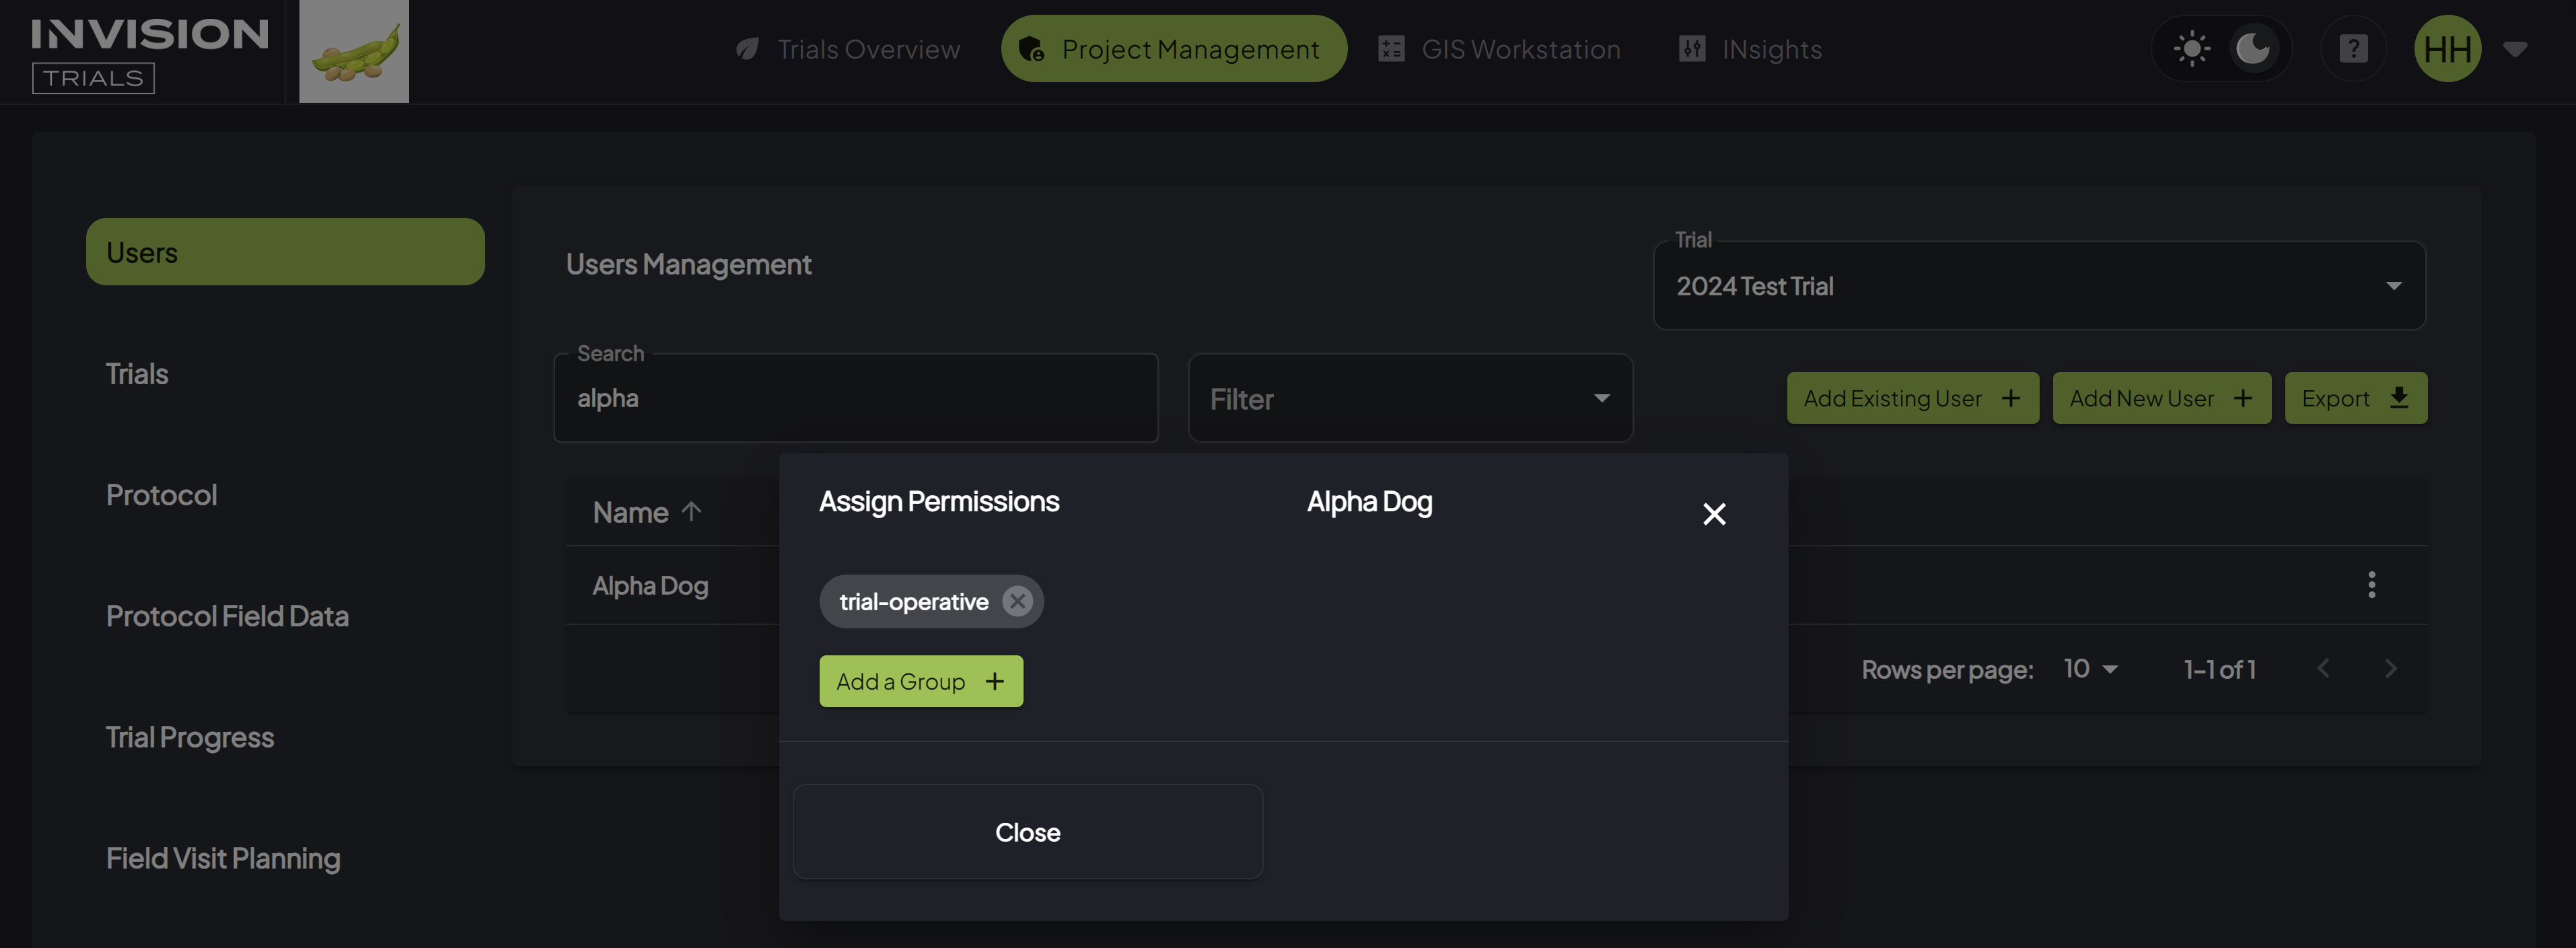
- Add a Group.
- A new popup will display. This popup will show the roles that the user has been assigned, if any.

- Select the Add a Group button to assign the first or a new role.
- Selecting the role from the list will add that role to the user.
- A new popup will display. This popup will show the roles that the user has been assigned, if any.

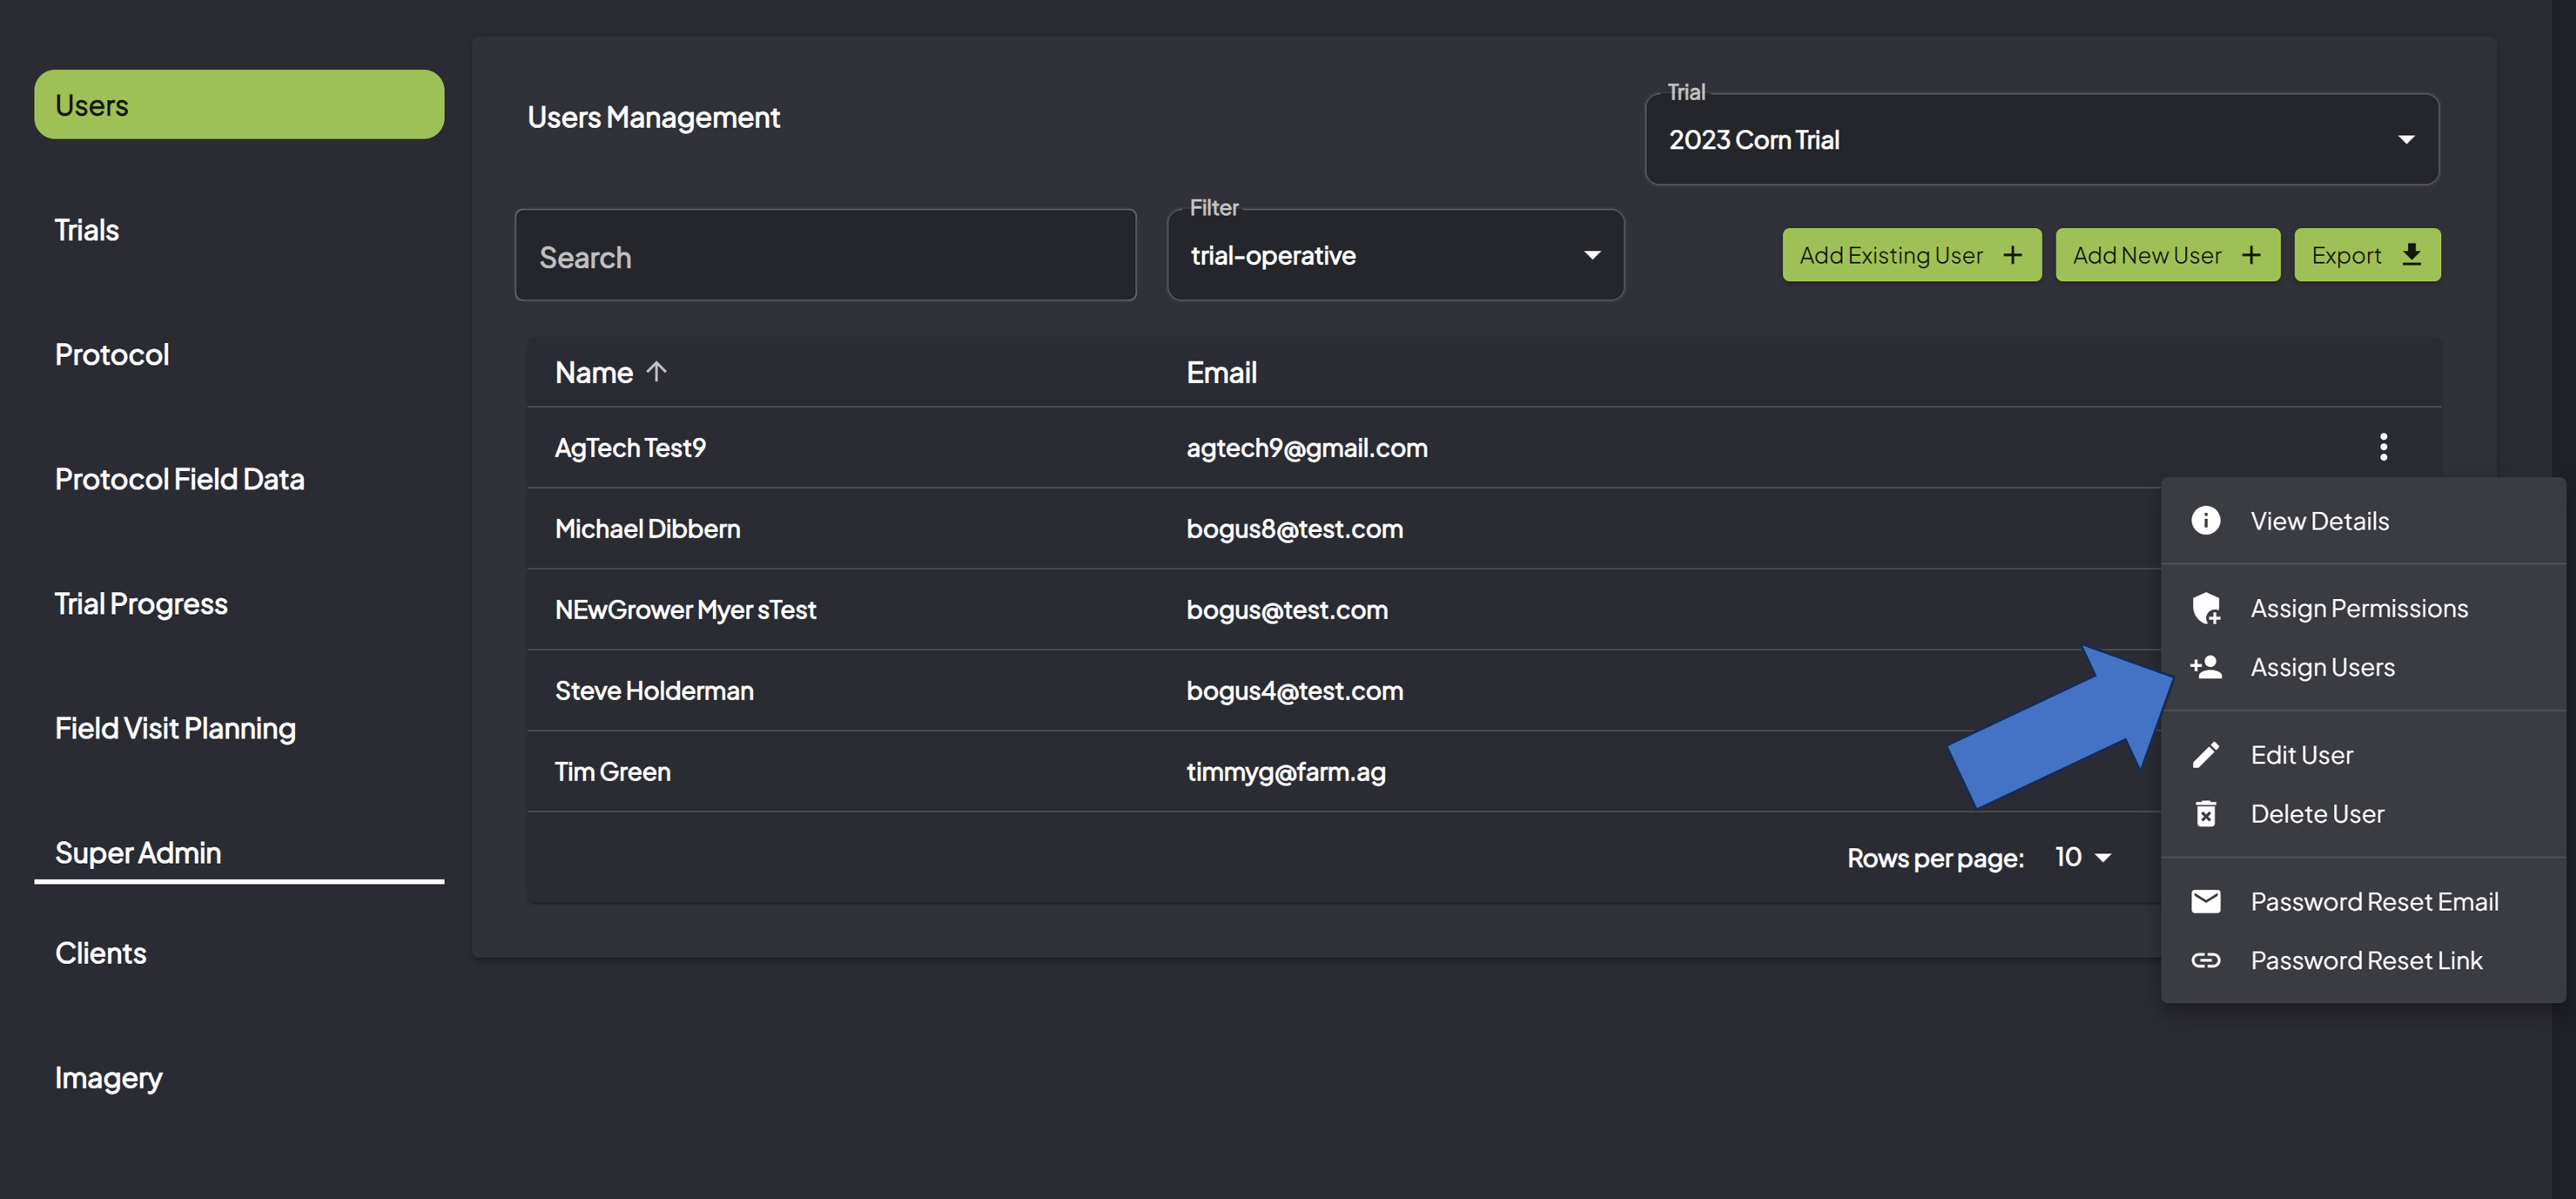
Some roles are designed so that a user can act on behalf of other users. For example, Trial-Operatives can enroll fields on behalf of growers that are assigned to them. To do so, the specific grower needs to be assigned to the Trial-Operative user.
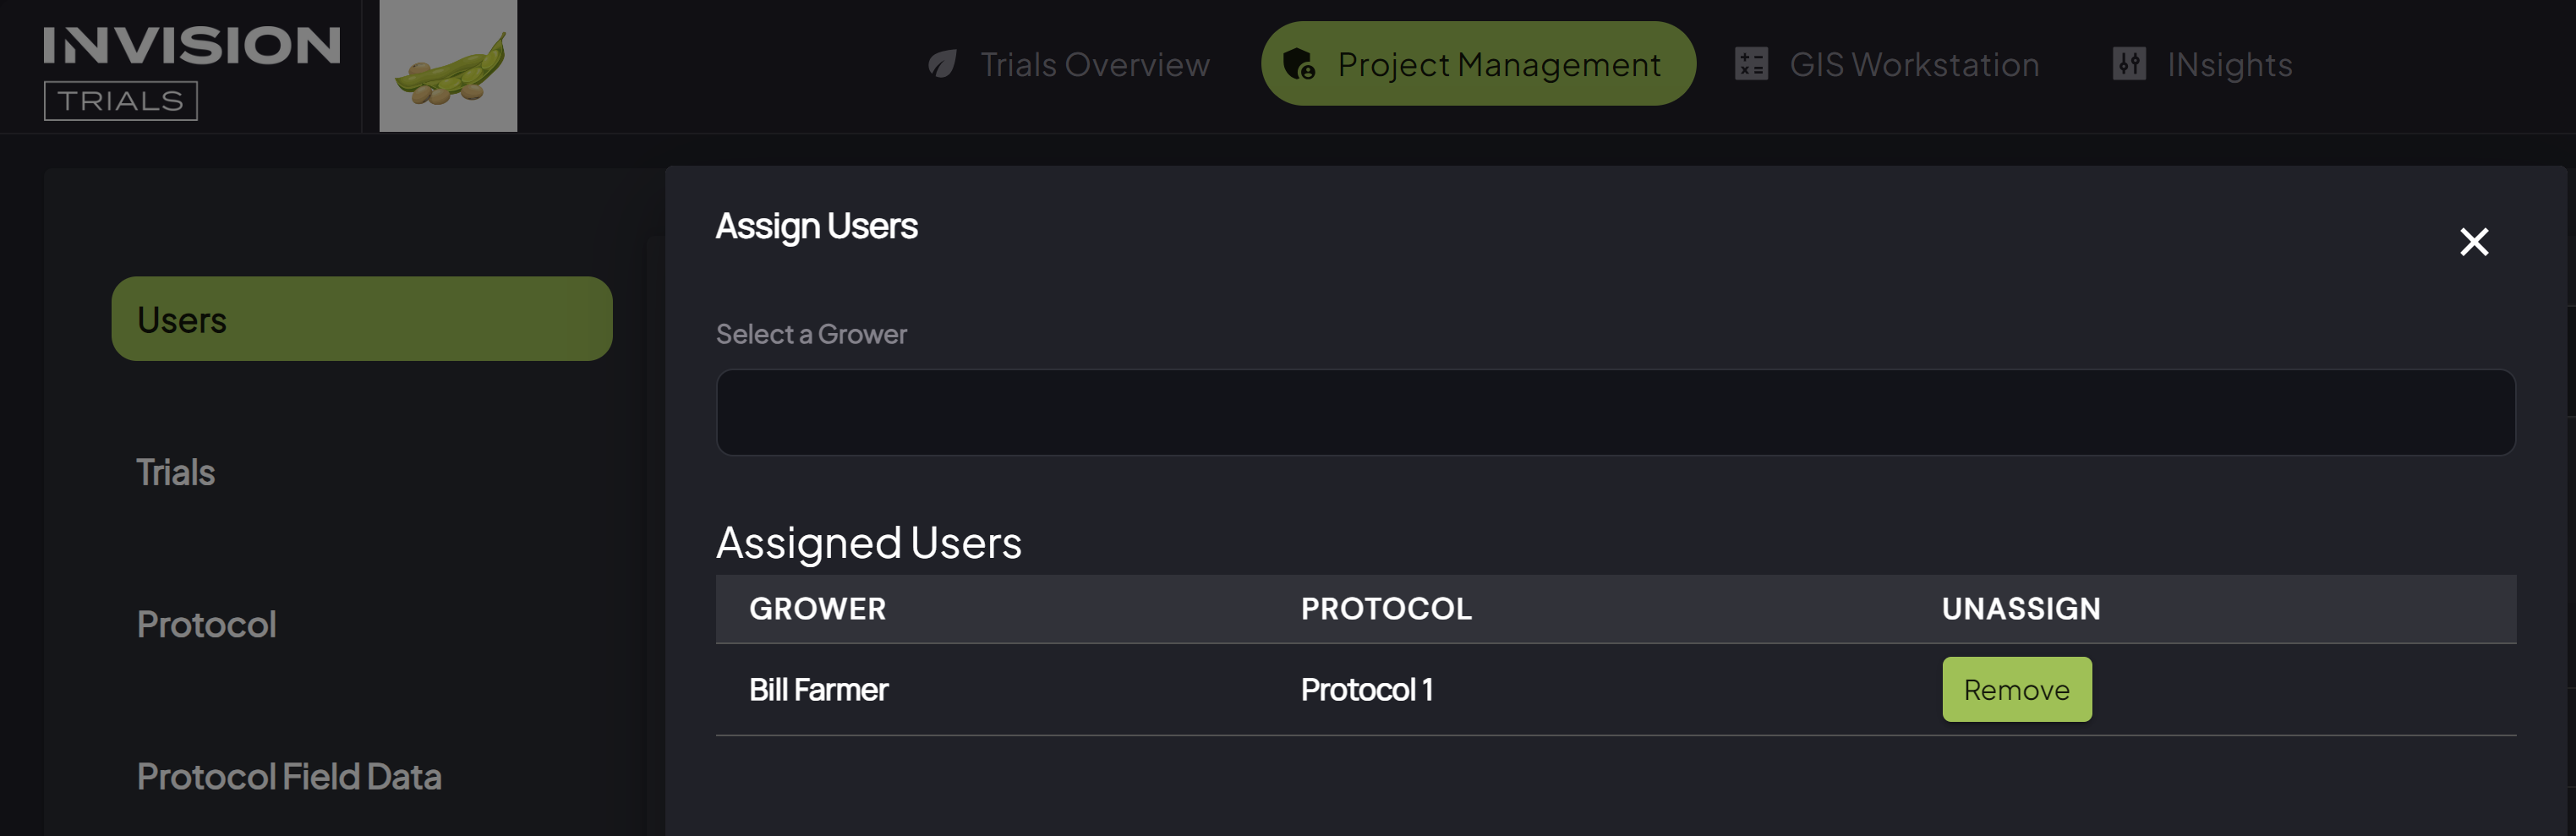
- Select Assign Users
- Once the user has the role assigned to them that let's them act on behalf of growers, select the three dots to the right of their name to access their details.
- A menu will pop with different options, select the Assign Users option.

- Search for Growers to Assign
- A new popup will display. This popup will show if any growers have already been assigned to this user.

- You can select a new grower to add by typing their name in the Select a Grower search bar, and selecting the grower from the drop down.
- A new popup will display. This popup will show if any growers have already been assigned to this user.
- Confirm Assignment
- Once the grower is selected, confirm the assignment by clicking the Assign button.

- Once the grower is selected, confirm the assignment by clicking the Assign button.

How To Create a New Trial
Guide to Creating a New Trial
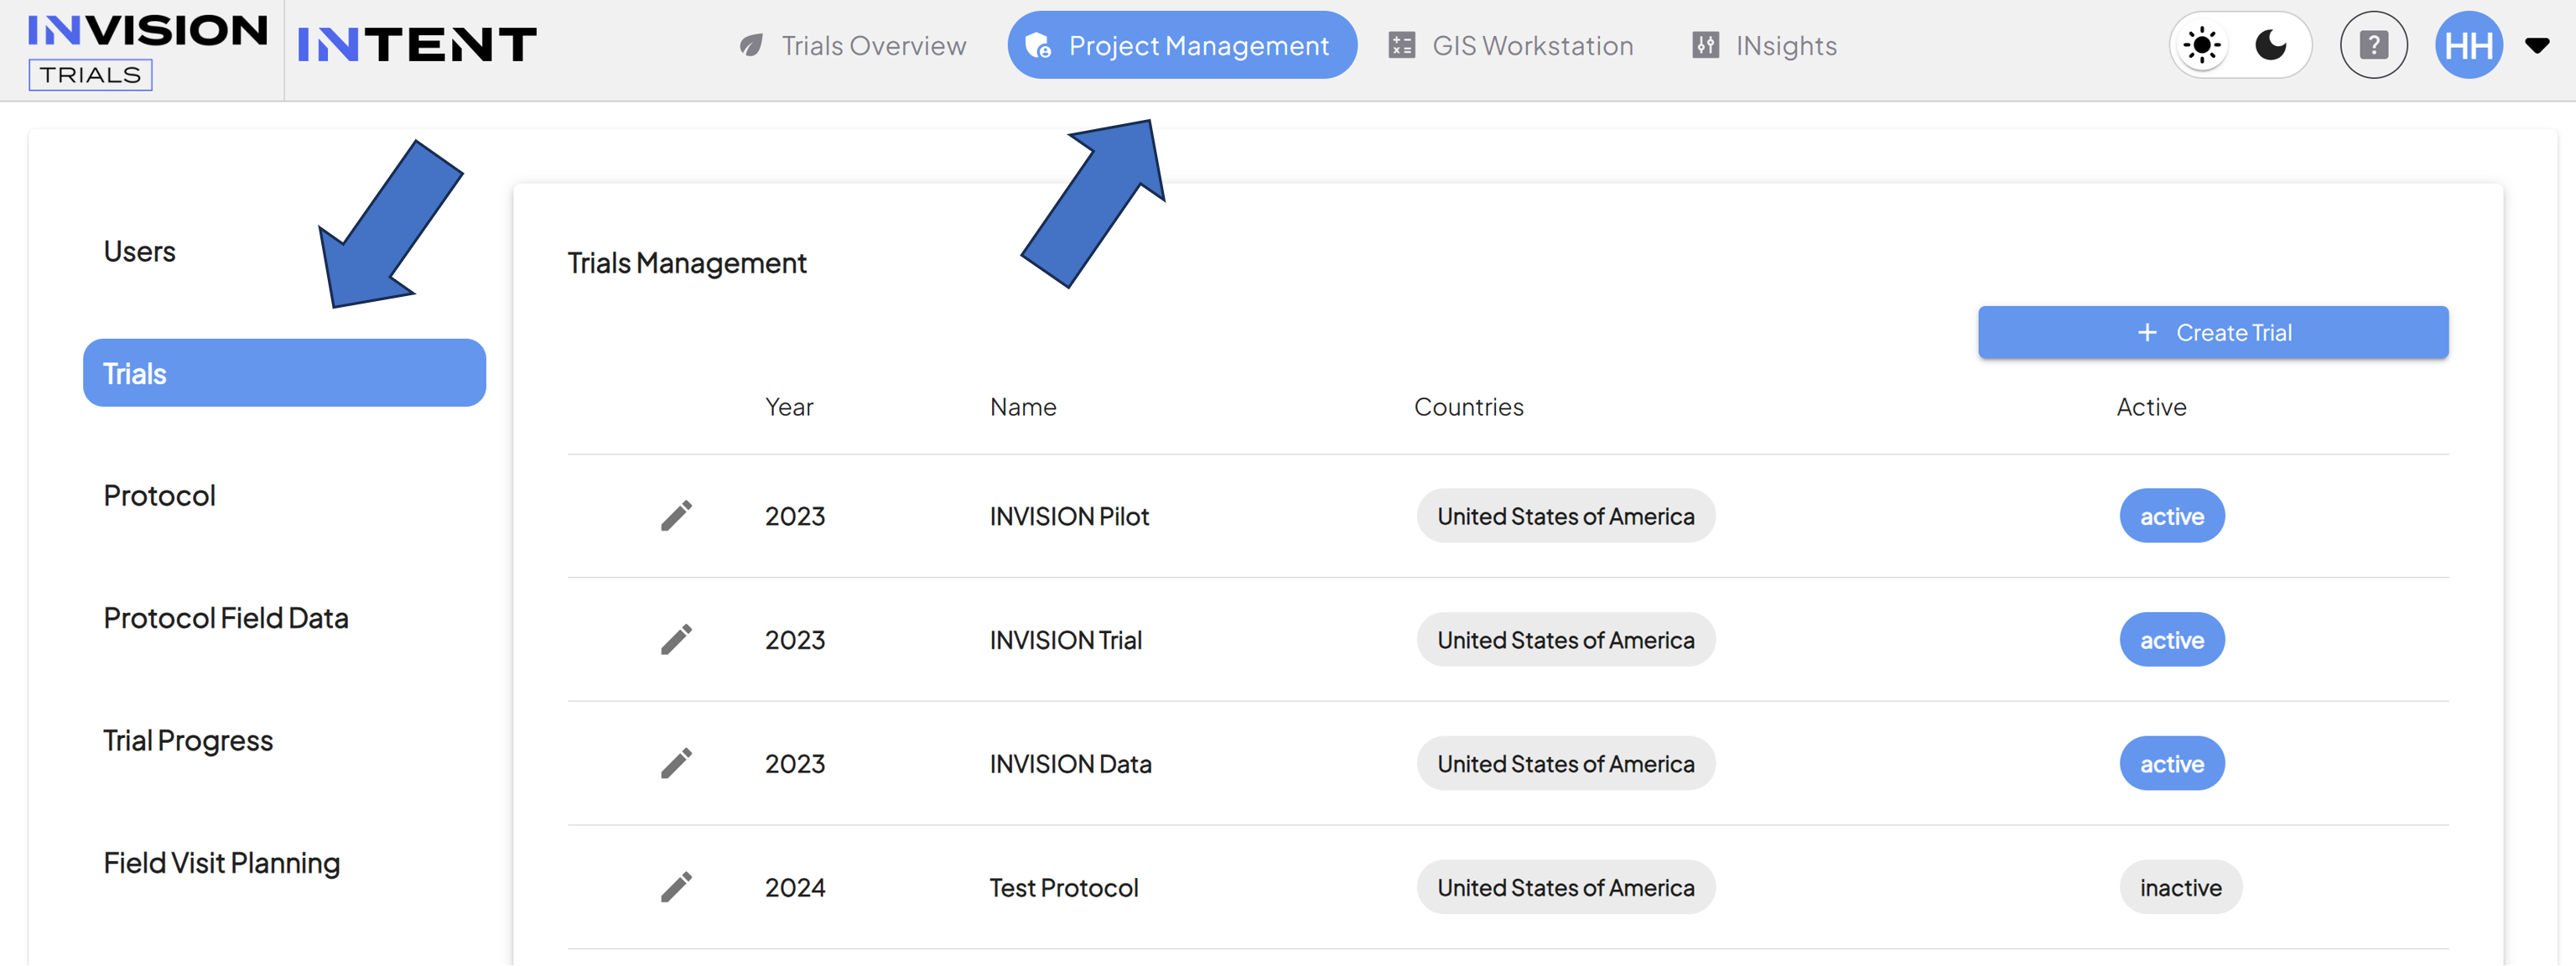
- Navigate to the Trials Section of Project Management
- From the Admin tab, select Trials from the left pane.

- From the Admin tab, select Trials from the left pane.
-
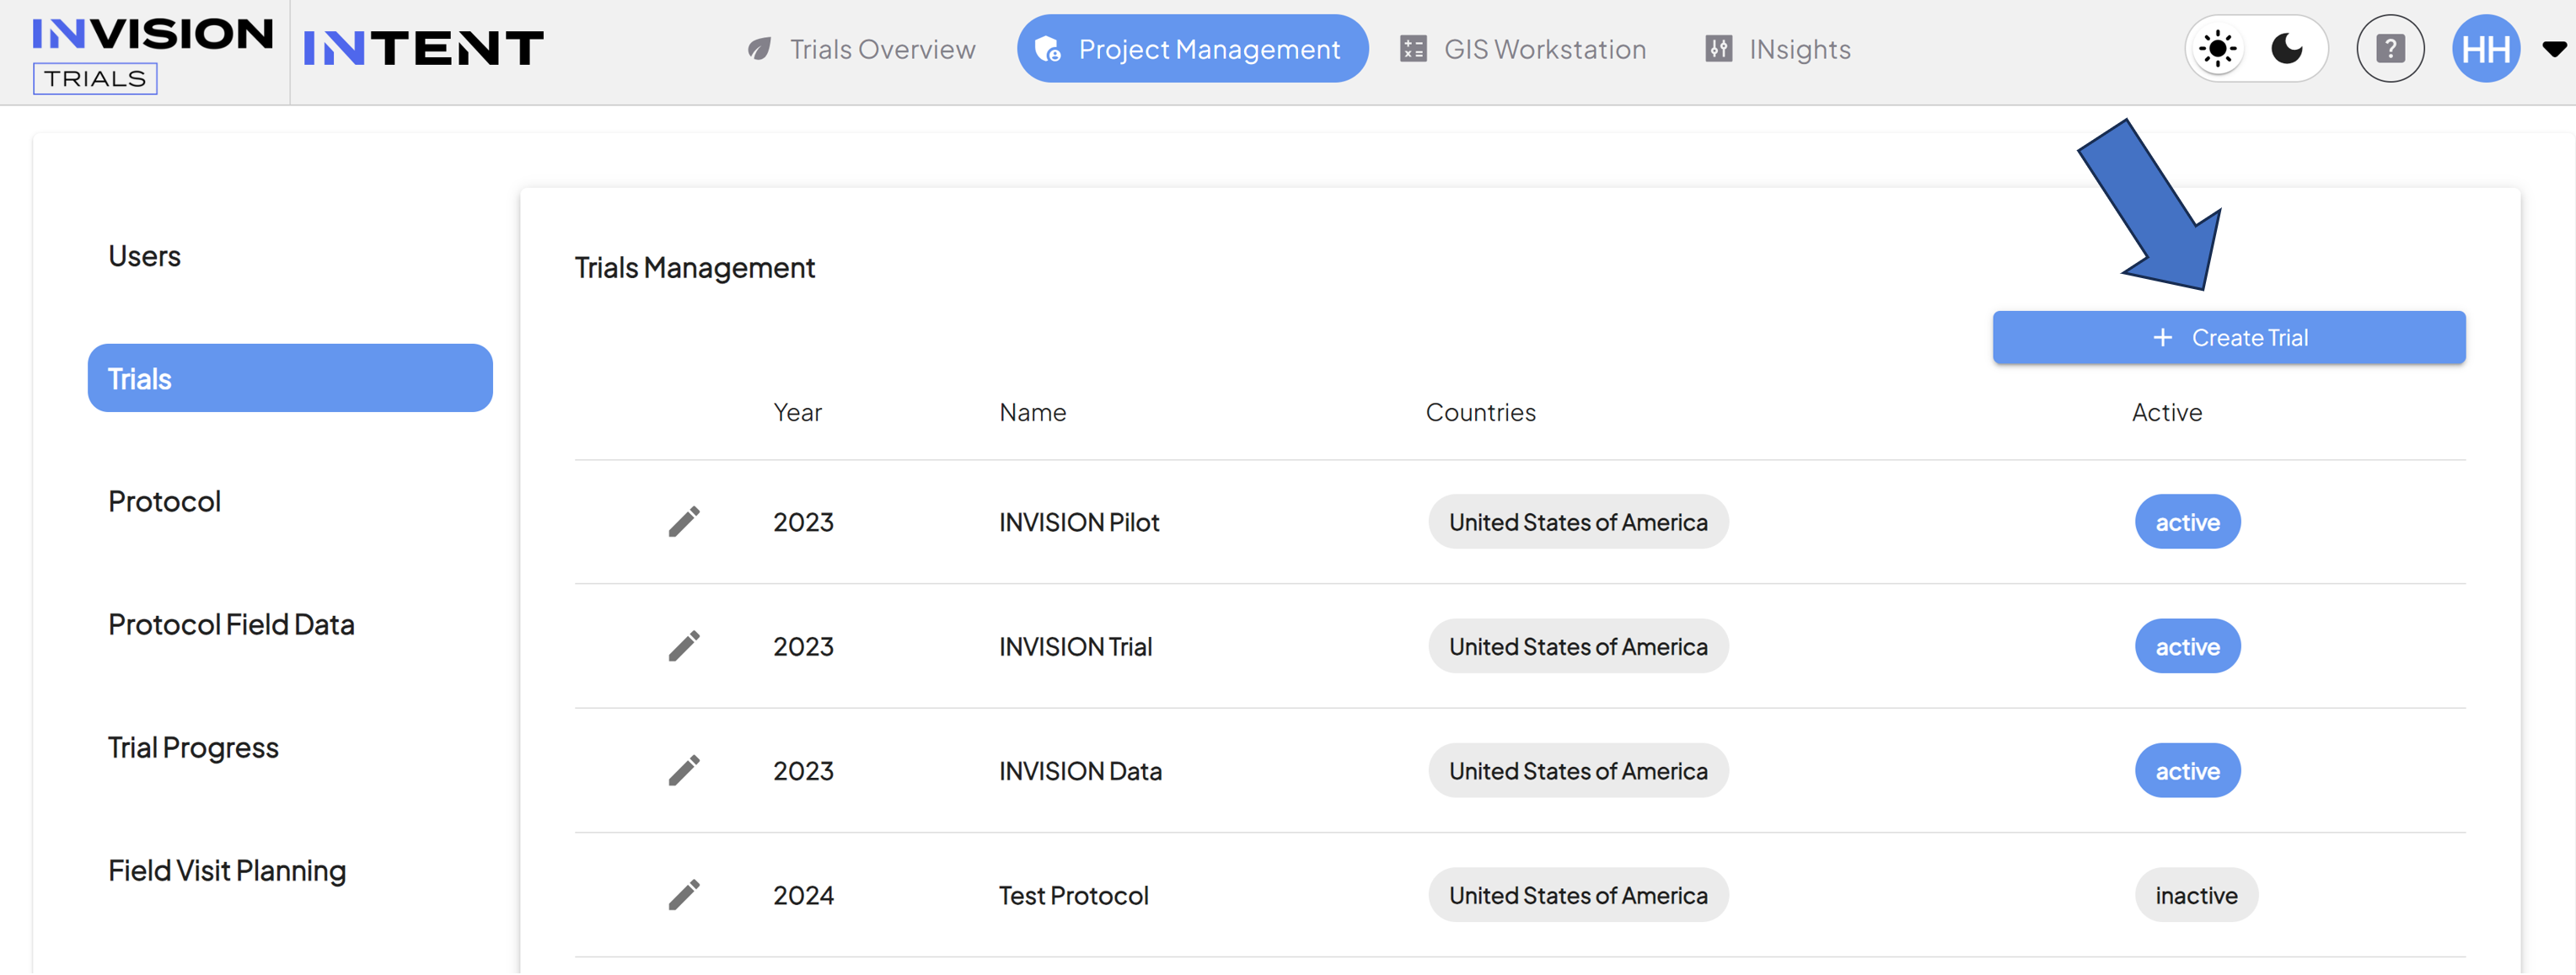
Create a New Trial
-
Click the Create Trial button.

-
-
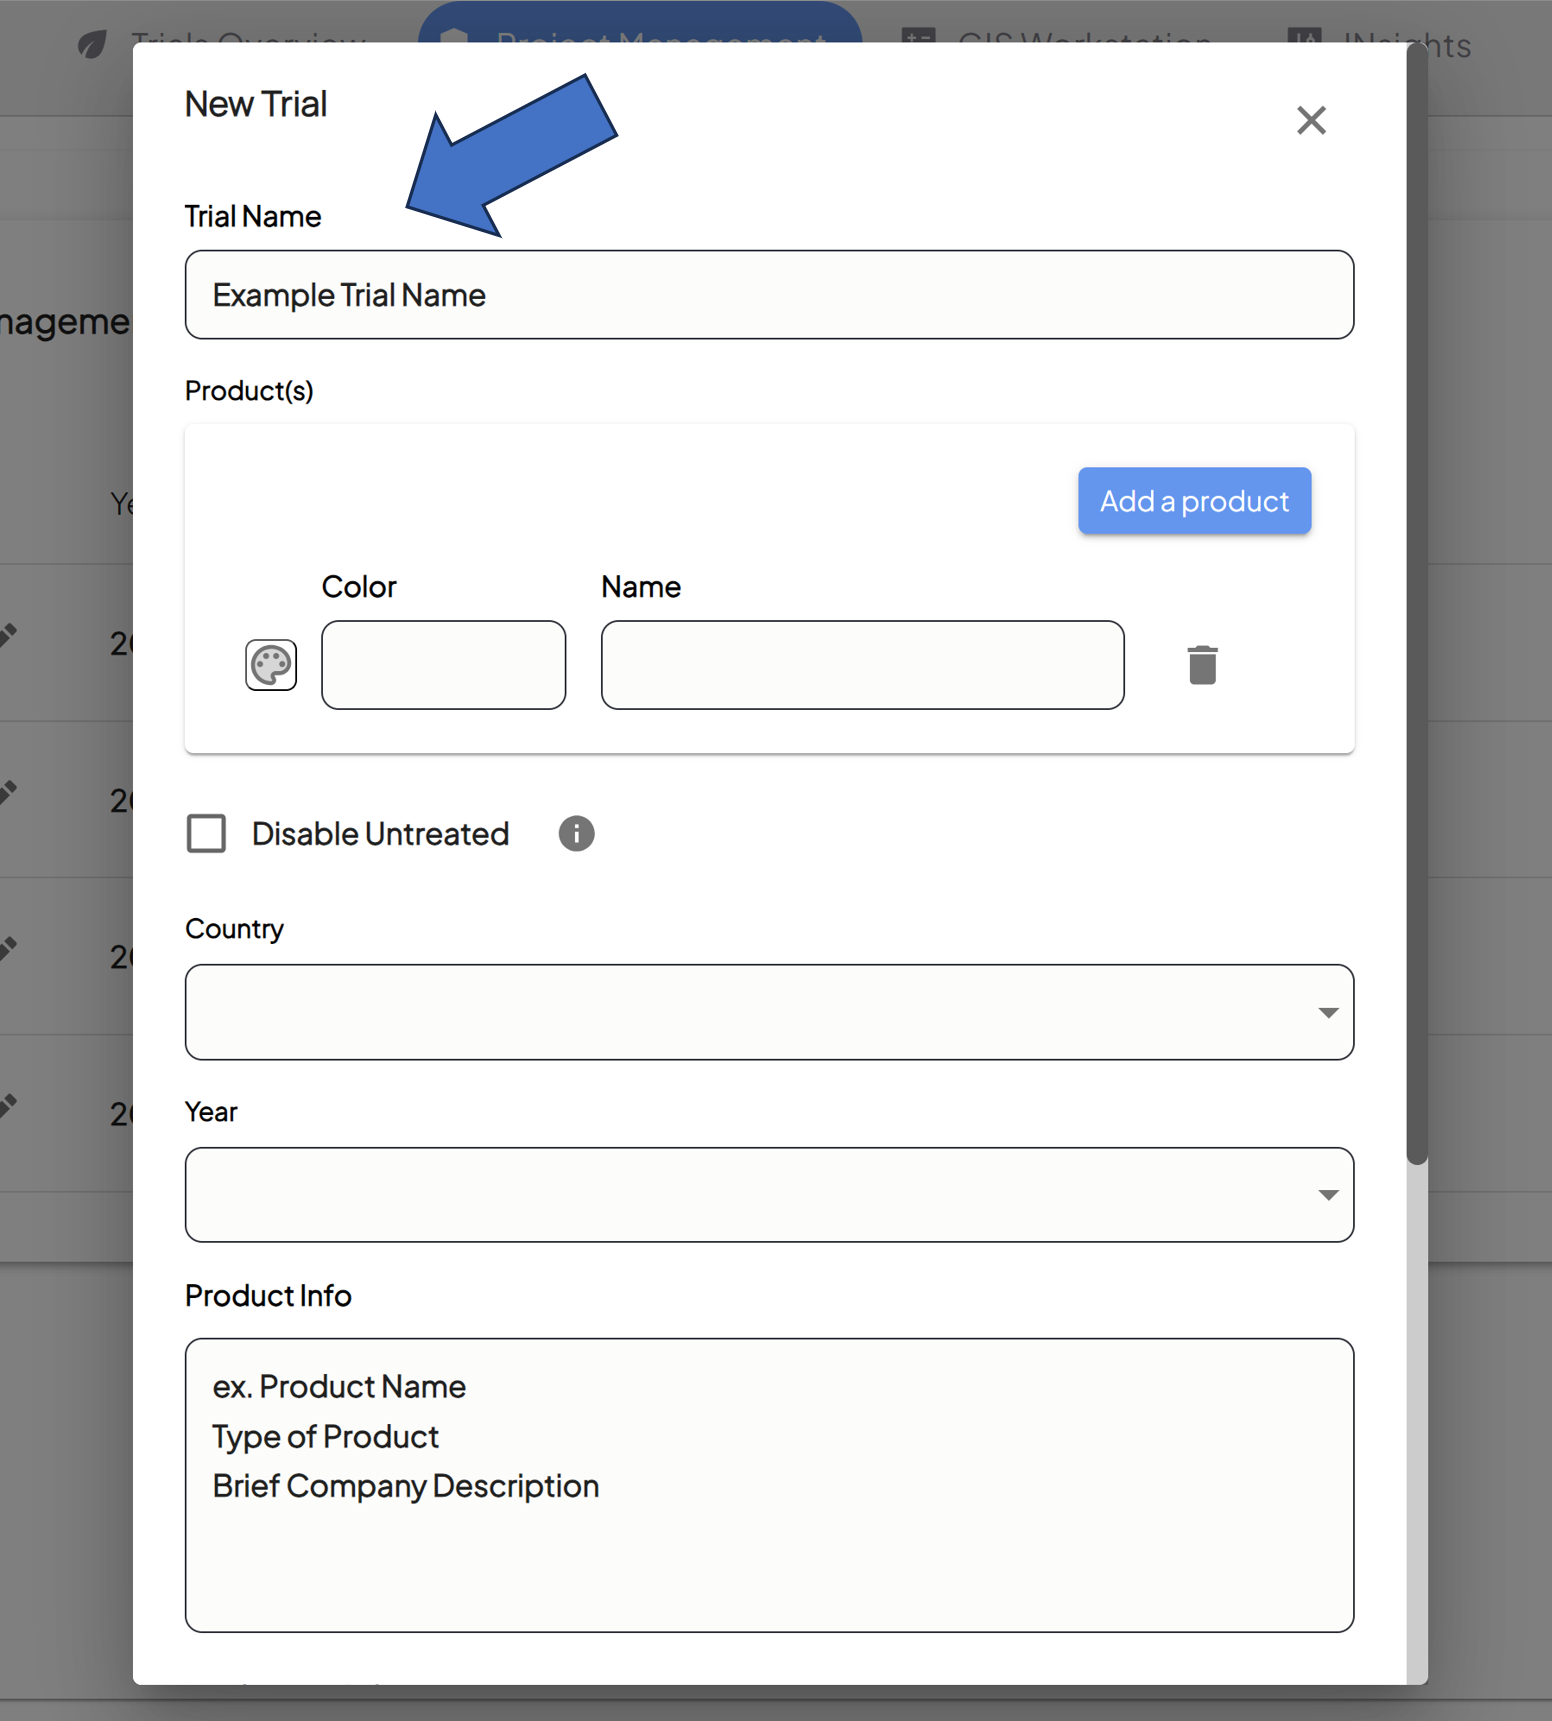
Name Your New Trial
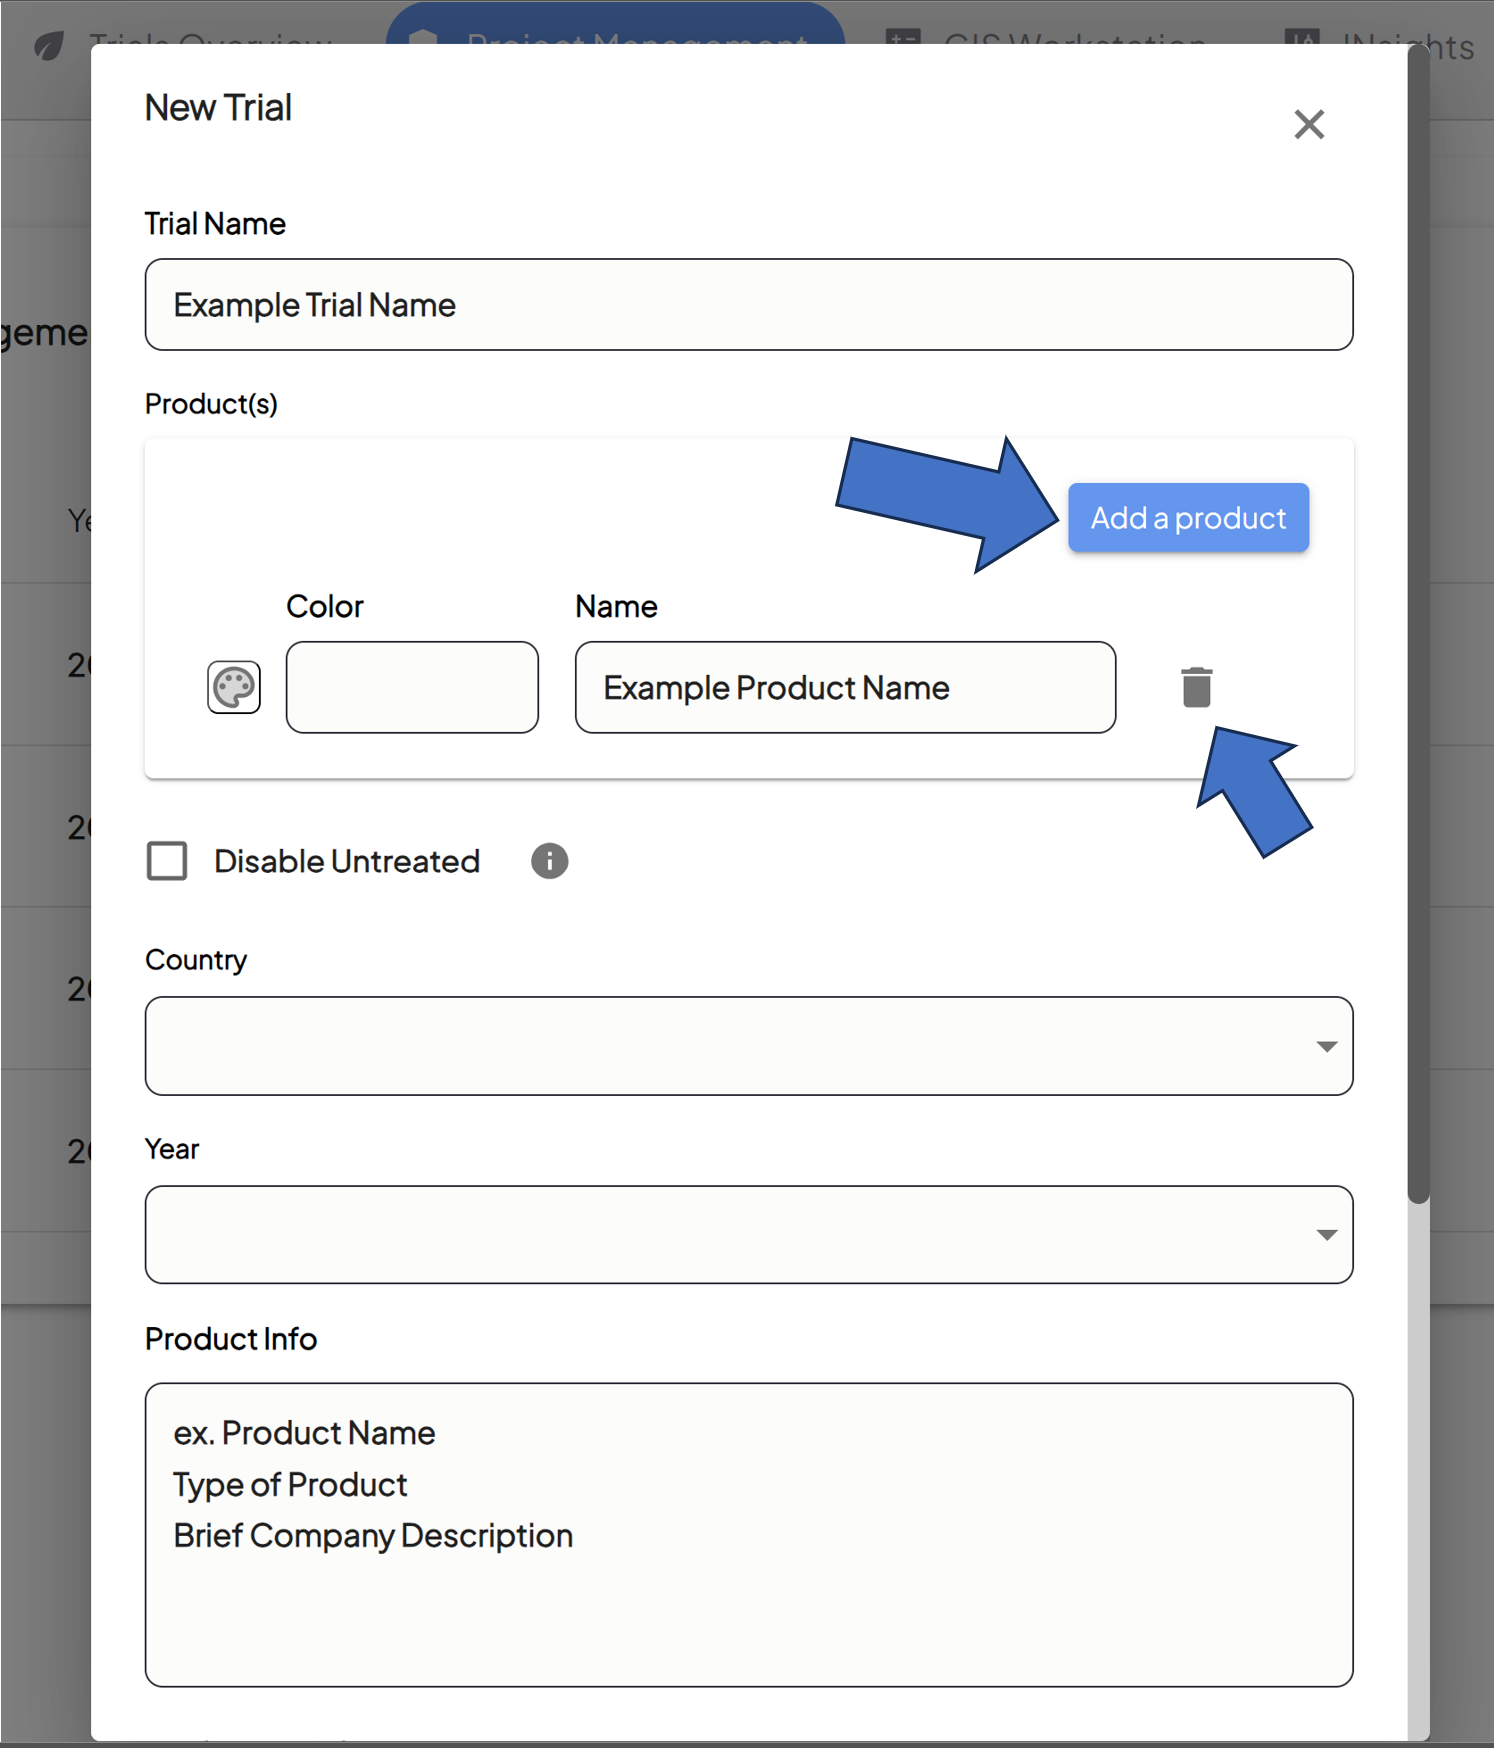
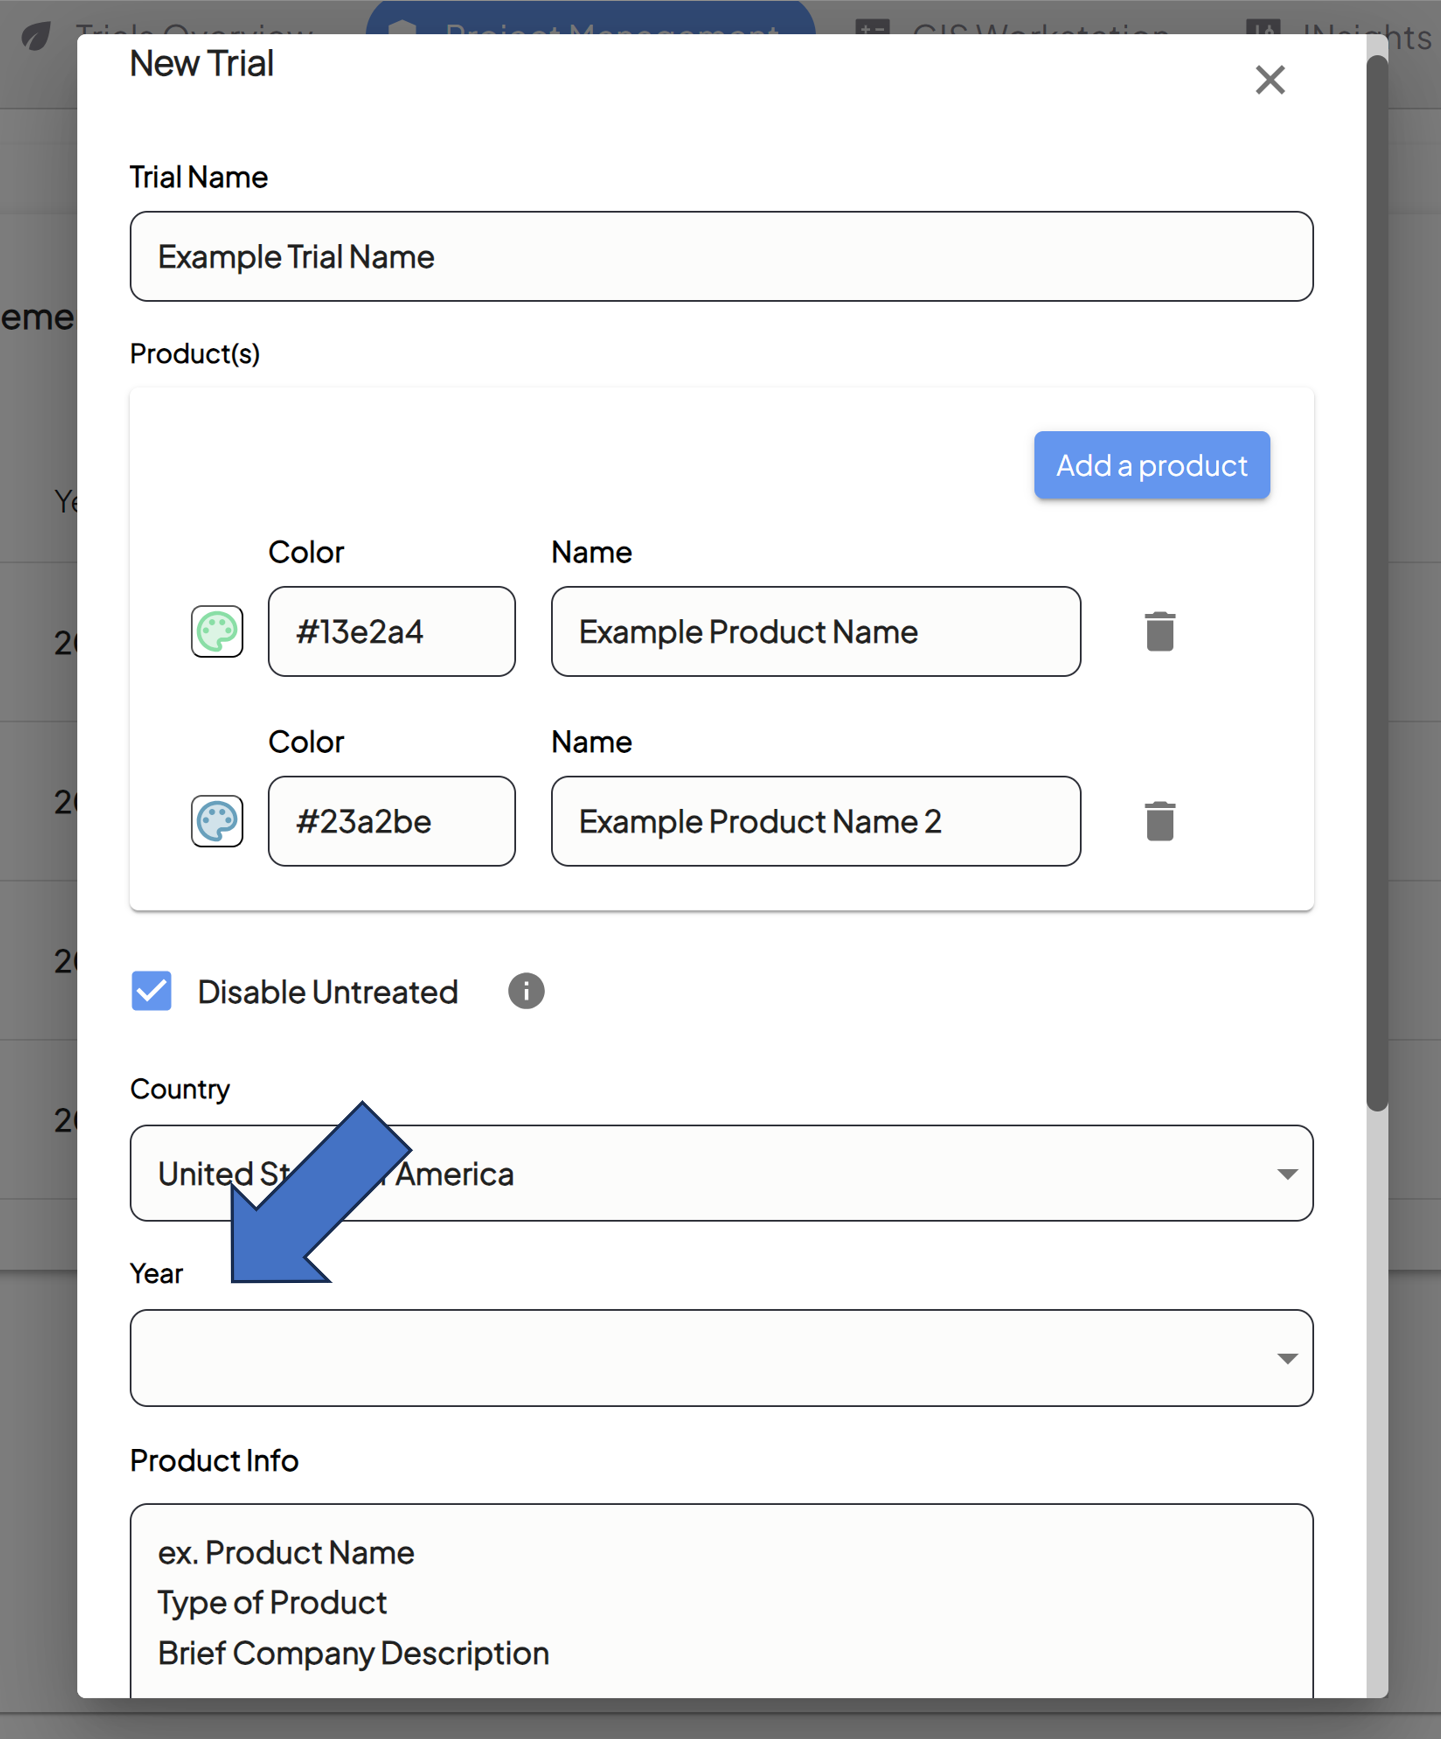
- A popup will appear where you can fill out all of the details for your trial.
-
Enter a name for your trial/project in the Trial Name field.

-
Determine the Products To Be Used
- Enter the name of the product in the Name field.
-
Click the Add a Product button to add more products that will be included in the trial.
- Click the trash can icon next to the Name field to delete any products.

-
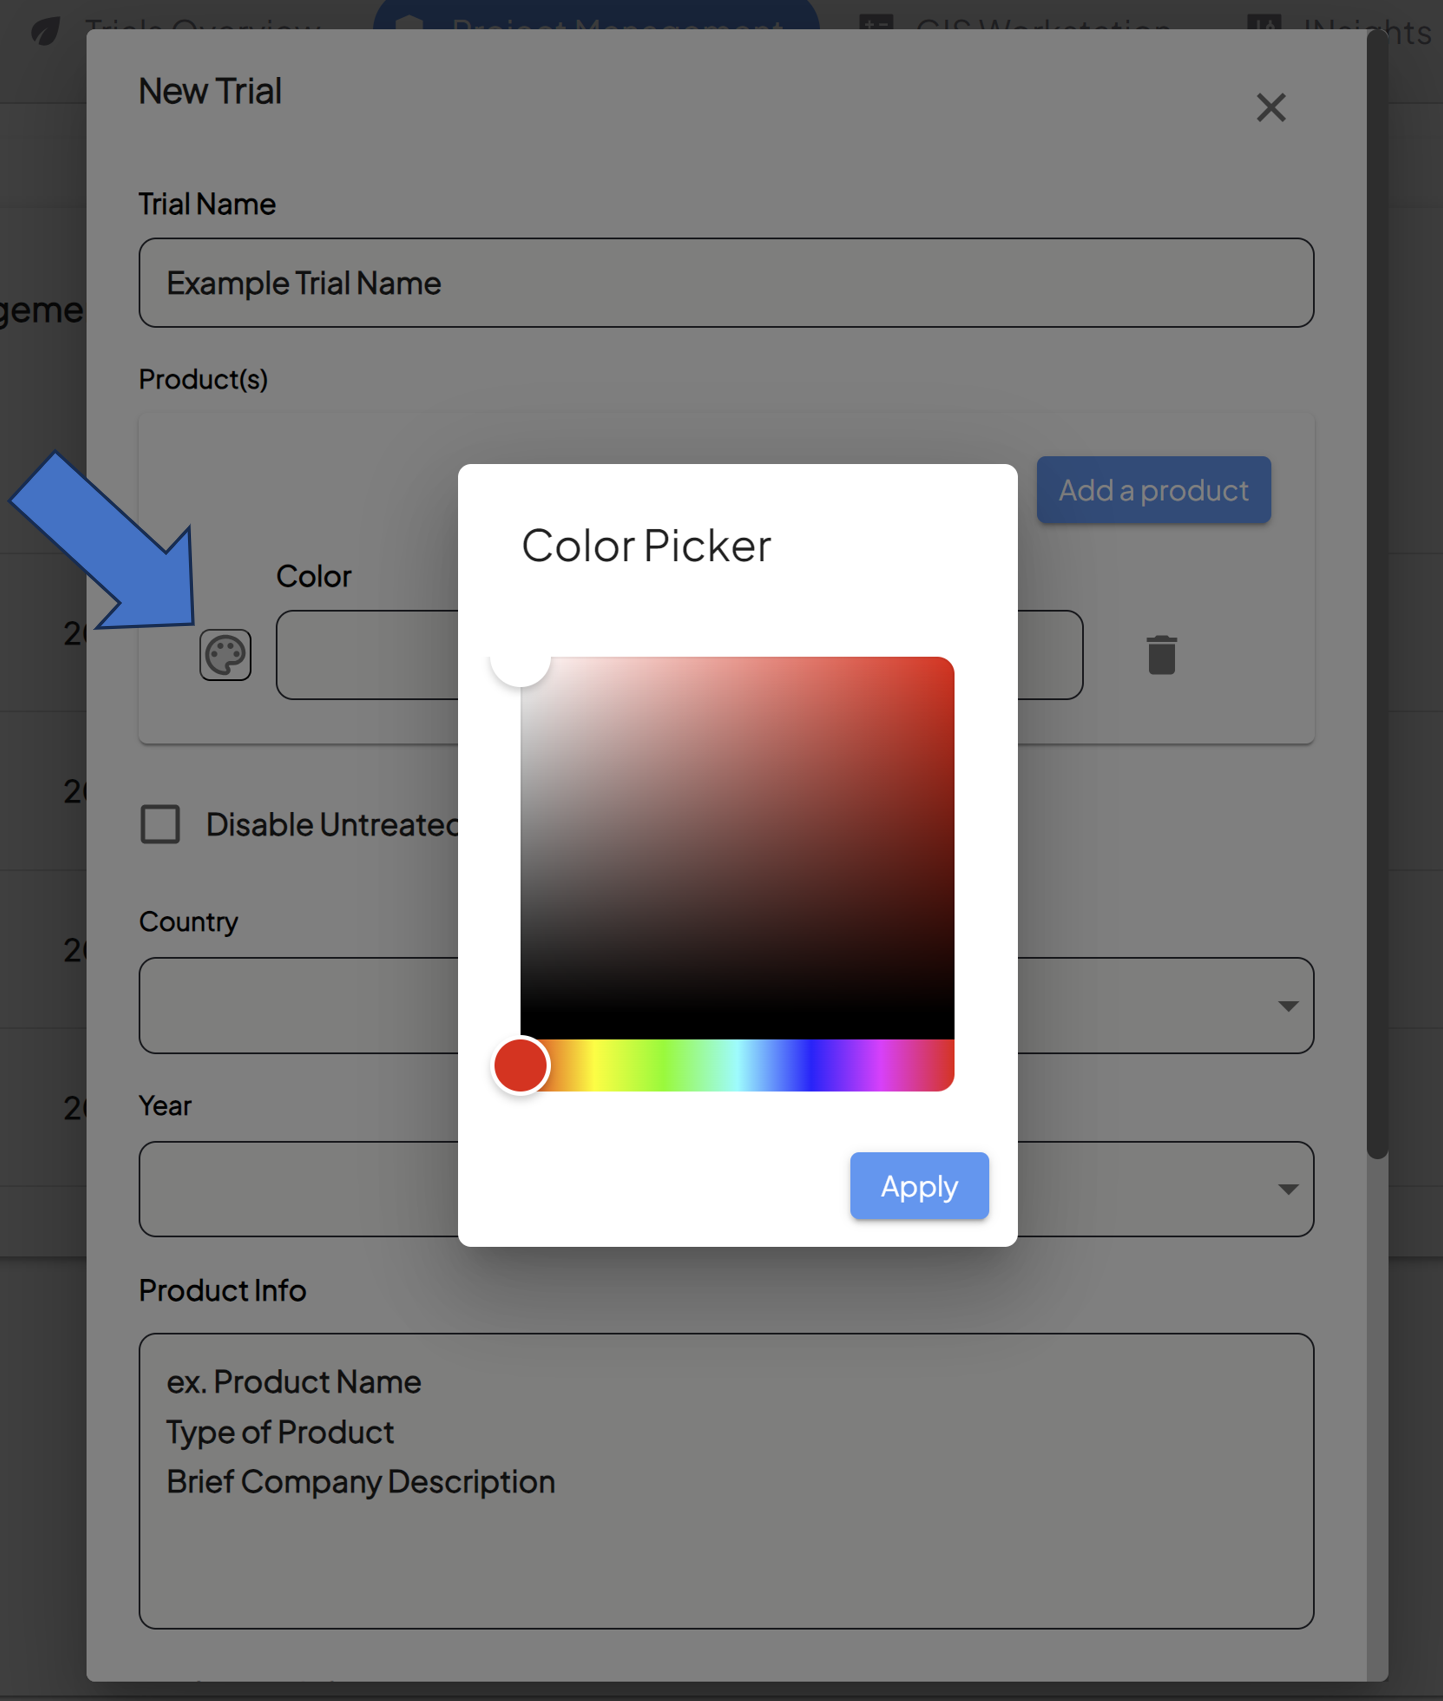
Customize Your Color Palette
-
Customize the product color by clicking on the color picker icon, choosing the desired branding/color for each product.

-
Note that this will be used in the data processing and visualization of the products in View Fields.
-
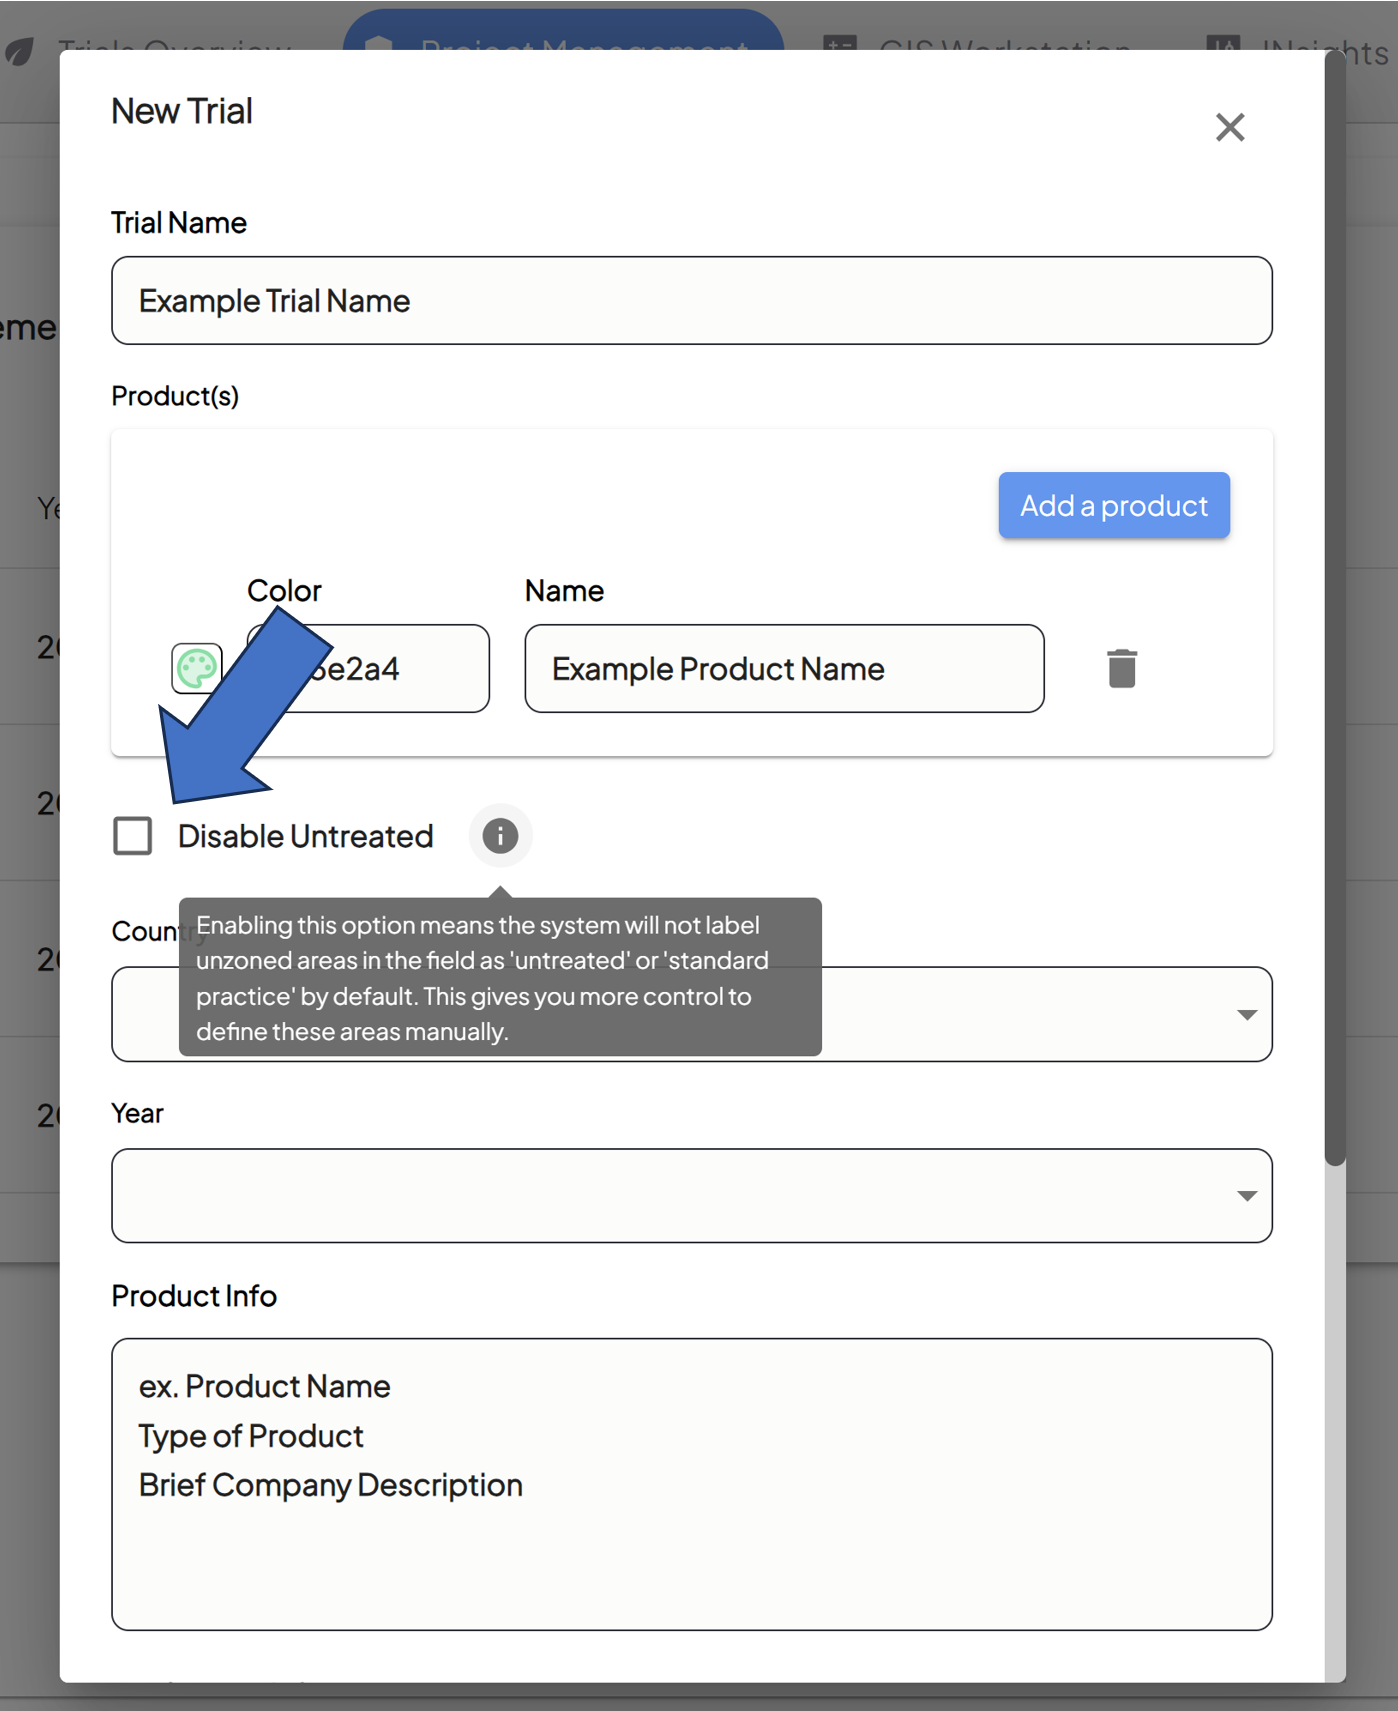
- Disable Untreated
- Check the Disable Untreated box if you do not want the system to automatically label unzoned areas (i.e. areas that are not determined to be treatment zones) as "untreated."

- Check the Disable Untreated box if you do not want the system to automatically label unzoned areas (i.e. areas that are not determined to be treatment zones) as "untreated."
-
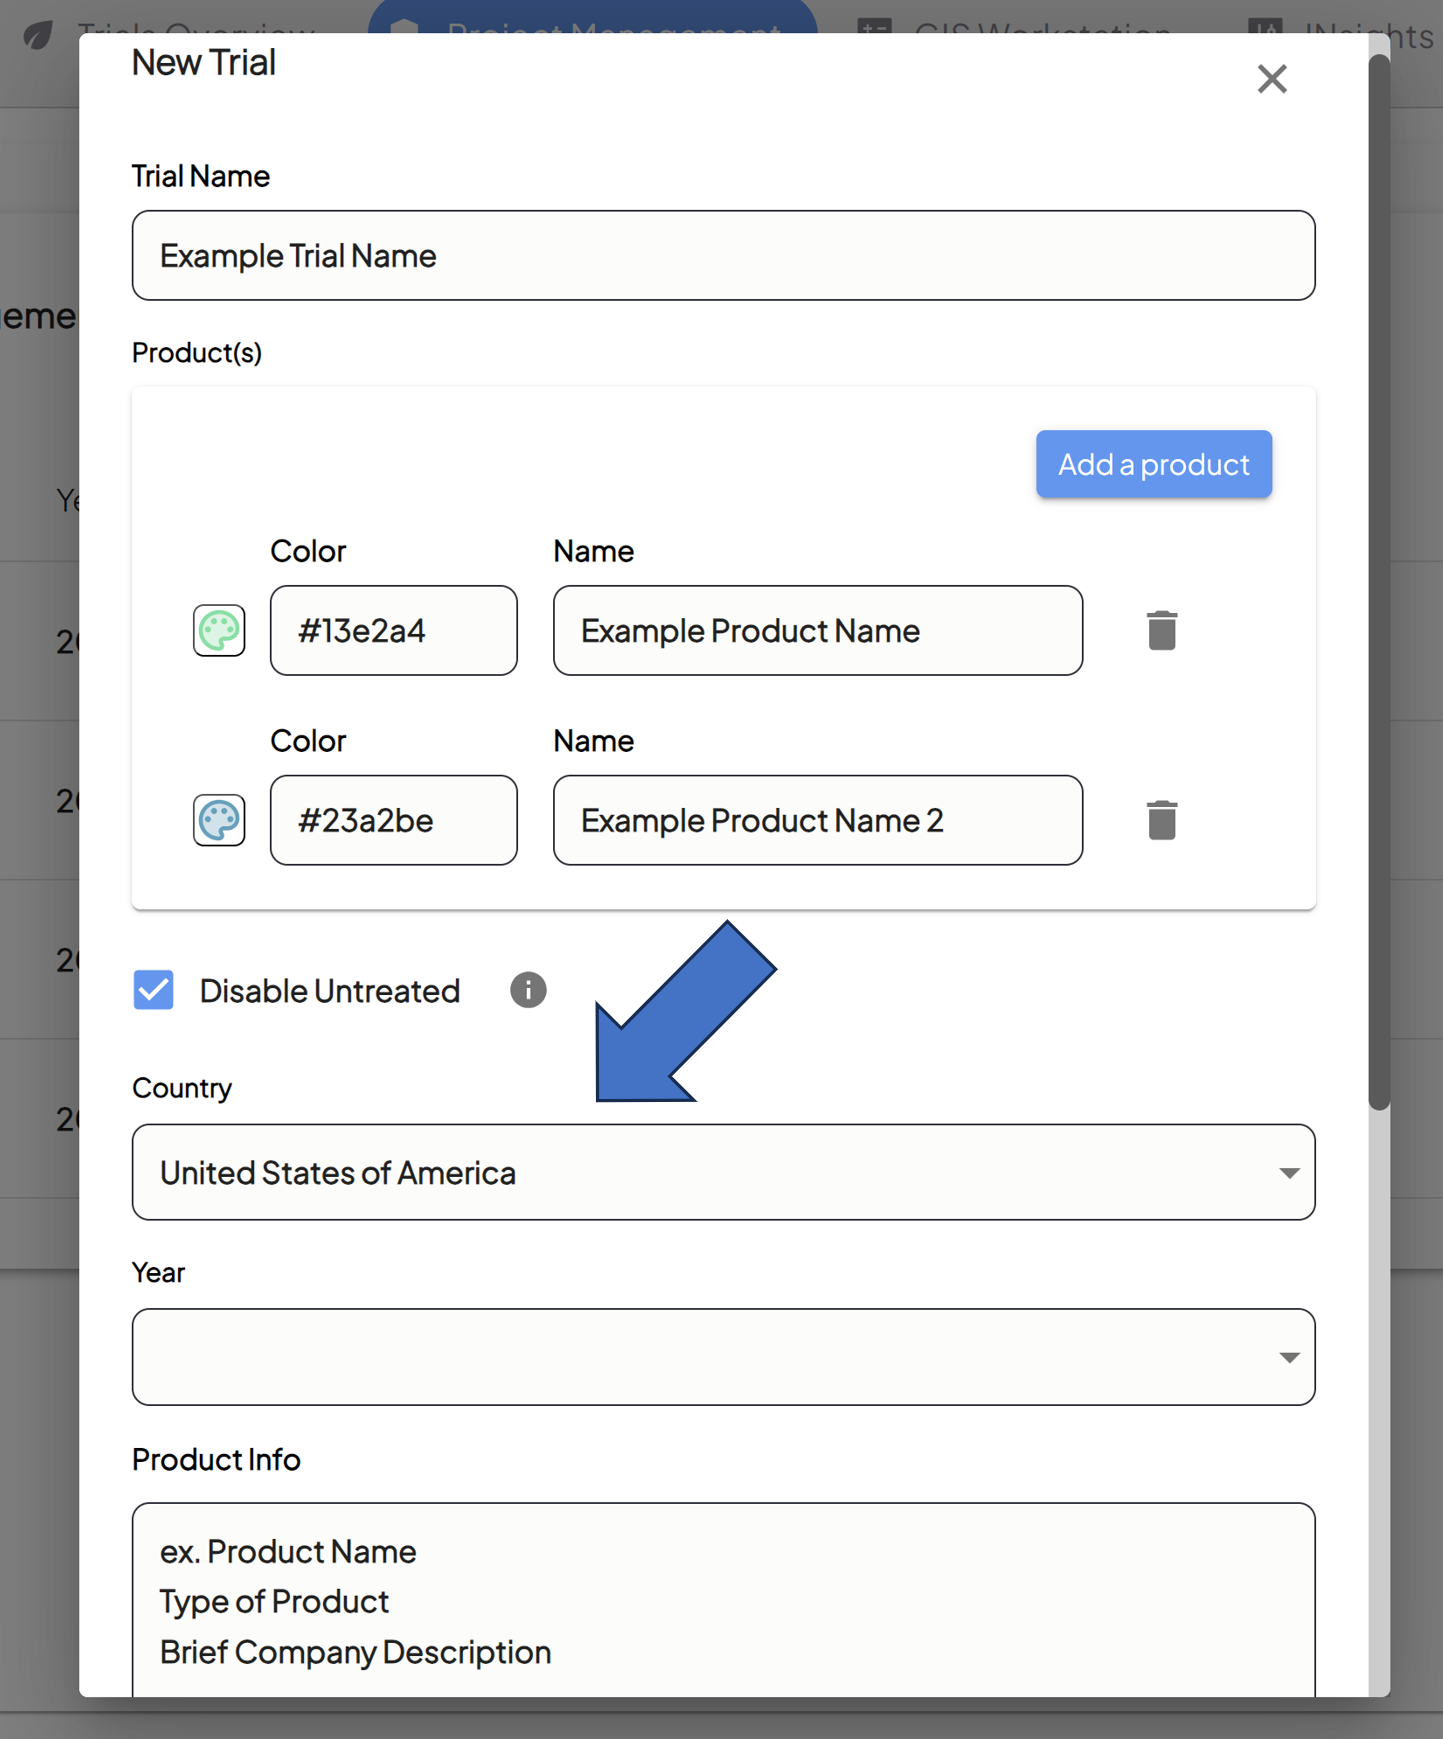
Determine the Country Where the Trial is Held
-
Select the country where the trial will take place from the Country dropdown menu.

-
-
Determine the Year of the Trial
-
Enter the year of the trial in the Year field.

-
- Include Product Information
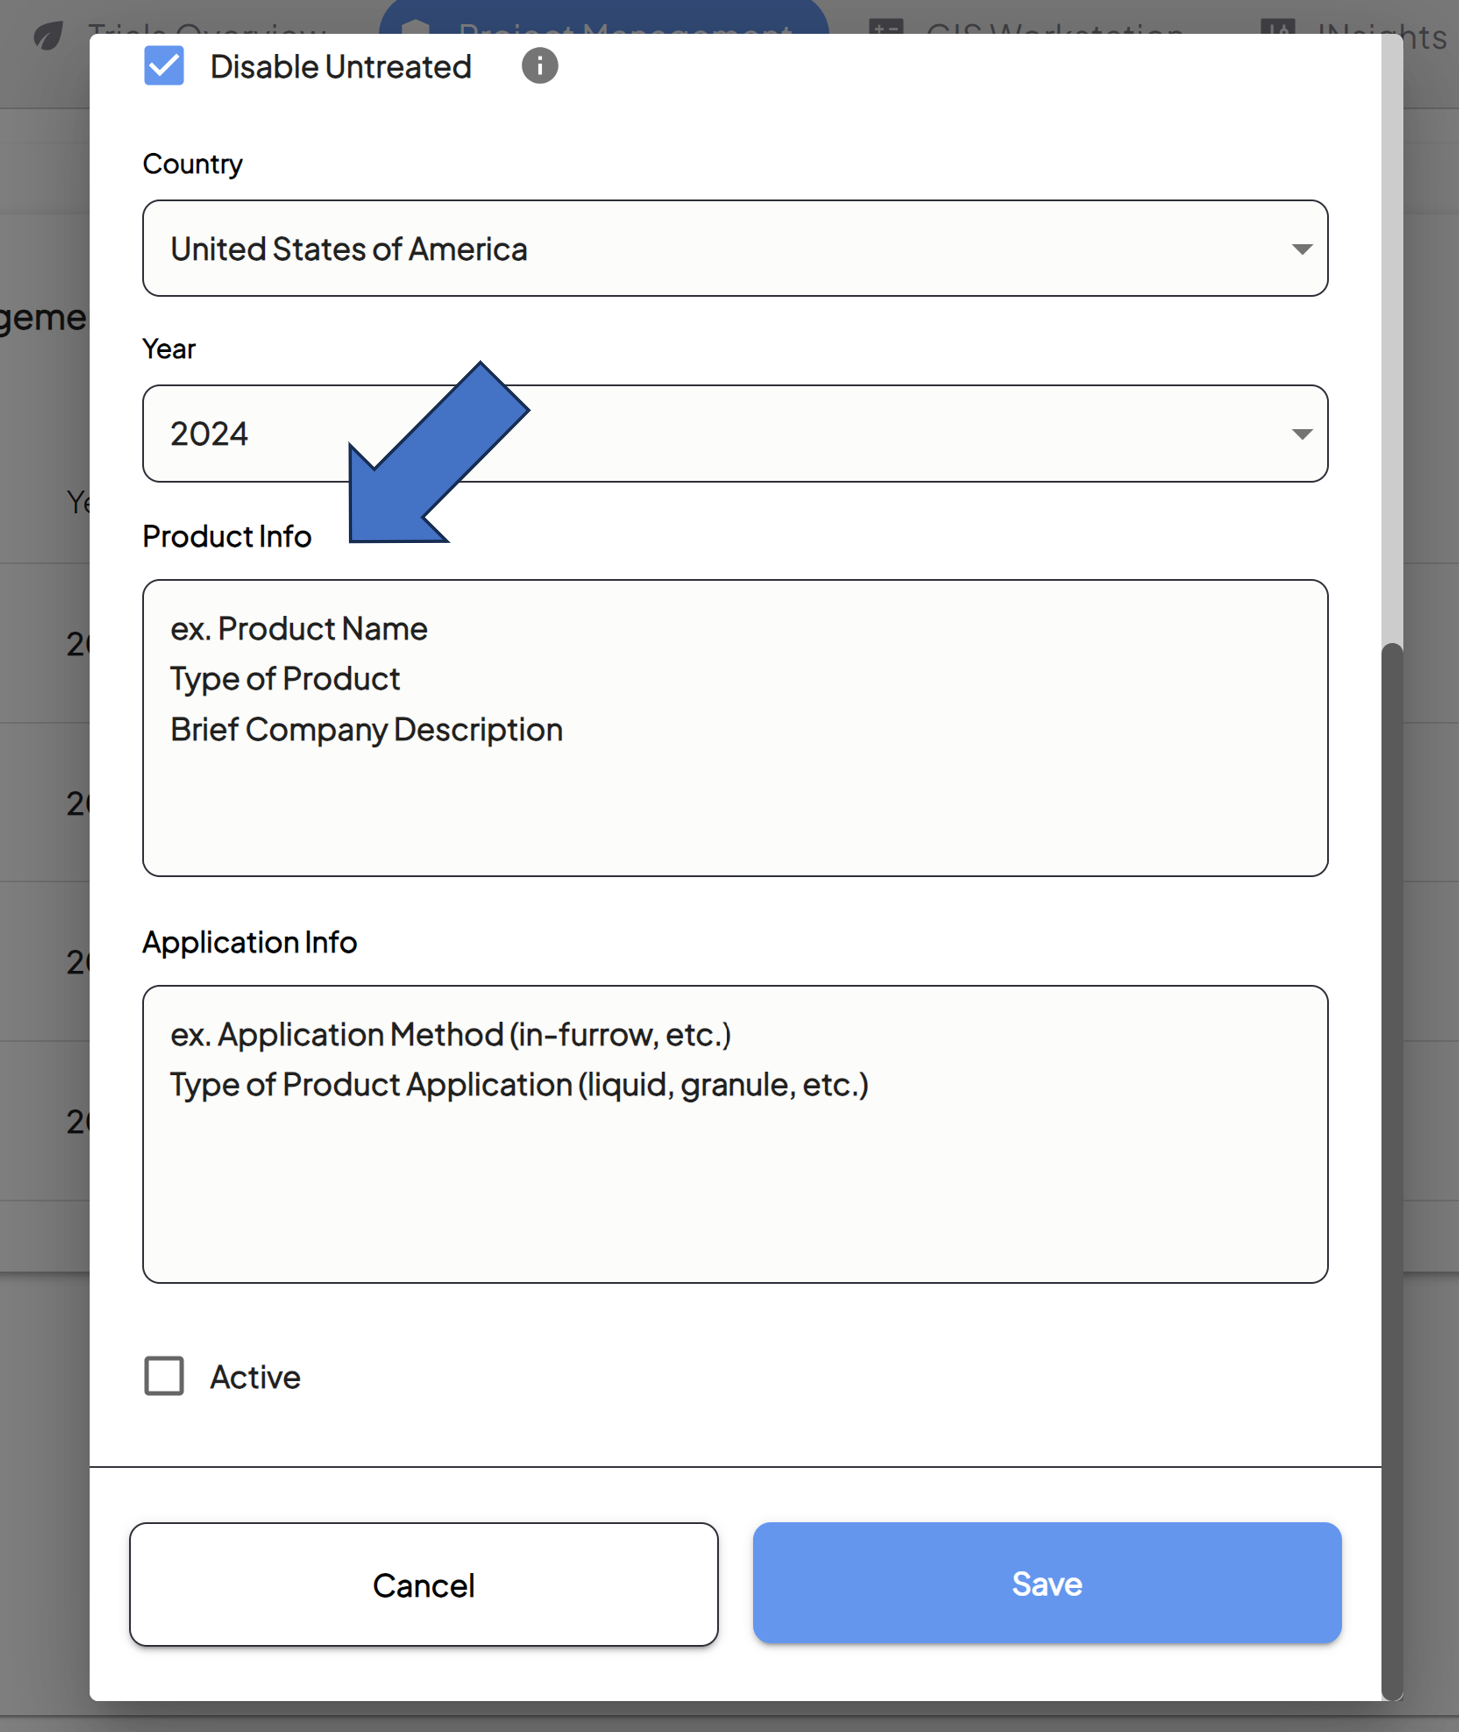
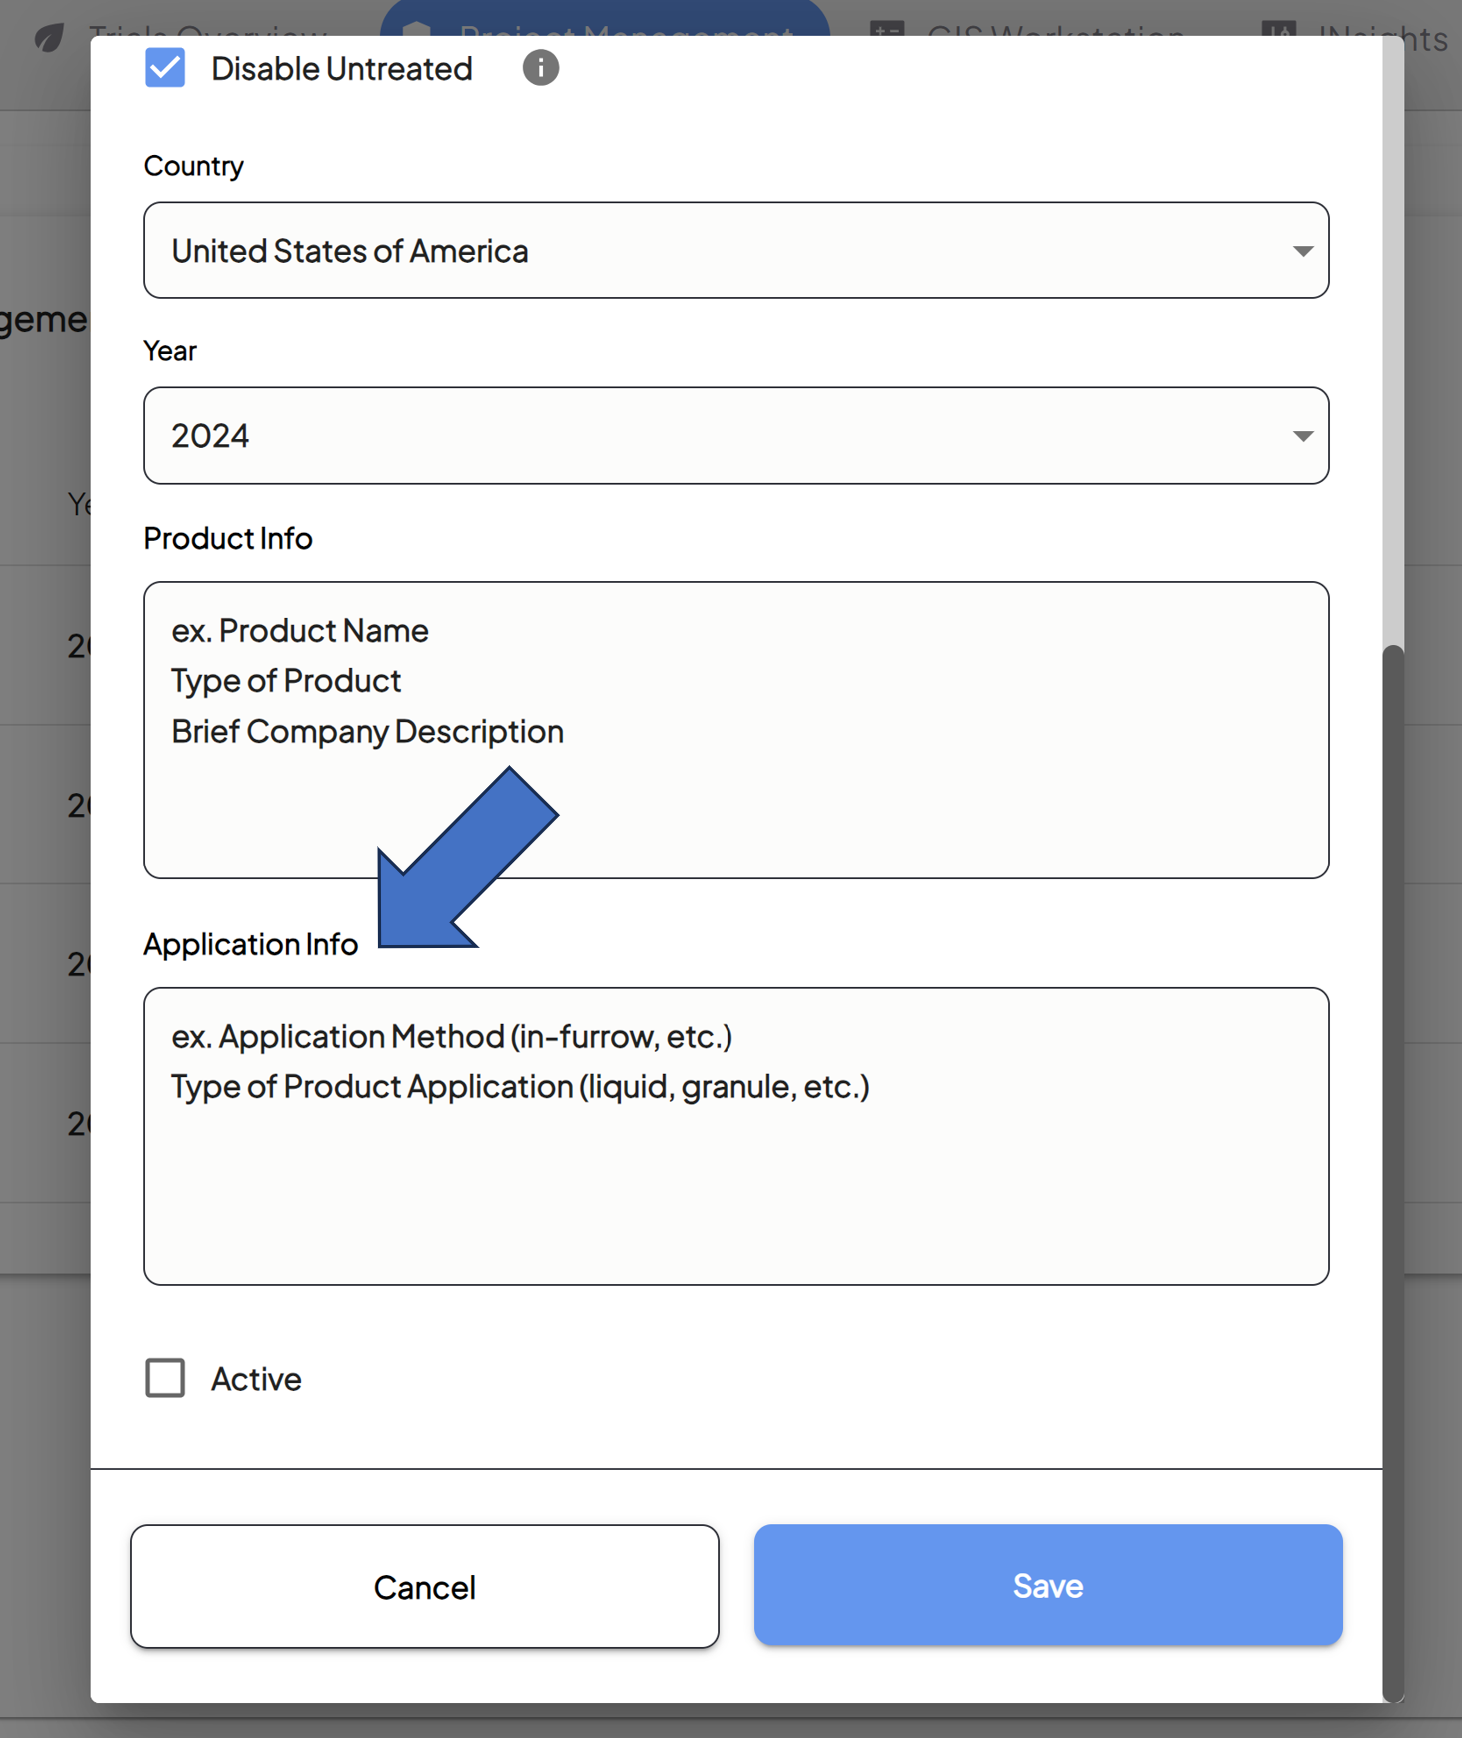
- Fill out the Product Info text box. Include information such as:
- The names of all products being used.
- The type of products they are.
- A description of the products.

- This information will populate the Field Performance Report that summarizes the statistics and performance of the trial on a field level.
- Fill out the Product Info text box. Include information such as:
- Include Application Information
-
Fill out the Application Info text box. Include information such as:
-
Application method of all products being used.
-
Type of products being applied.

-
- This information will populate the Field Performance Report that summarizes the statistics and performance of the trial on a field level.
-
-
Activate Your Trial
-
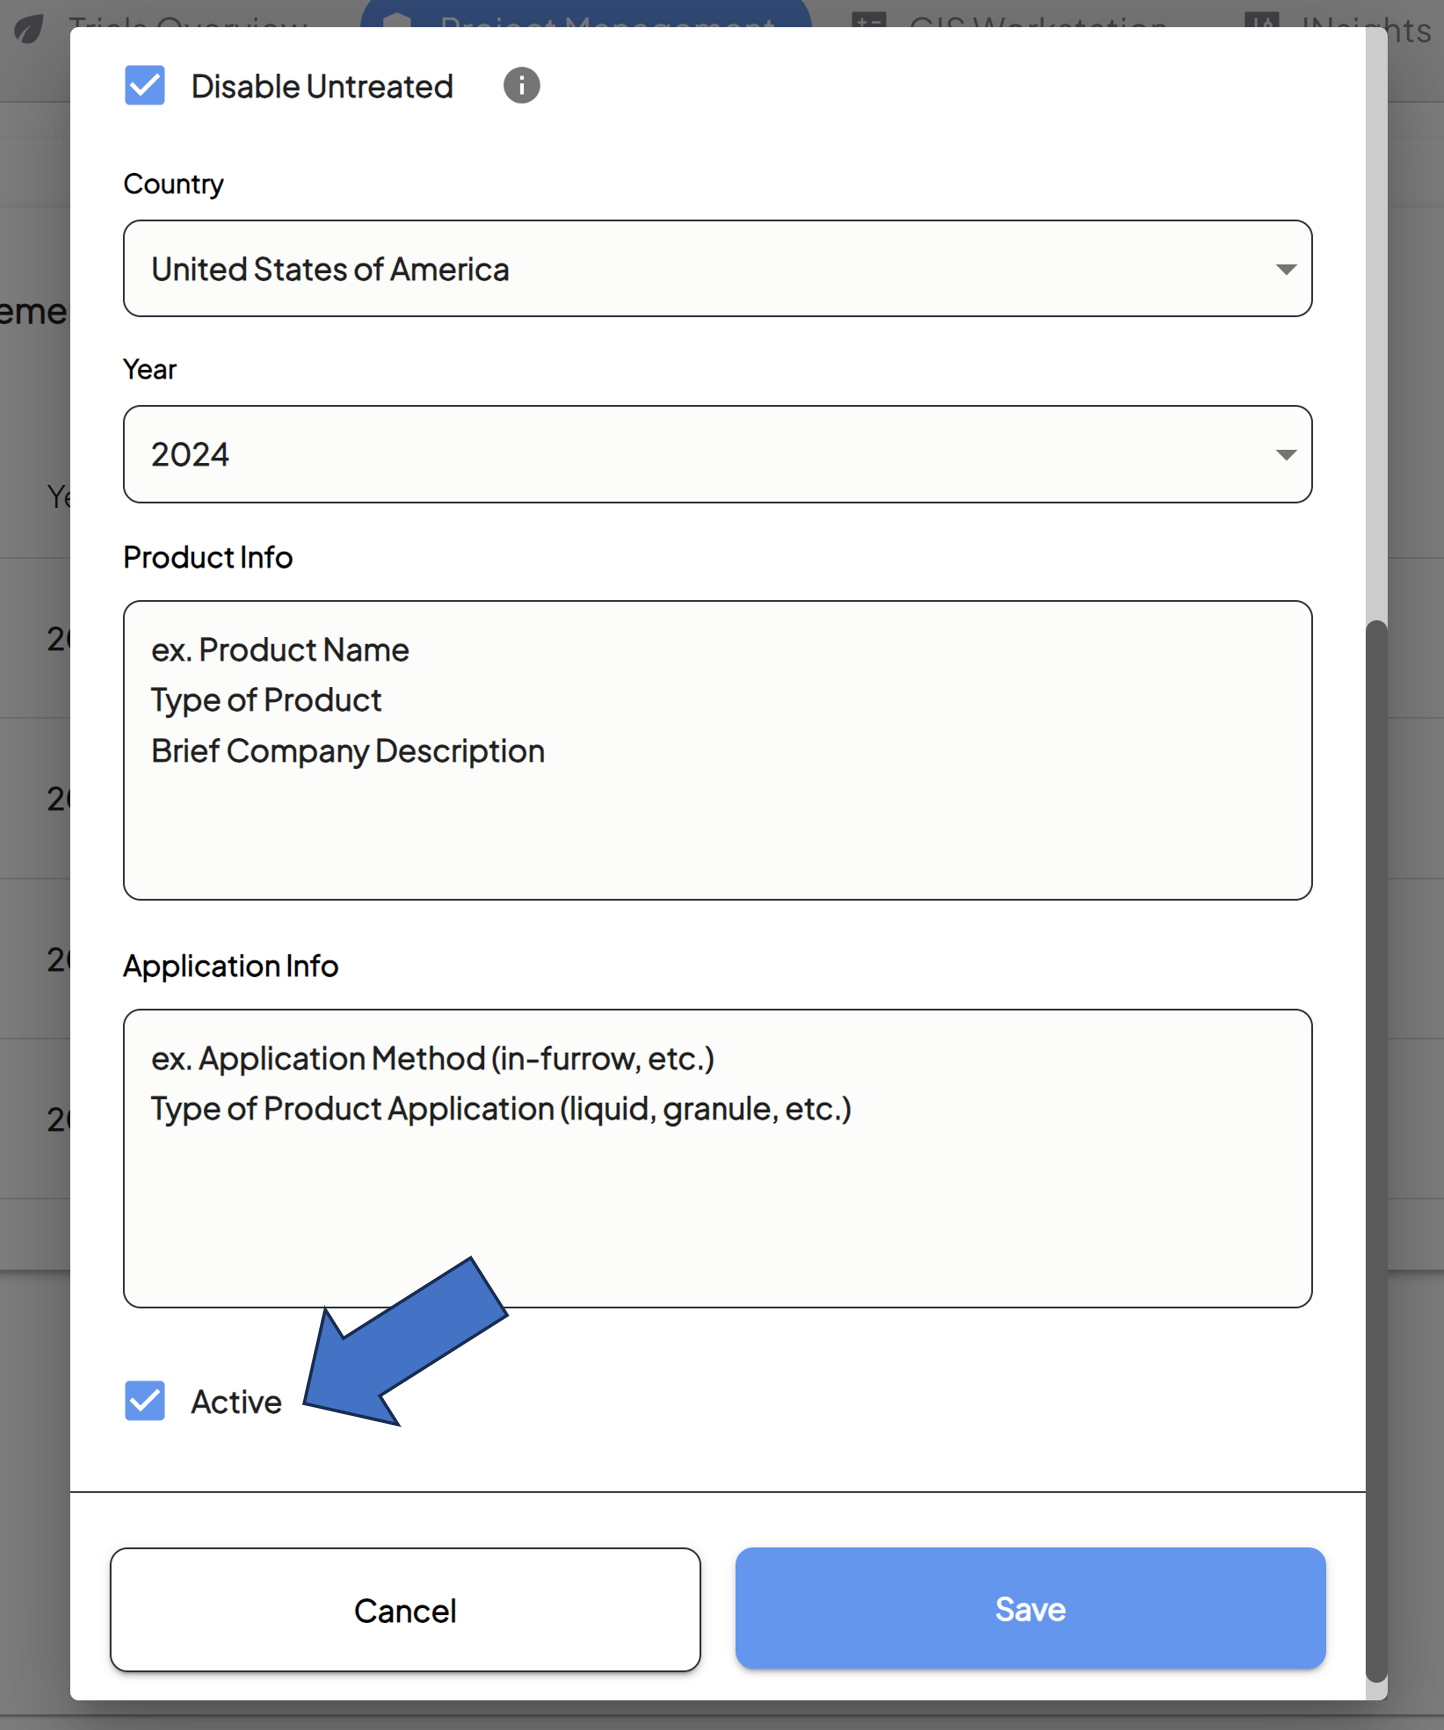
Check the Active box if you’re ready to kick off your project.

- You can leave your trial as inactive as long as necessary, but it will be hidden from the Overview Page/View Fields Page until activated.
-
-
Review and Confirm
-
Review the information you've entered and make any necessary edits.
-
Click the Save button to save your trial/project configuration.
-
You can return and edit the information you've submitted by clicking on the relevant trial/project from the dashboard and selecting the Edit icon.

For additional help, follow along with this video demonstrating how to create a new trial:
-
How To Create a Trial Protocol
Guide to Creating a Trial Protocol
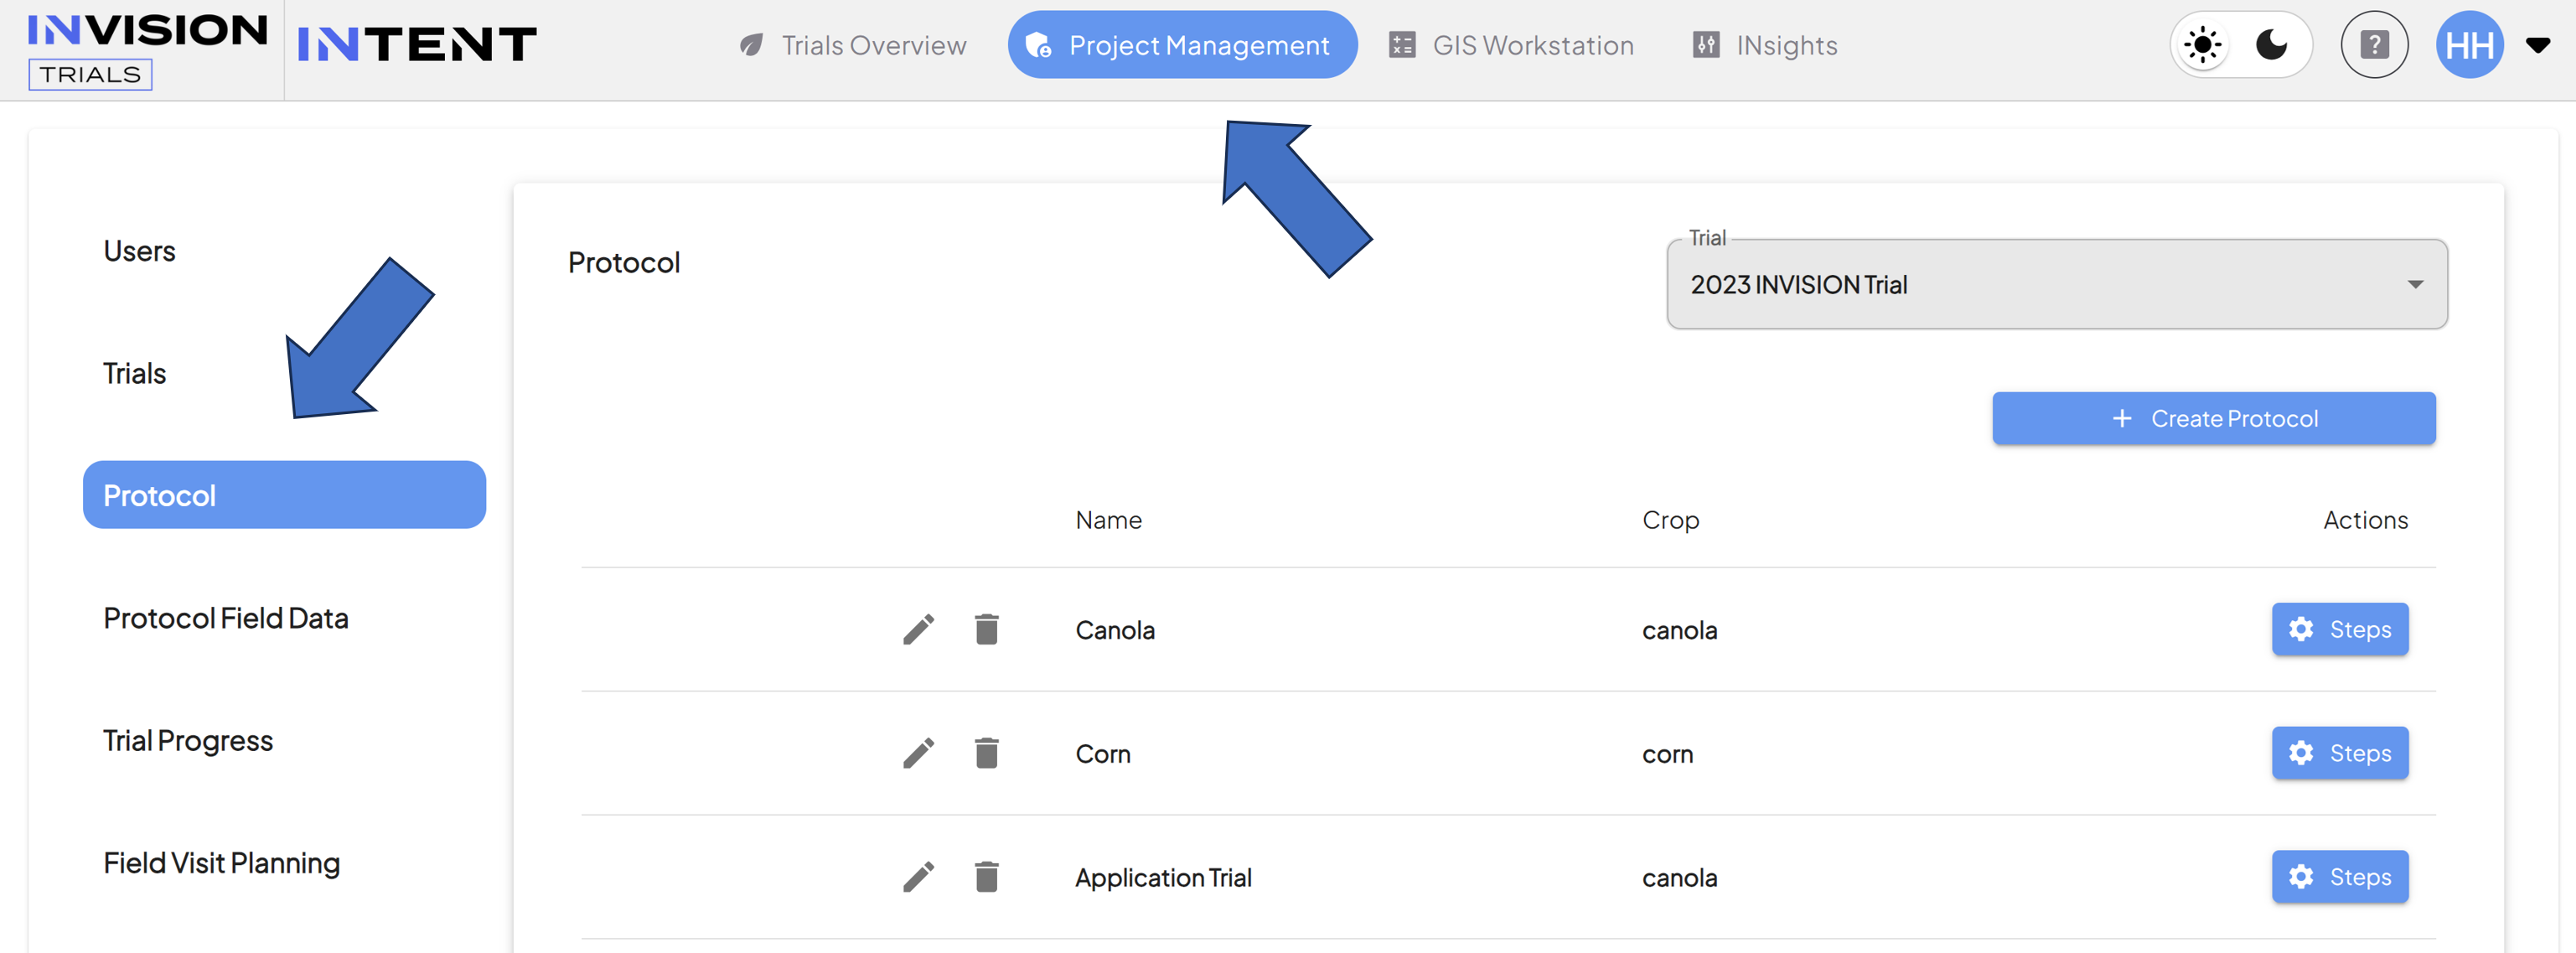
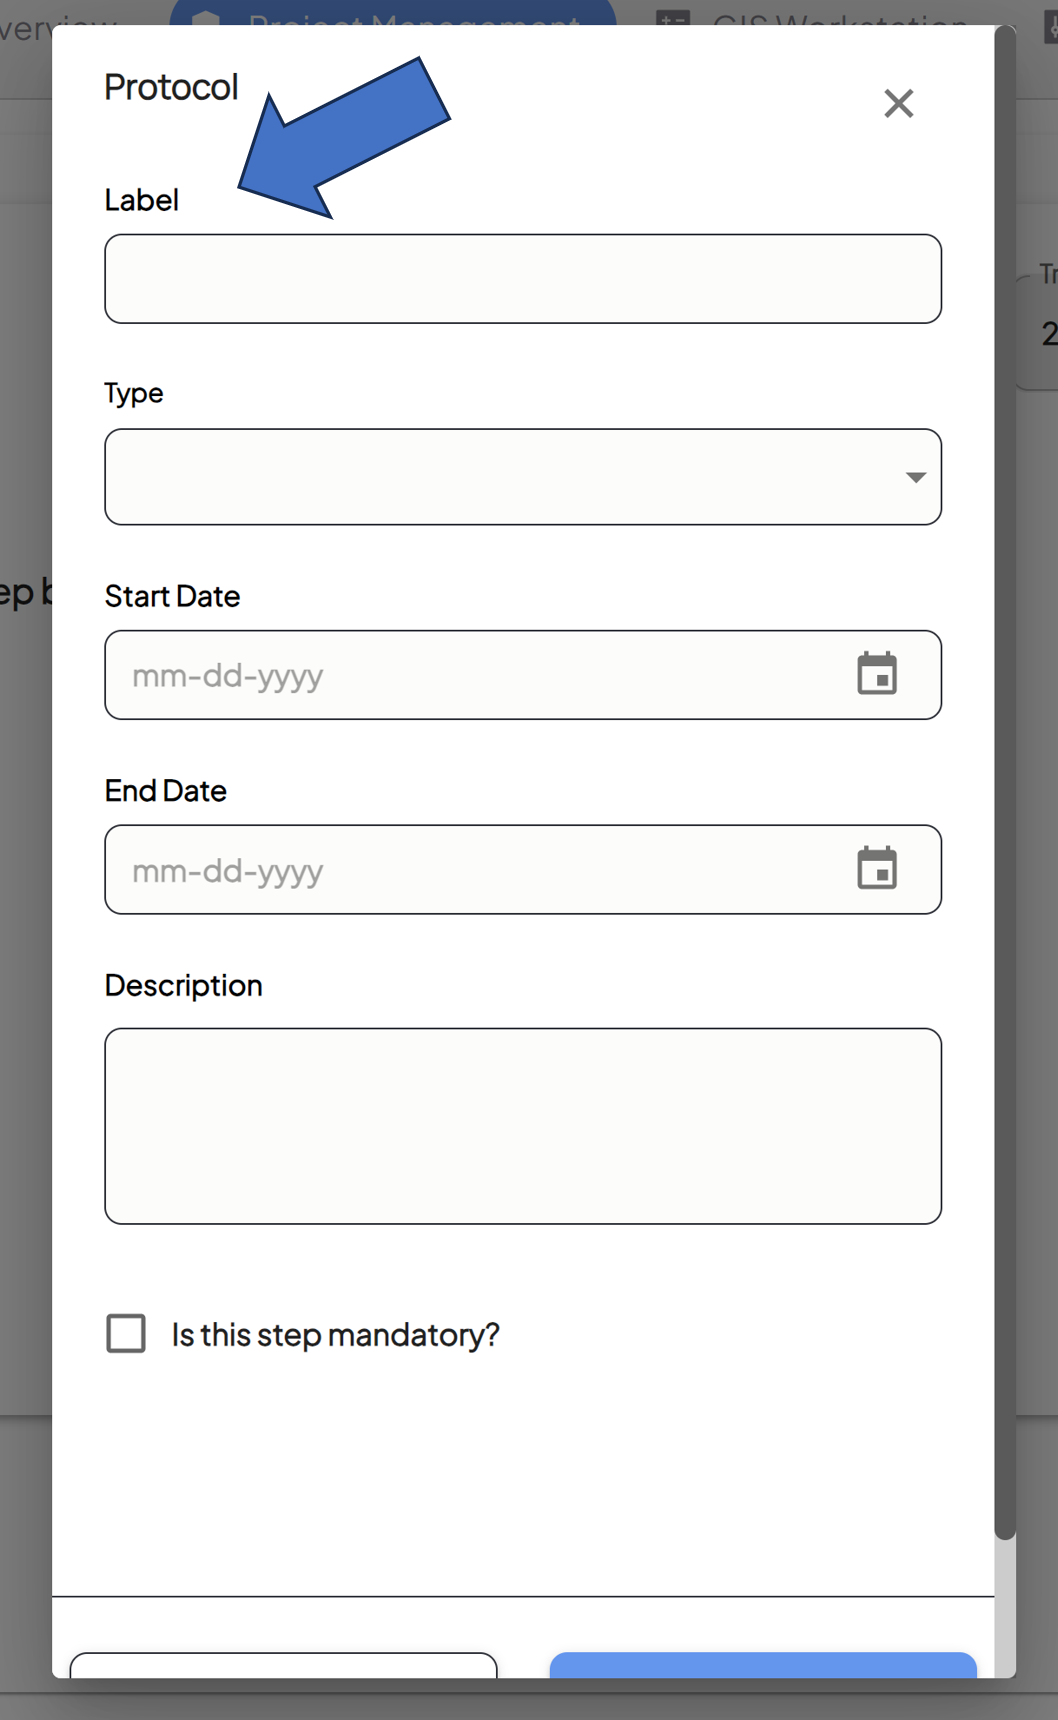
- Navigate to the Protocol section of the Project Management tab
- From the Admin tab, select Protocol from the left panel.

- From the Admin tab, select Protocol from the left panel.
- Select a Trial
- Choose the correct Trial from the drop-down box.

- Choose the correct Trial from the drop-down box.
- Get Started on Your Protocol
- Click the Create Protocol button.

- Click the Create Protocol button.
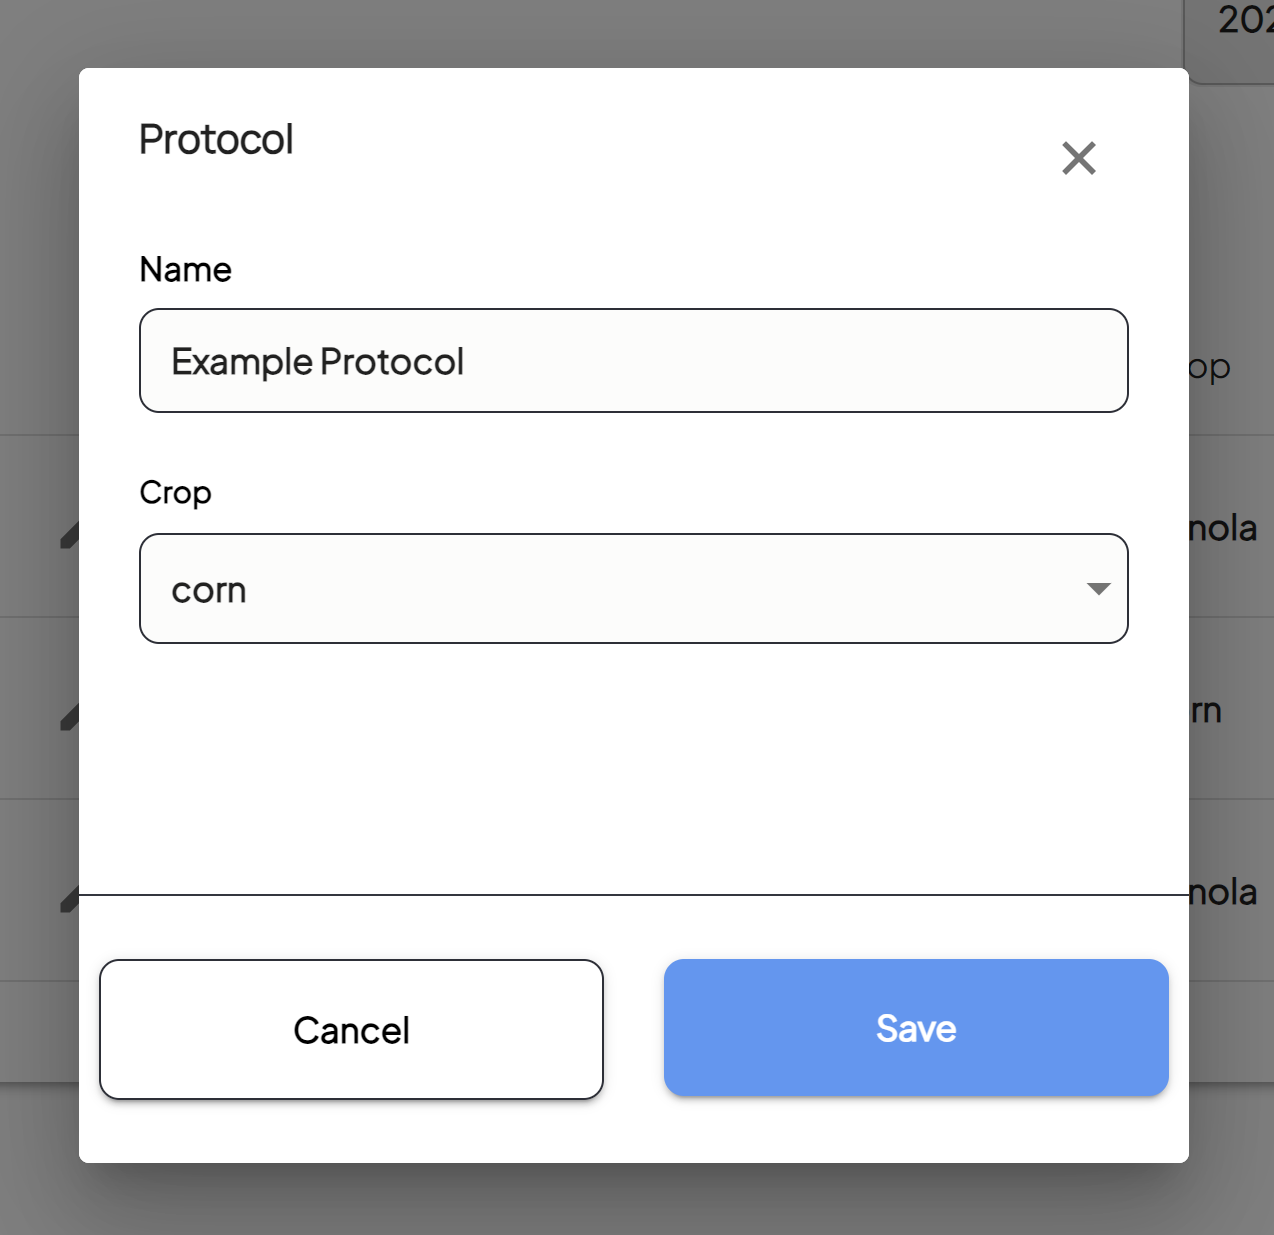
- Select and Name and Crop
- Name your Protocol, select your Crop, and click Save

- Before building out your Protocol, determine the objectives for your trial.
- Think about what kind of data points you need to collect and how you want to collect them.
- You may also have multiple protocols for a single trial.
- Name your Protocol, select your Crop, and click Save
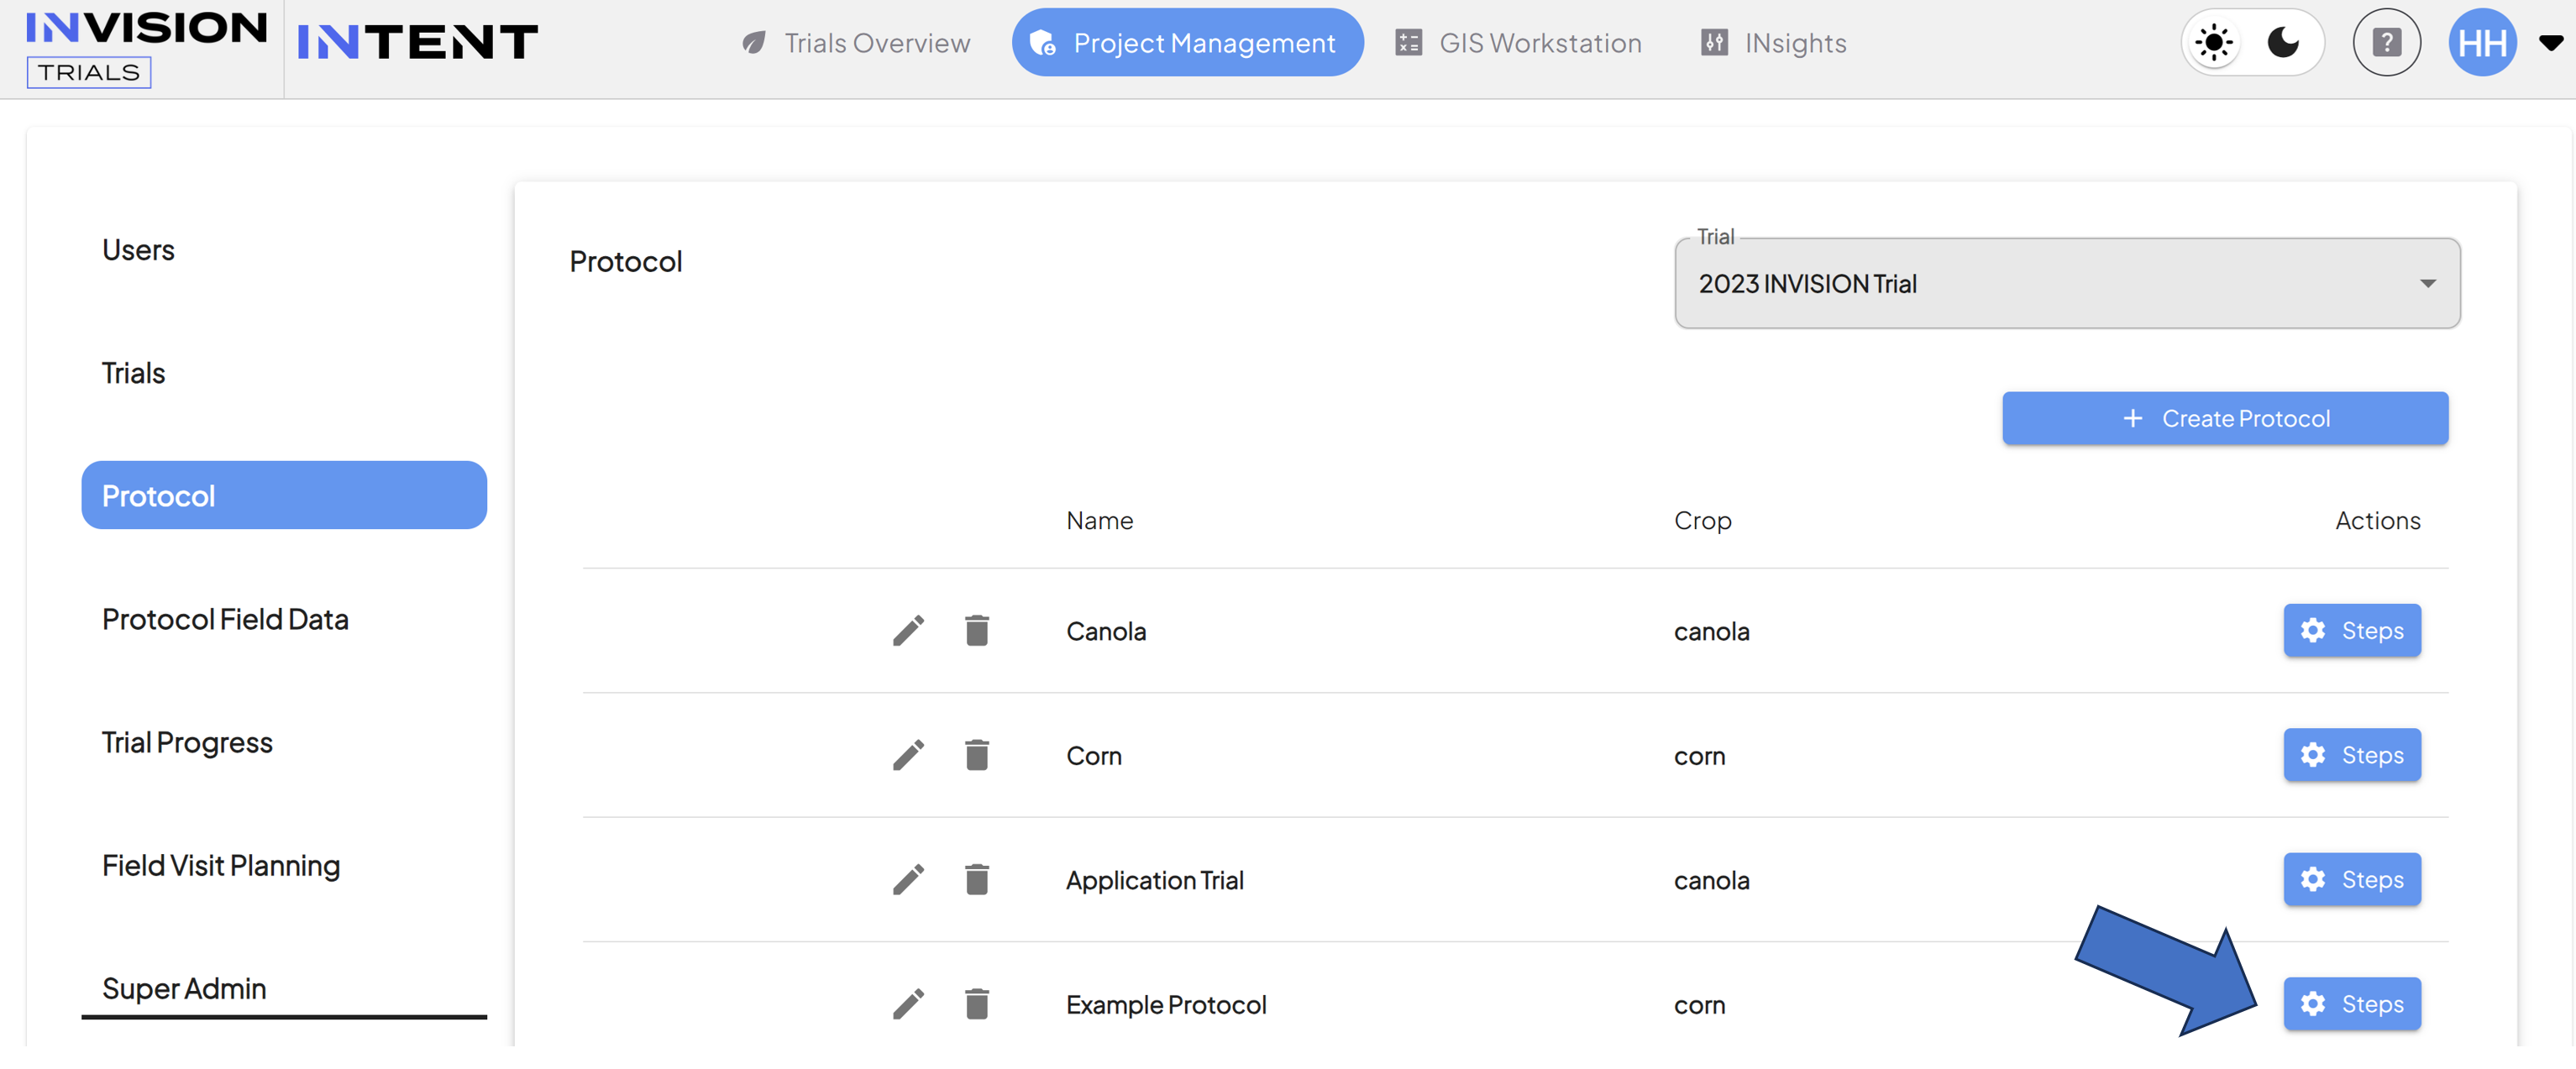
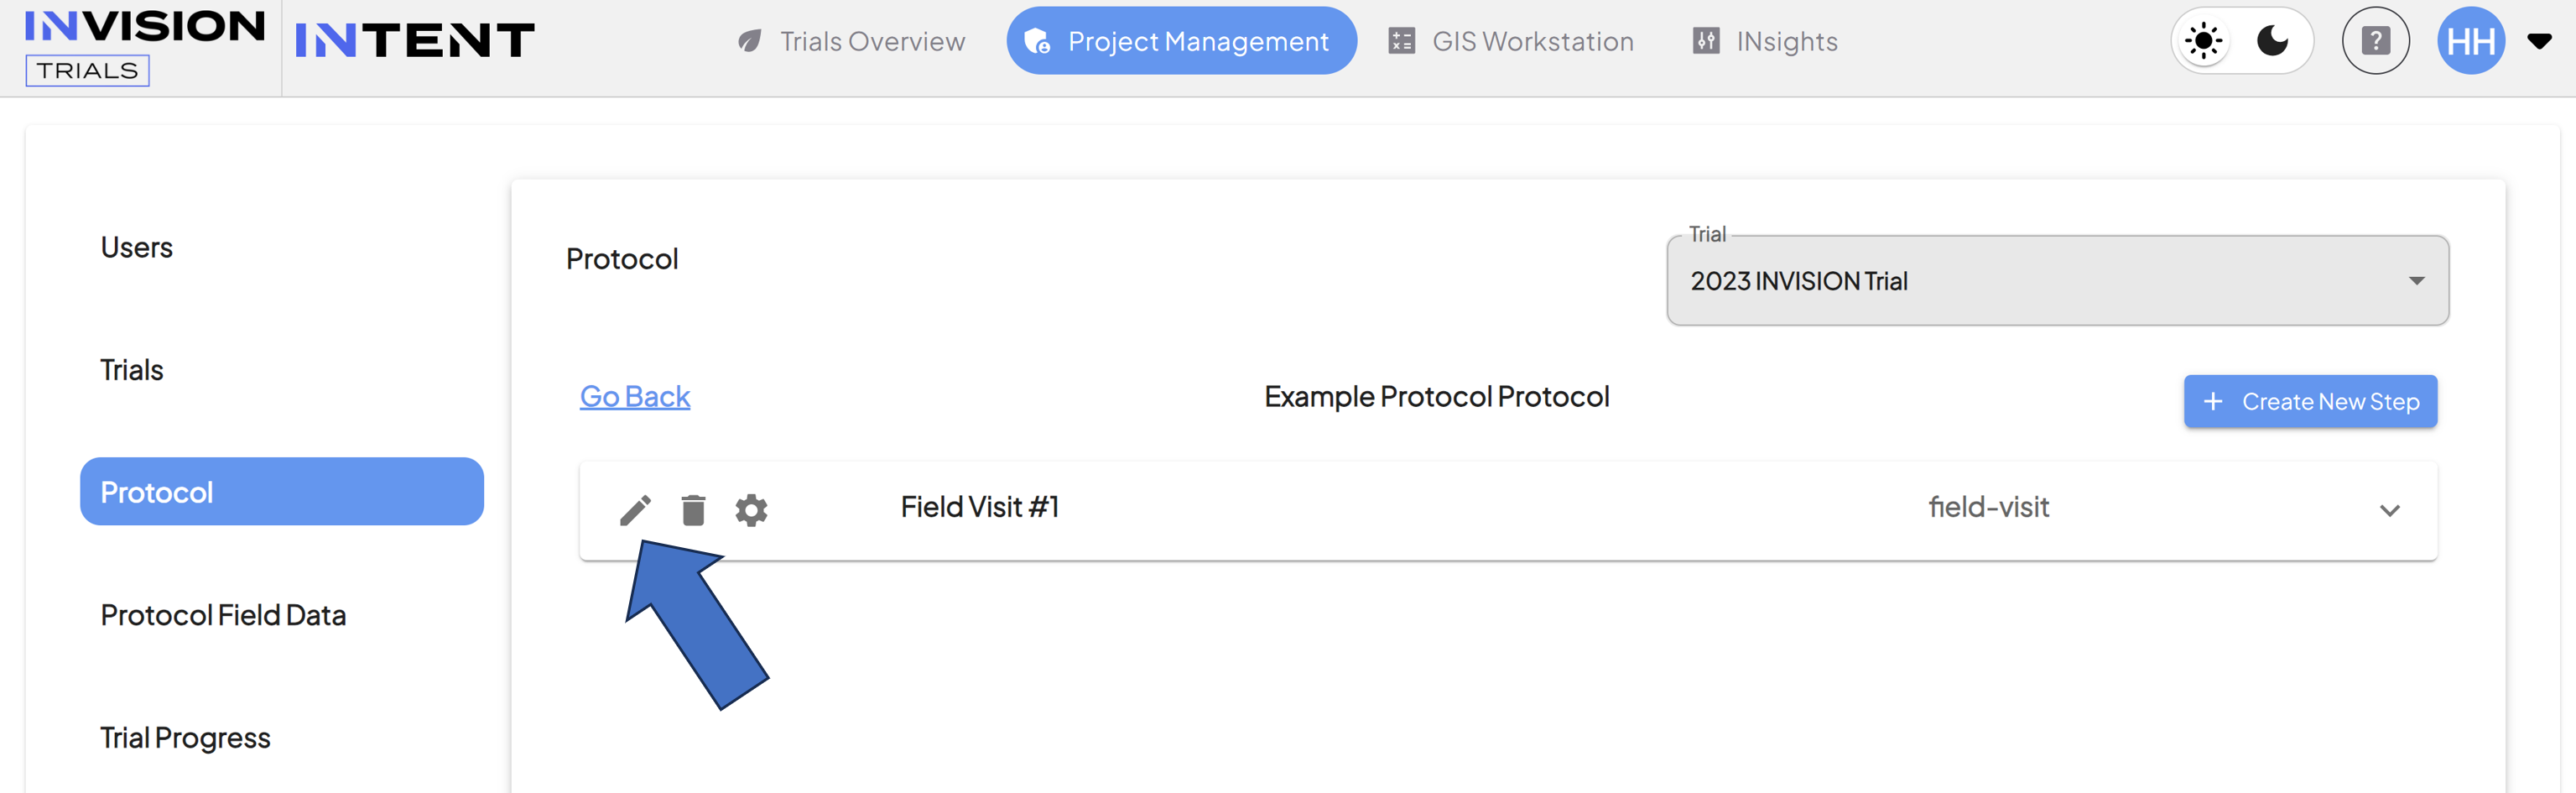
- Create the Steps For Your Protocol
- Once you’re ready to get started, click on the Steps button to the right of the trial

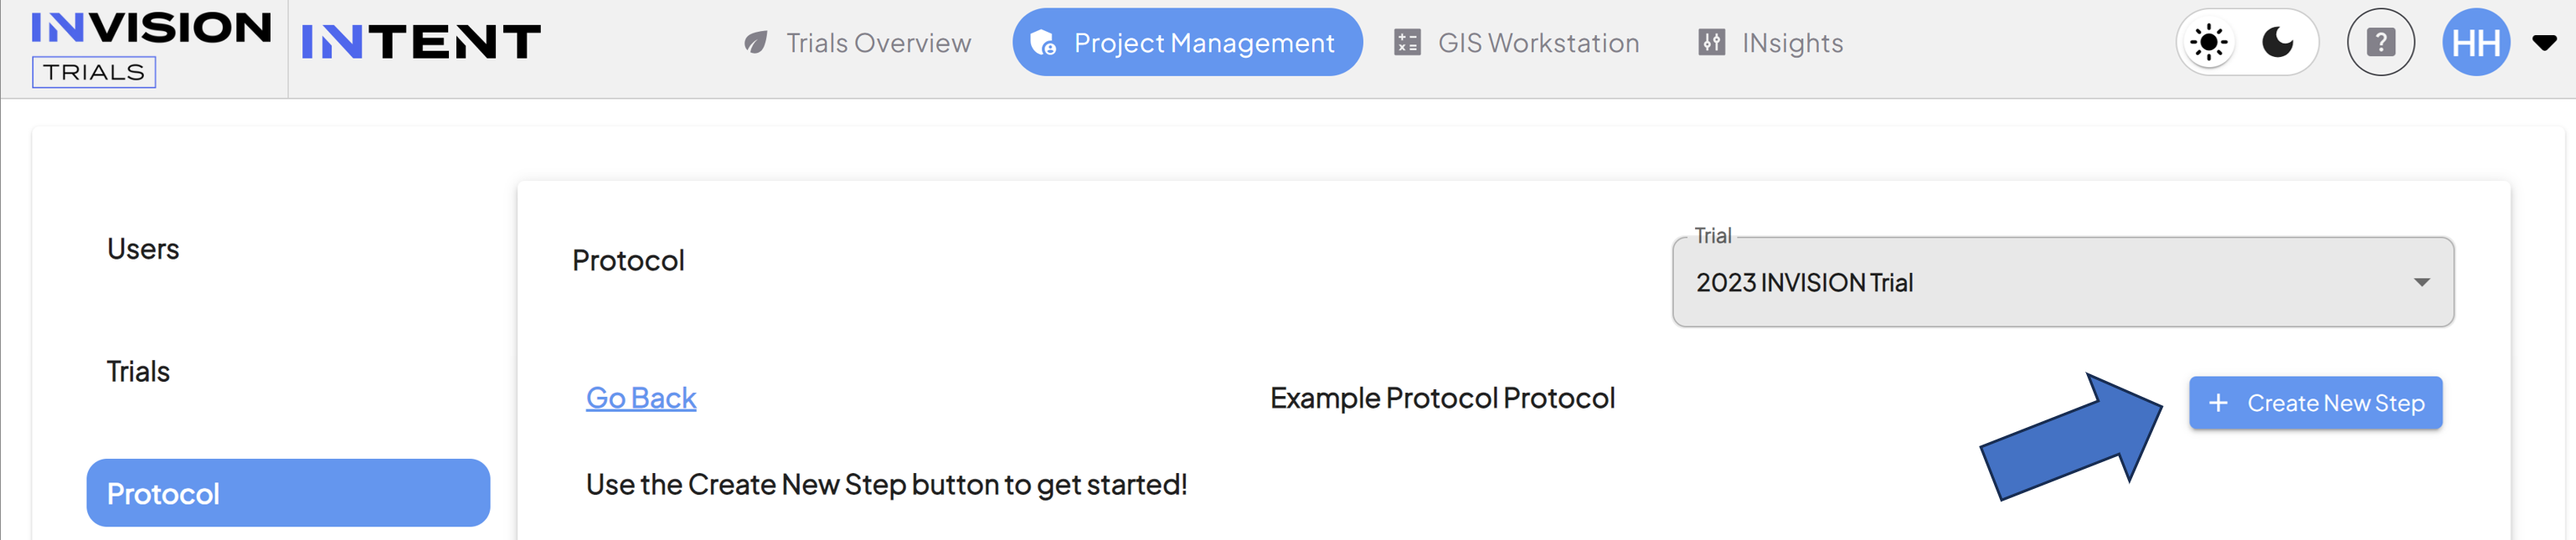
- Click Create New Step to add your first step to your protocol.

- A popup will appear where you can fill out all of the details for your protocol step.
- Once you’re ready to get started, click on the Steps button to the right of the trial
- Name Your Protocol Step
- Fill out the Label field to name your protocol step.

- This label is what identifies the protocol step in View Fields.
- Fill out the Label field to name your protocol step.
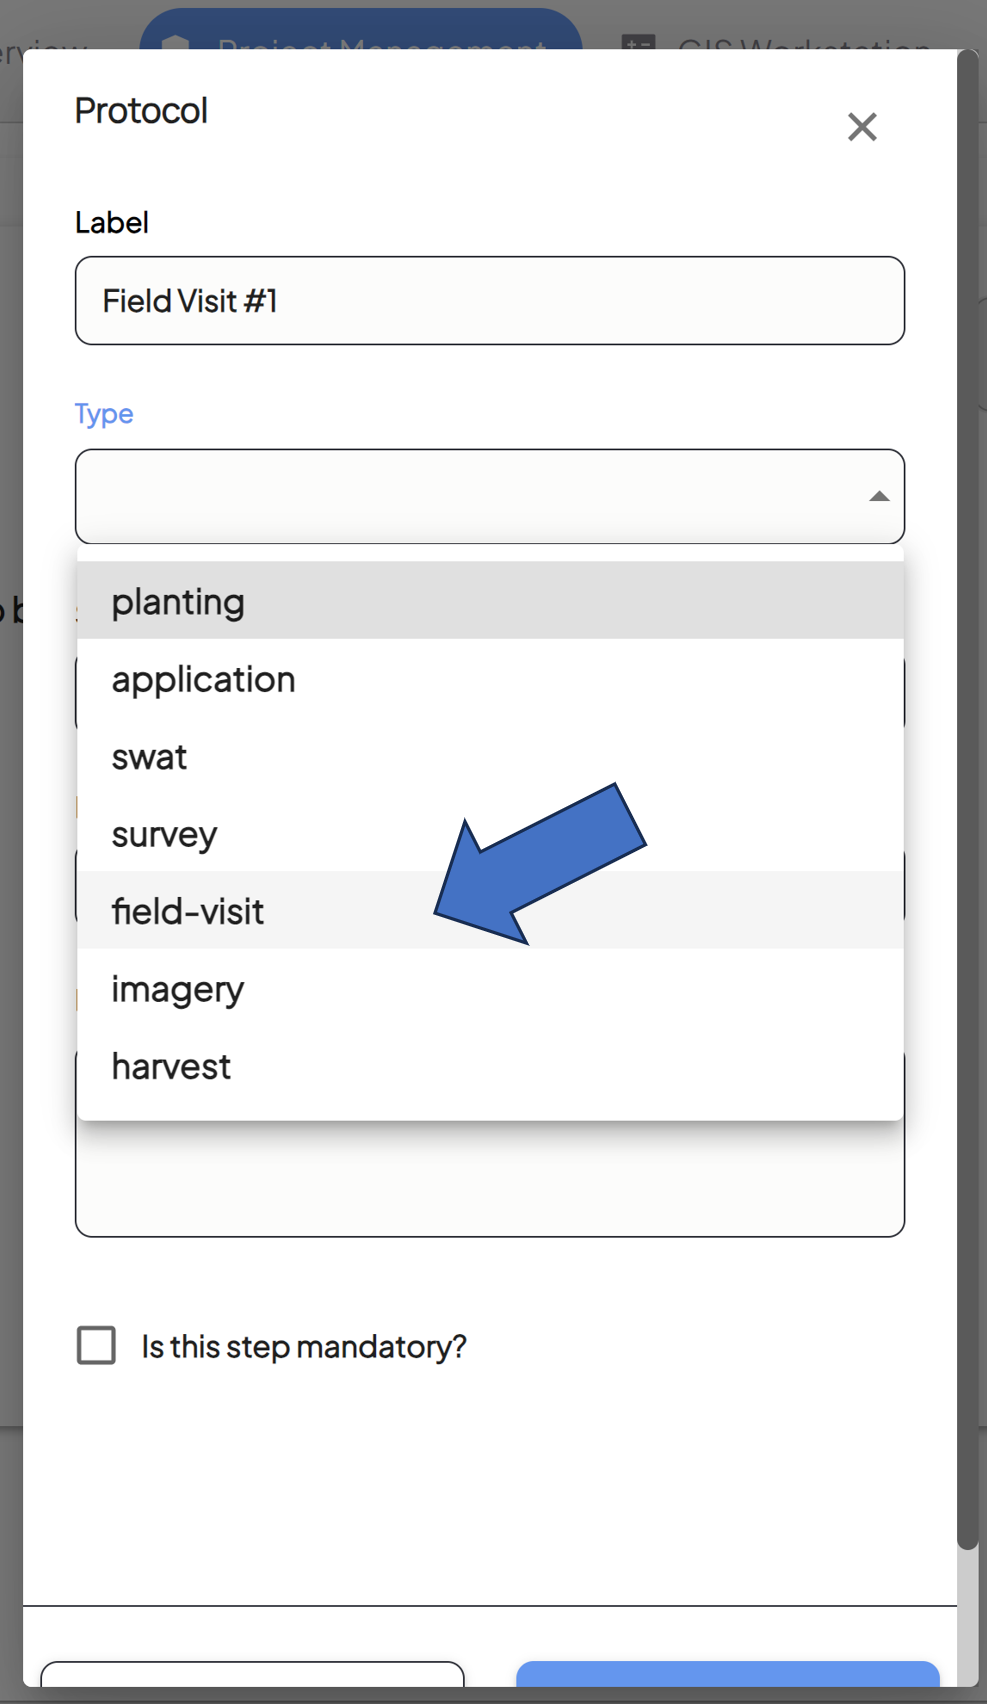
- Determine the Type of Step
- Choose the Type from one of the 6 different pre-built step types:
- Plating
- Application
- Survey
- Field-Visit
- Imagery
- SWAT (Soil Water and Topographical maps)

- Choose the Type from one of the 6 different pre-built step types:
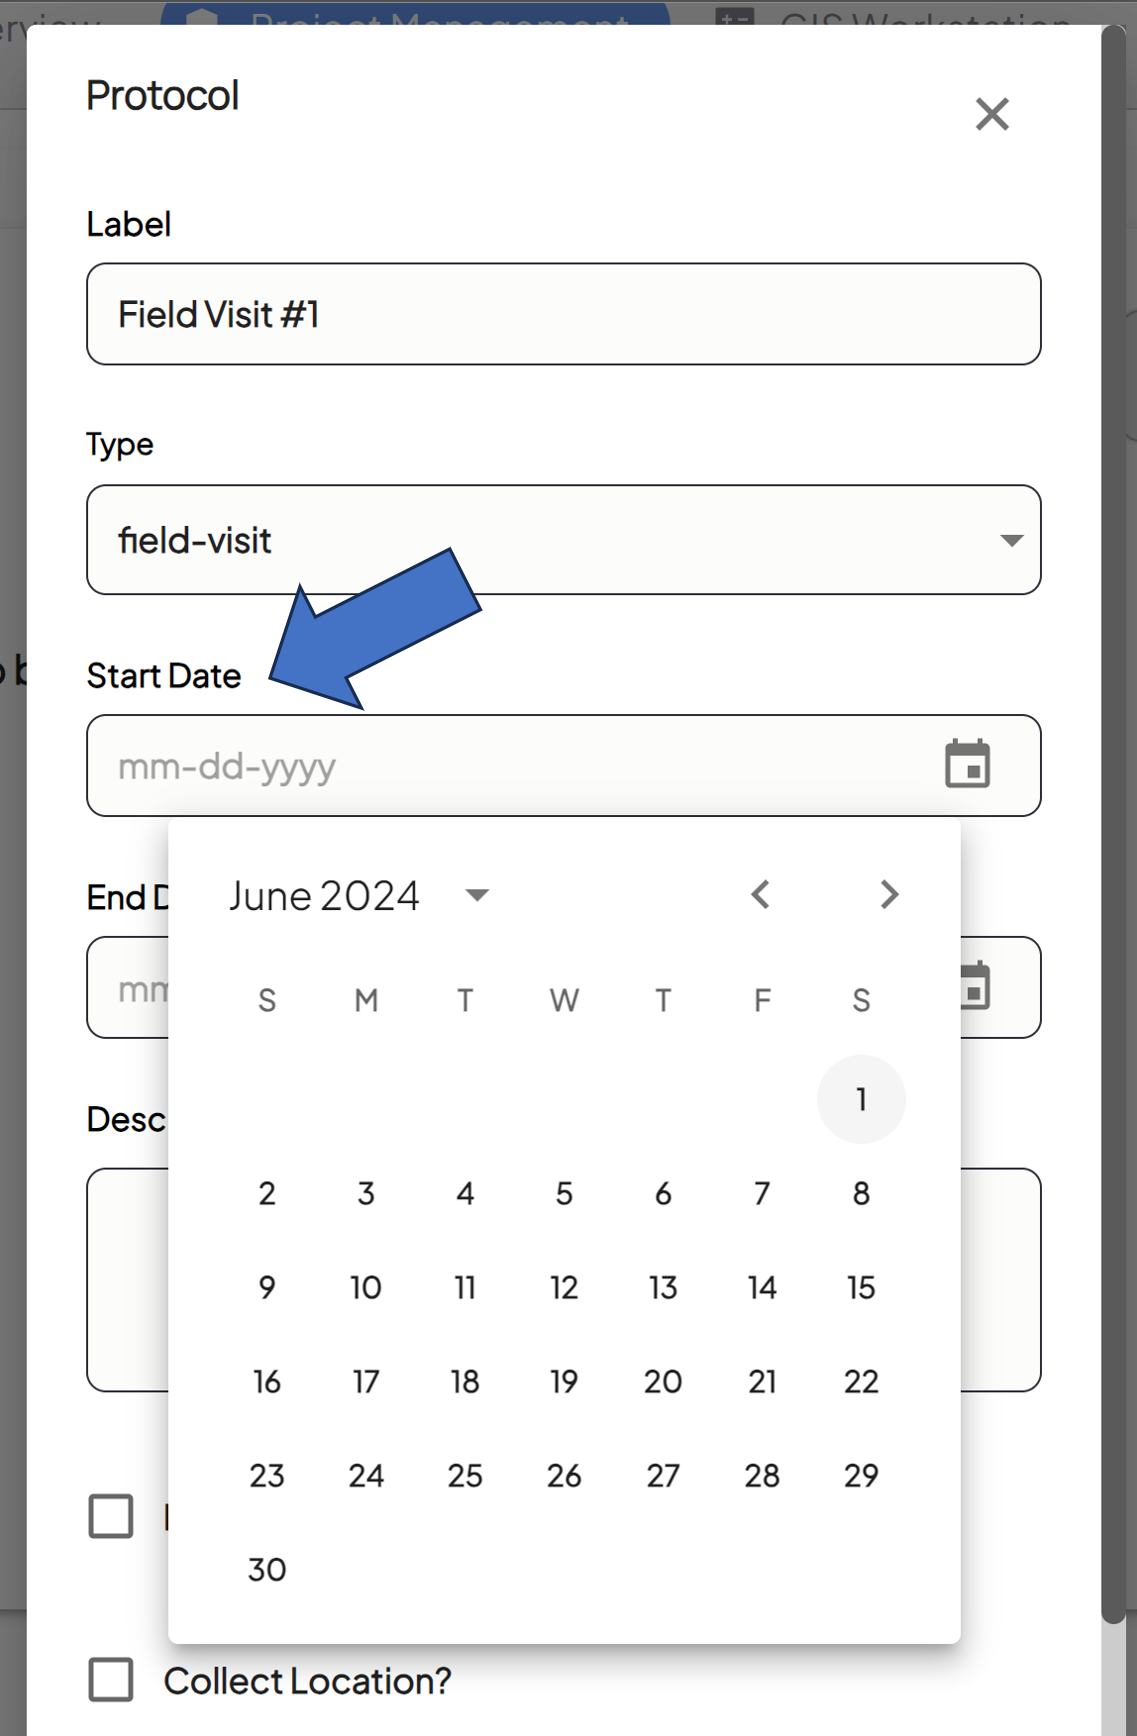
- Set the Start Date
- Select the date on which this step will become available to your users.

- Select the date on which this step will become available to your users.
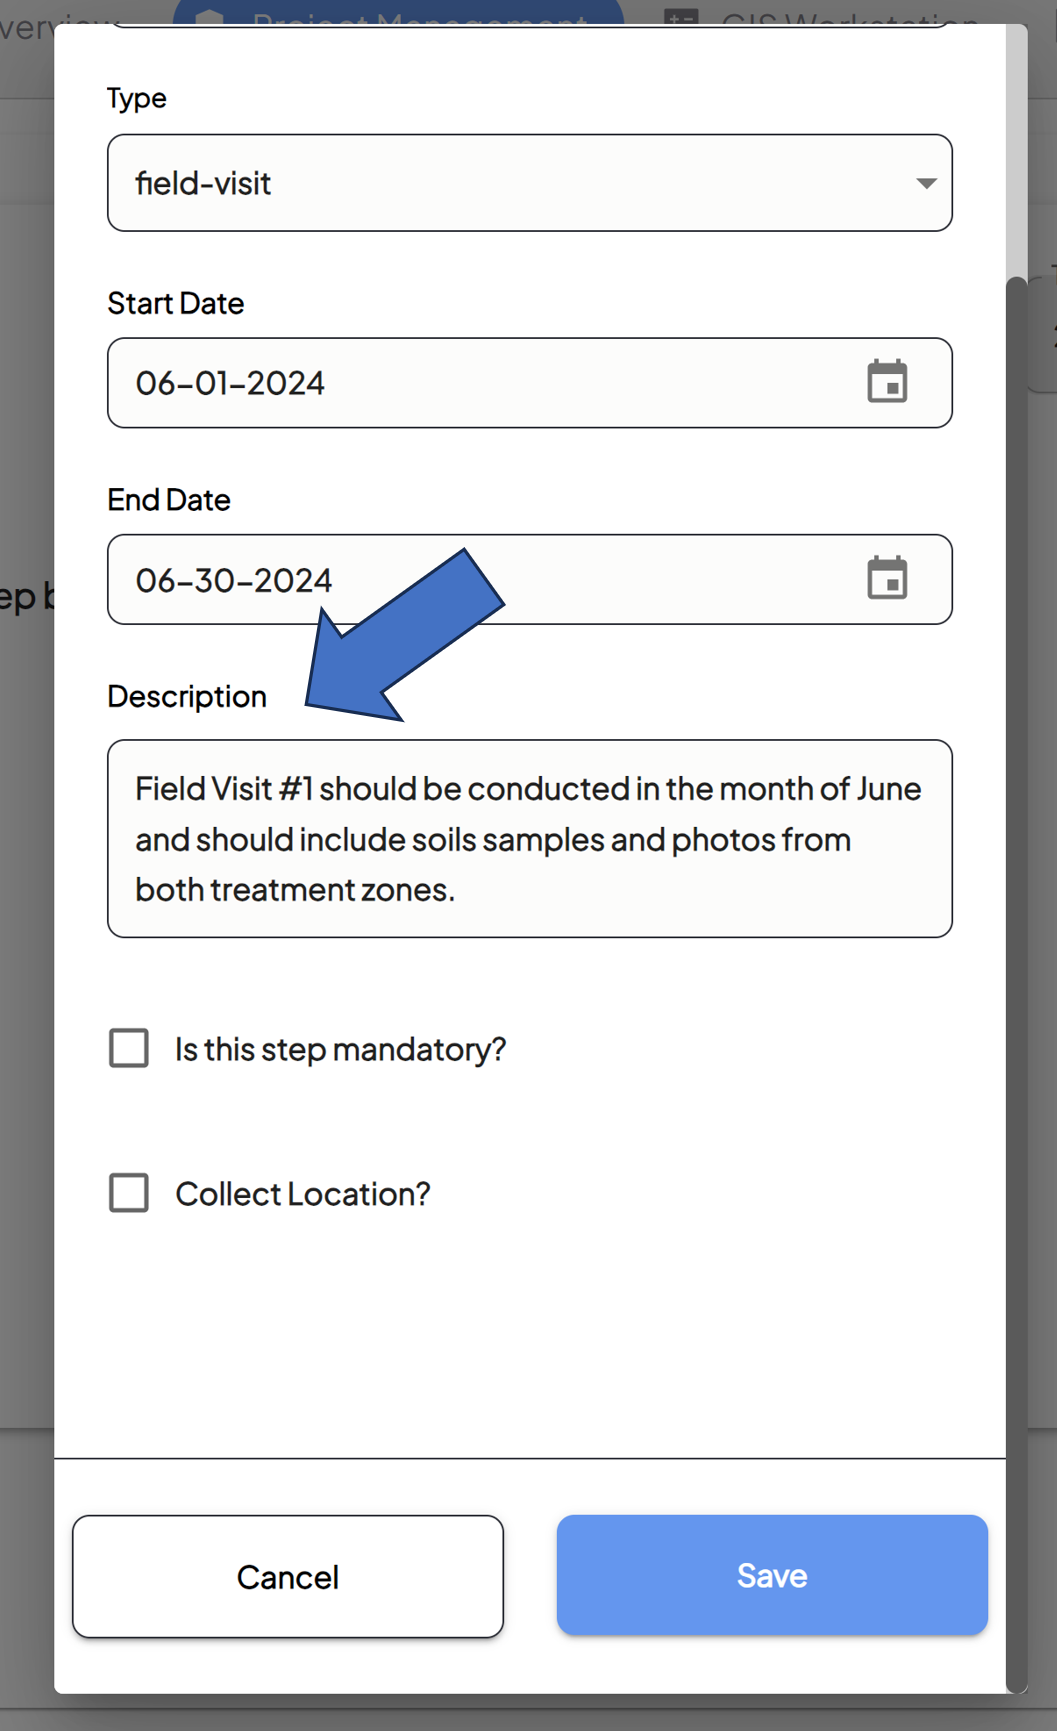
- Set the End Date
- Select the date on which this step becomes unavailable to your users.
- Fill Out the Description
- Provide a description for this protocol step.

- The description can be found later in View Fields.
- Provide a description for this protocol step.
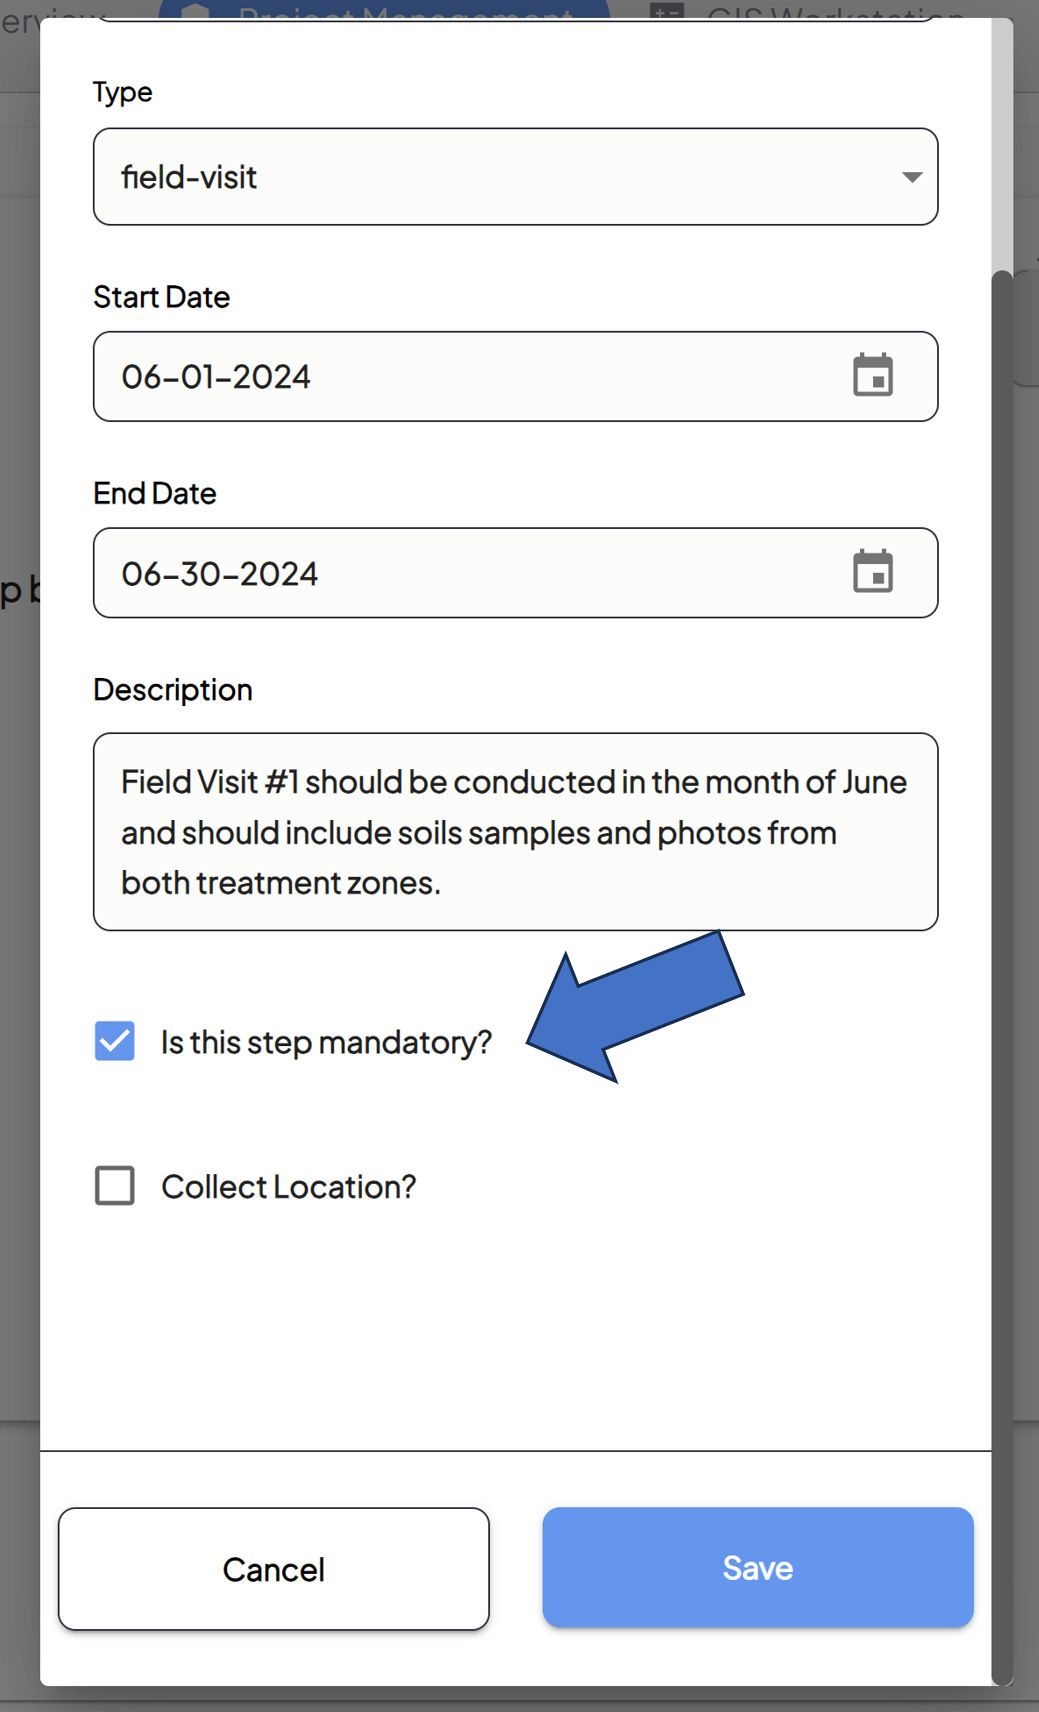
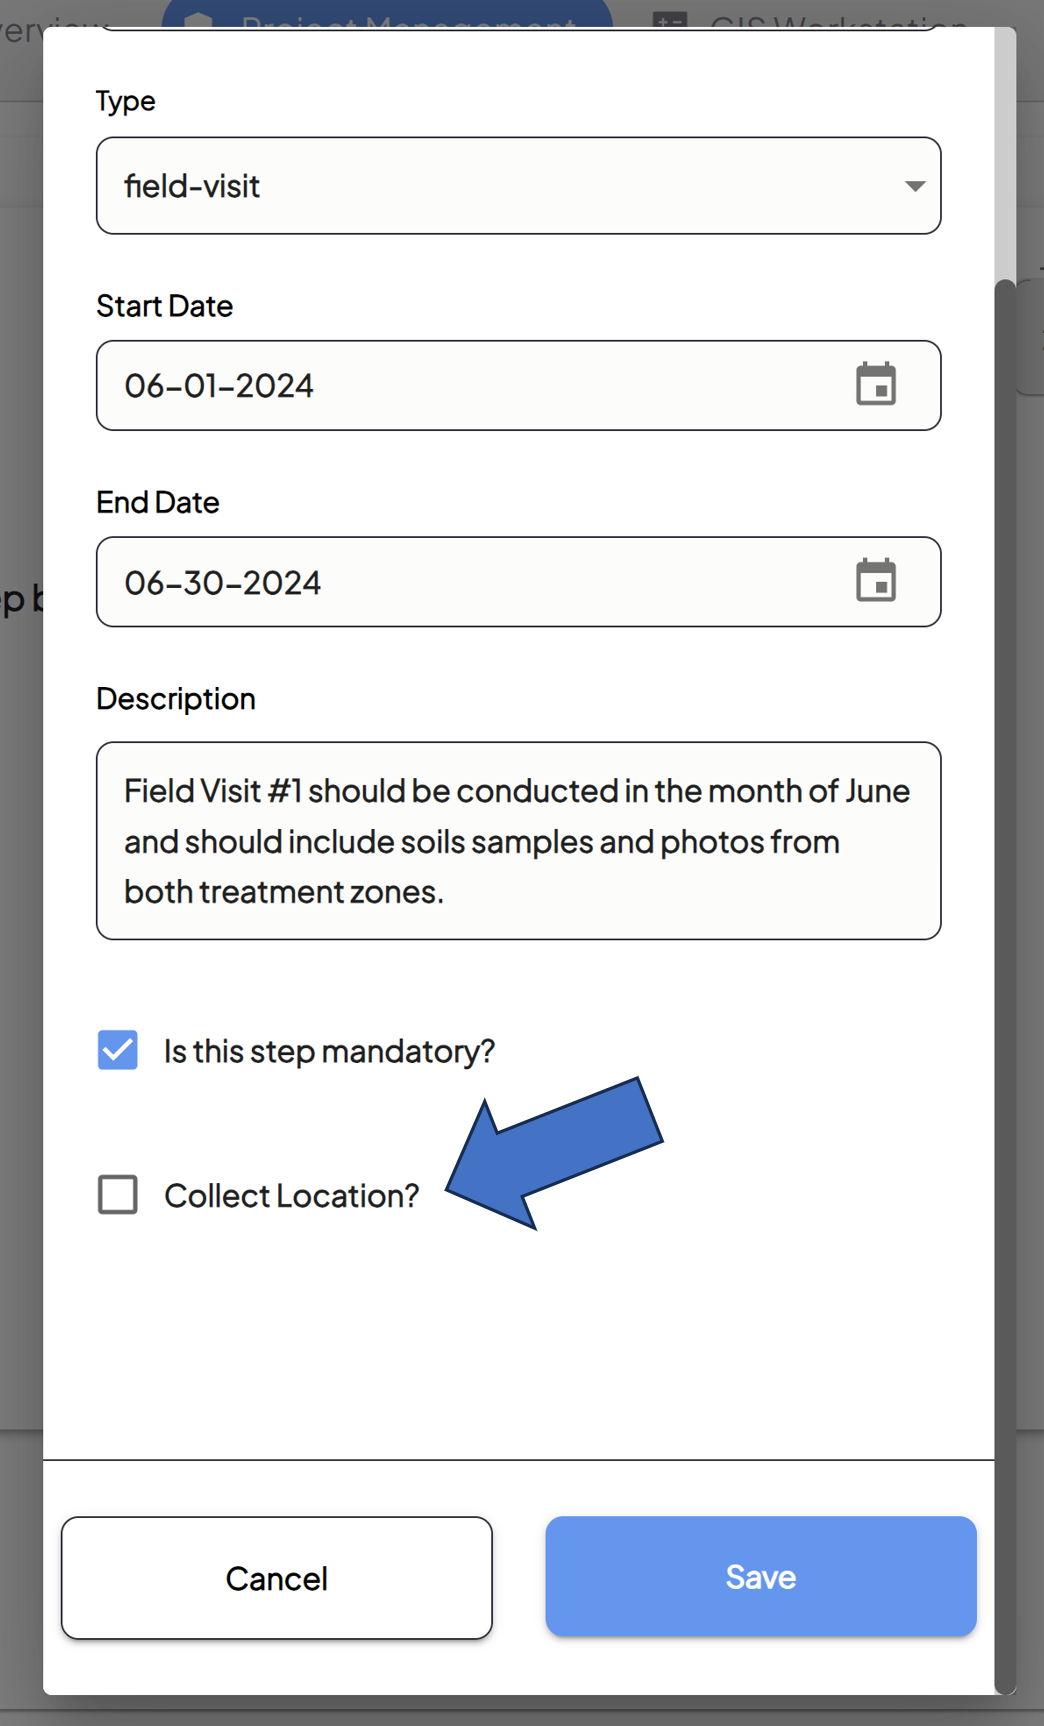
- Determine if the Step is Mandatory or Optional
- Check the following box if this protocol step should be mandatory.
- Mandatory boxes are denoted with an asterisk in View Fields.

- Mandatory boxes are denoted with an asterisk in View Fields.
- Protocol steps are defaulted as optional, unless this box is checked.
- Check the following box if this protocol step should be mandatory.
- Determine if Location Should Be Collected
- If the step you're creating is a field-visit type, you can check this box so that location is automatically captured when data is collected.

- If the step you're creating is a field-visit type, you can check this box so that location is automatically captured when data is collected.
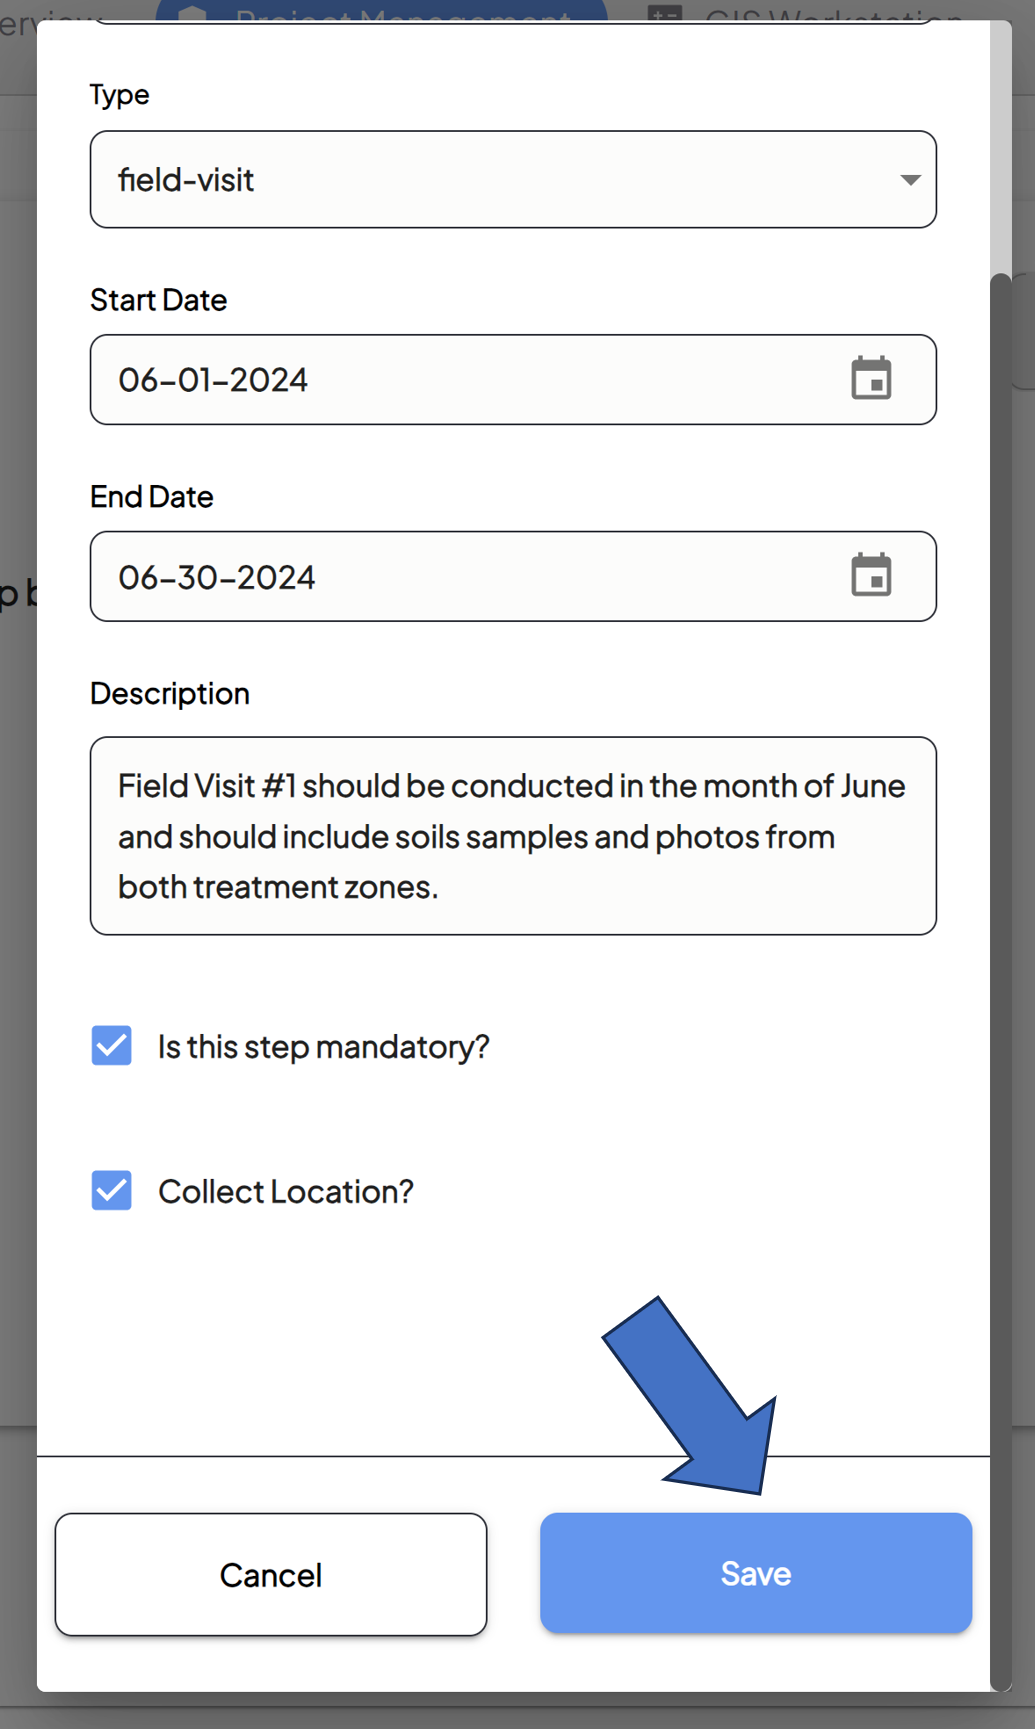
- Review and Confirm
- Review the information and click the Save button.

- This step will now appear in your Protocol. You can also edit the step if needed.

- Continue following these steps until your full Protocol has been defined, from beginning to end.
- You can return to the Protocol screen to Edit or Delete Protocol Steps that have been created by clicking on the icons to the left.
- Review the information and click the Save button.
For additional help, follow along with this video demonstrating how to setup a Trial Protocol:
How To Add Field Data Questions to a Protocol Step
Guide to Adding Field Data Questions to a Protocol Step
Field Data are the additional questions to be asked during a protocol step. They help to inform the overall trial and provide additional context and insight.
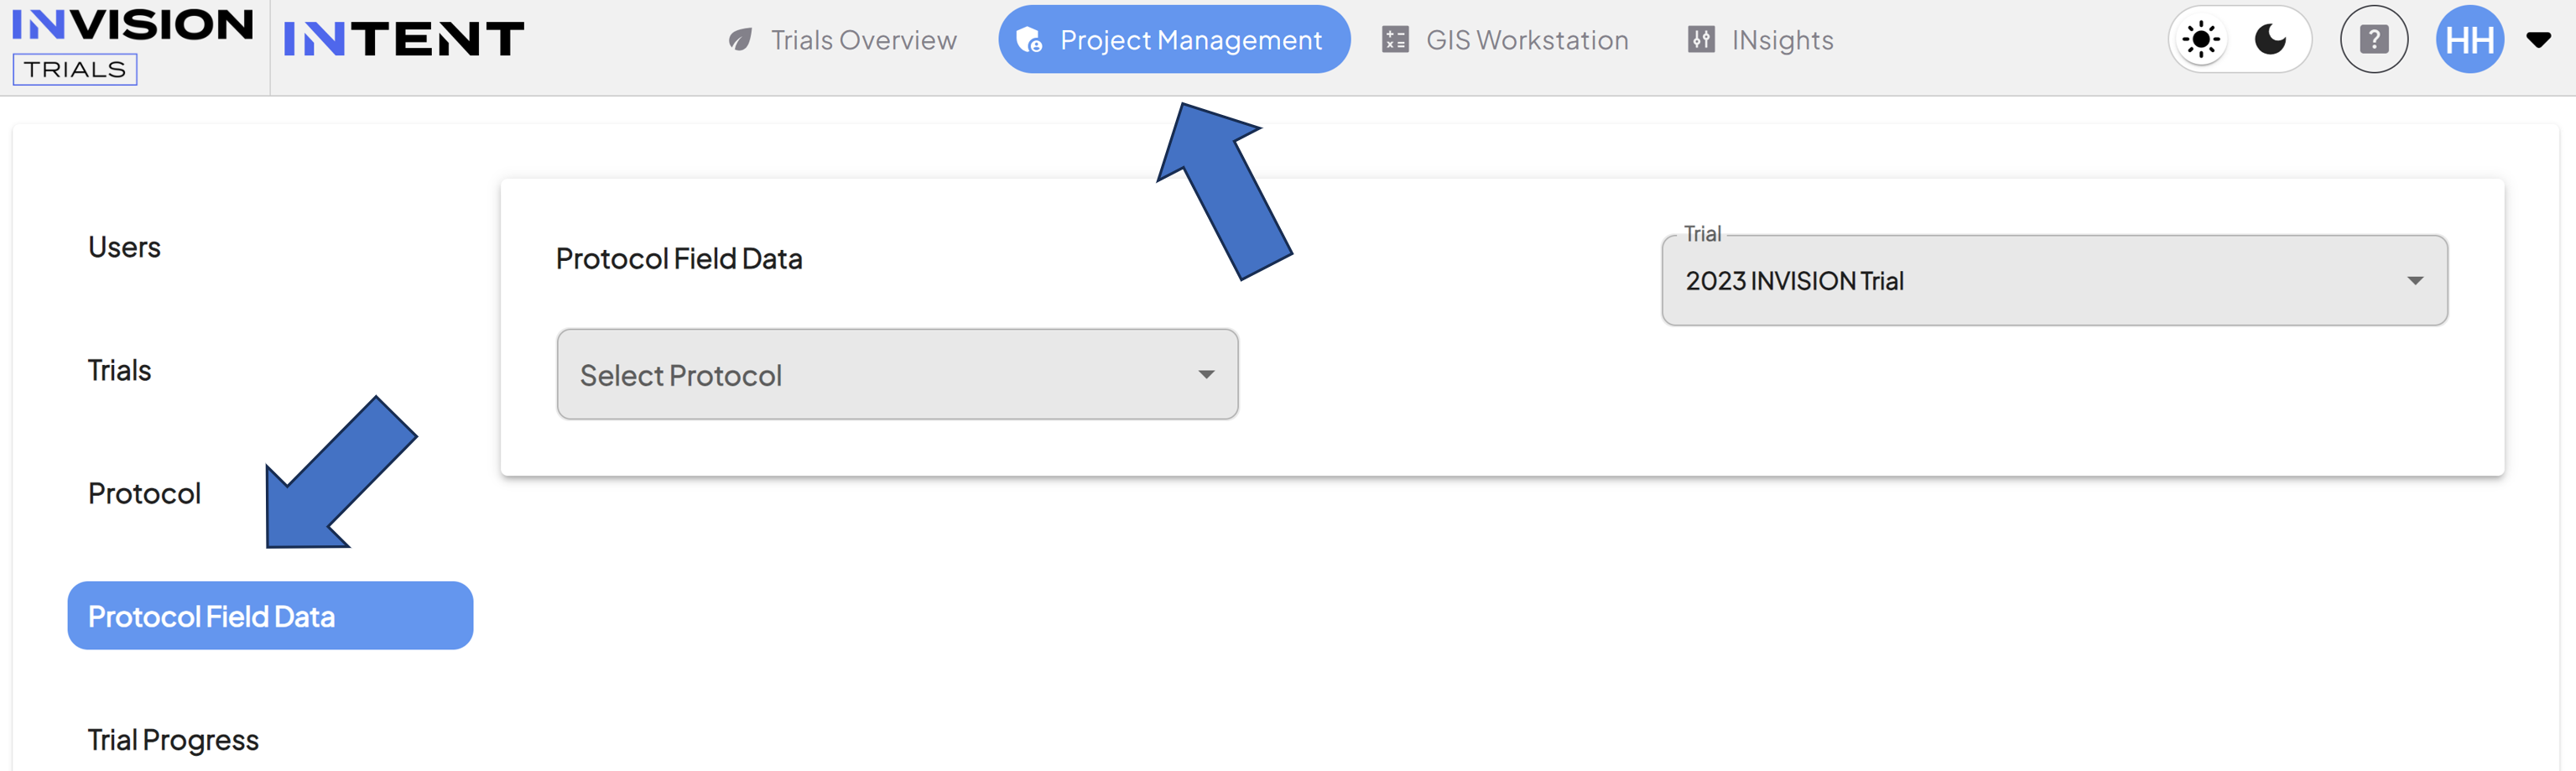
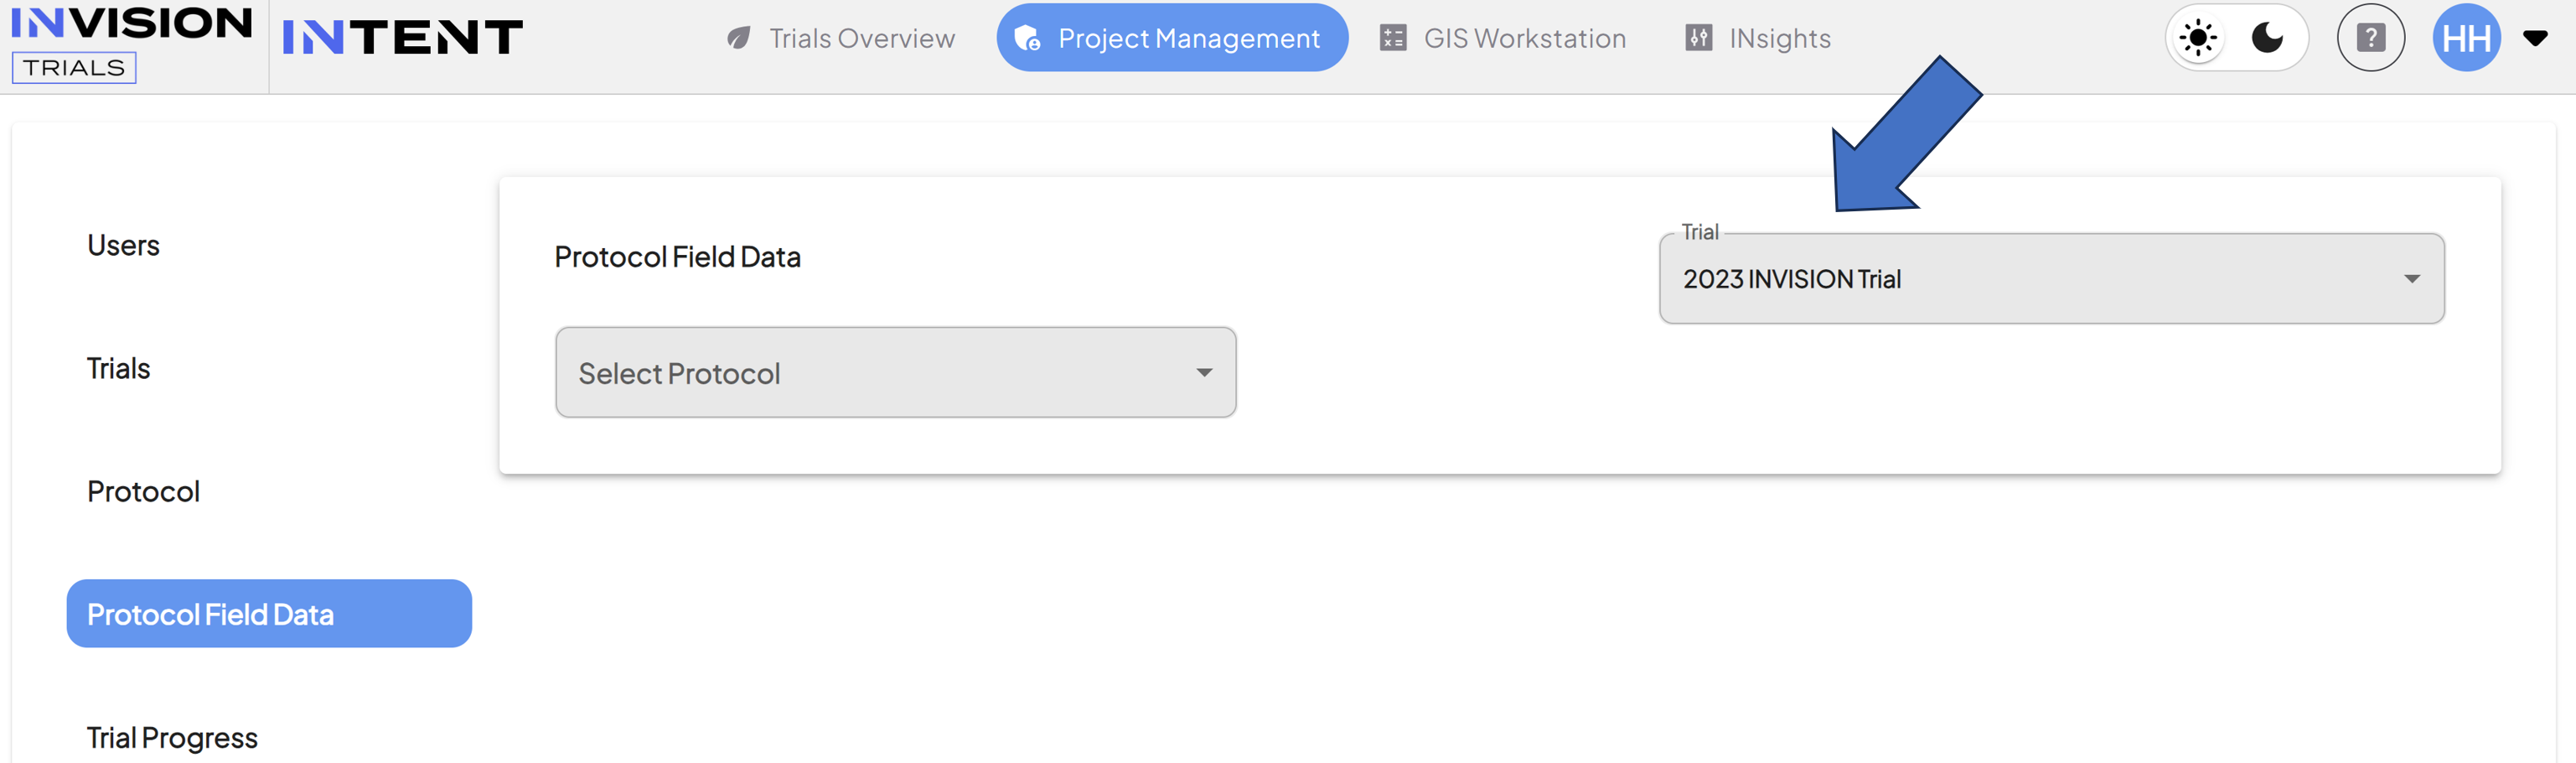
- Navigate to the Protocol Field Data section of Project Management
-
From the Admin tab, select Protocol Field Data from the left pane.

-
- Select Your Trial
-
Choose the correct Trial from the drop-down box, as well as the correct Protocol.

-
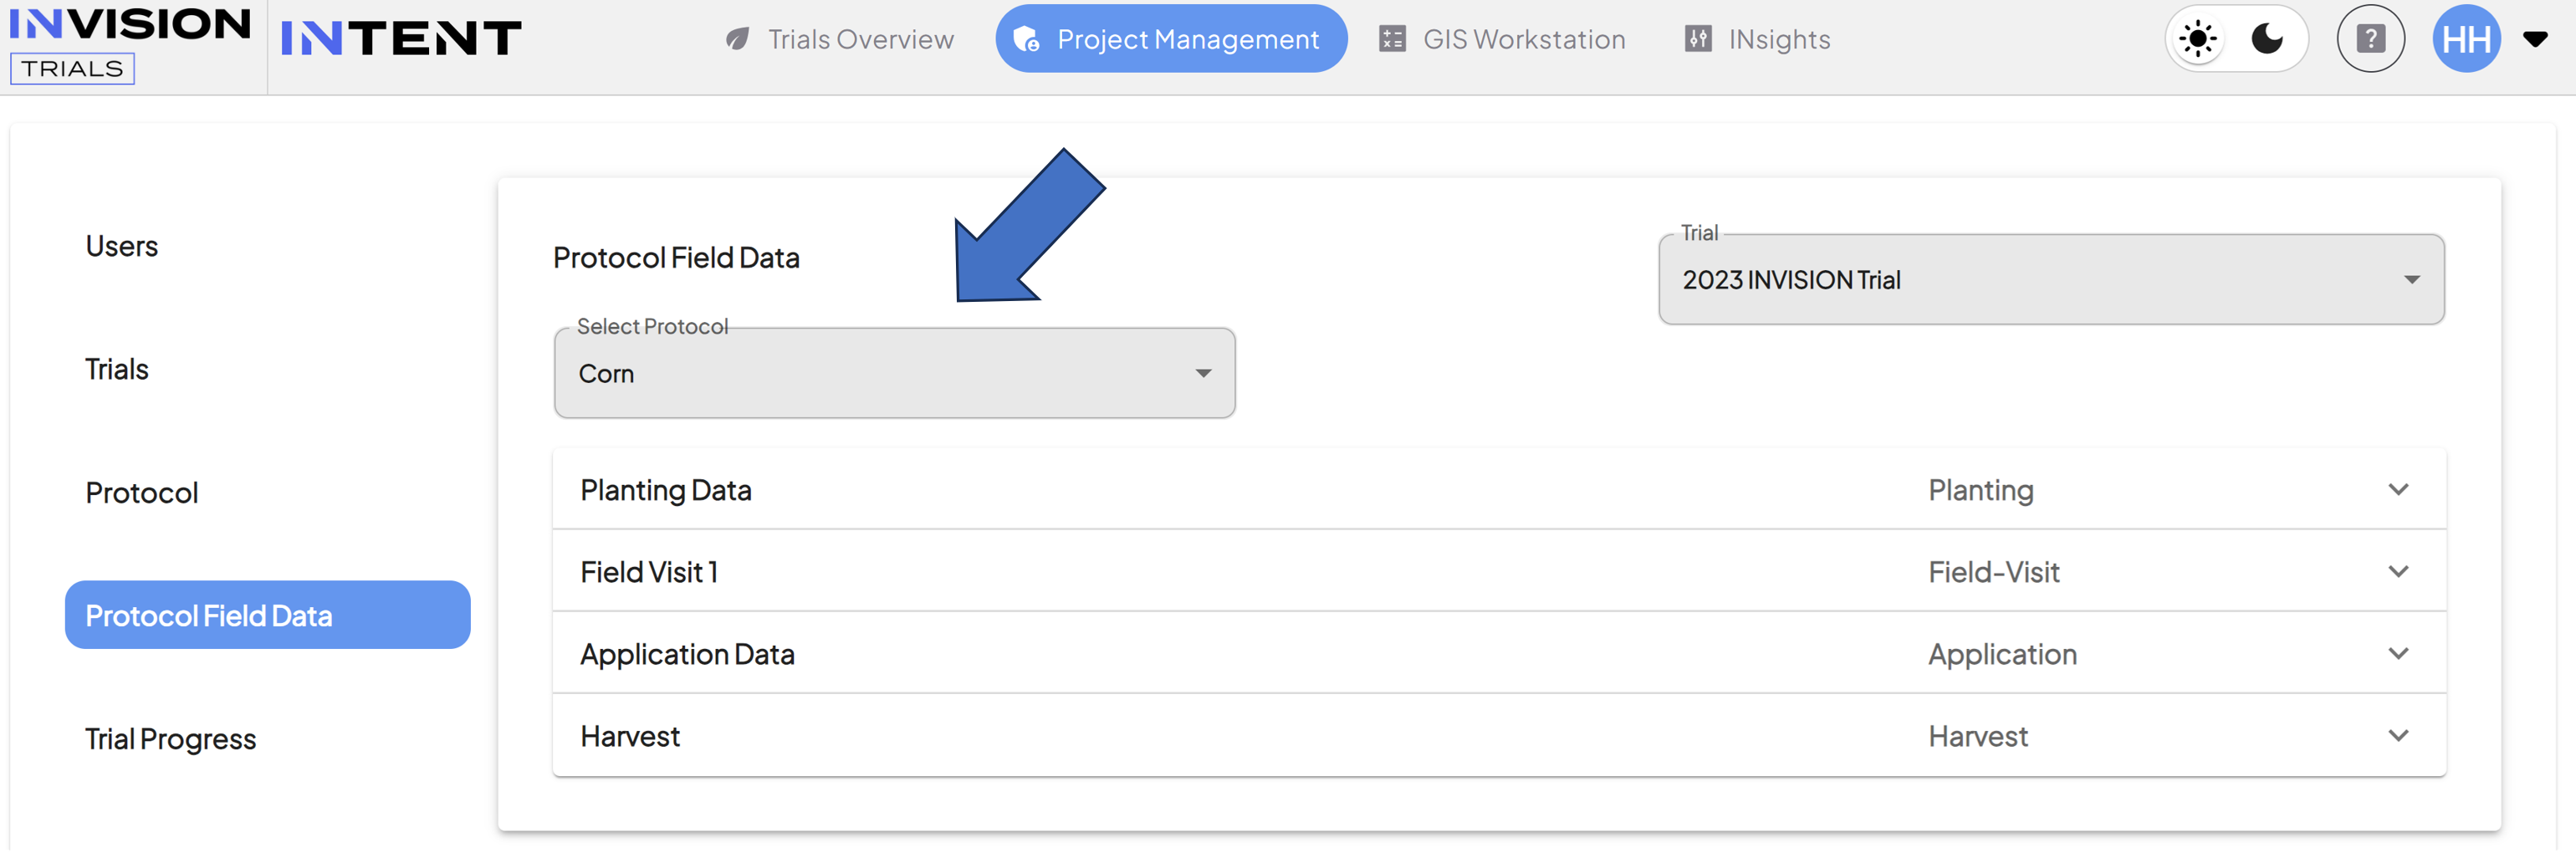
- Select Your Protocol
- Choose the correct Protocol from the dropdown menu.
-
Once you select the Protocol, all of your Protocol steps will be displayed.

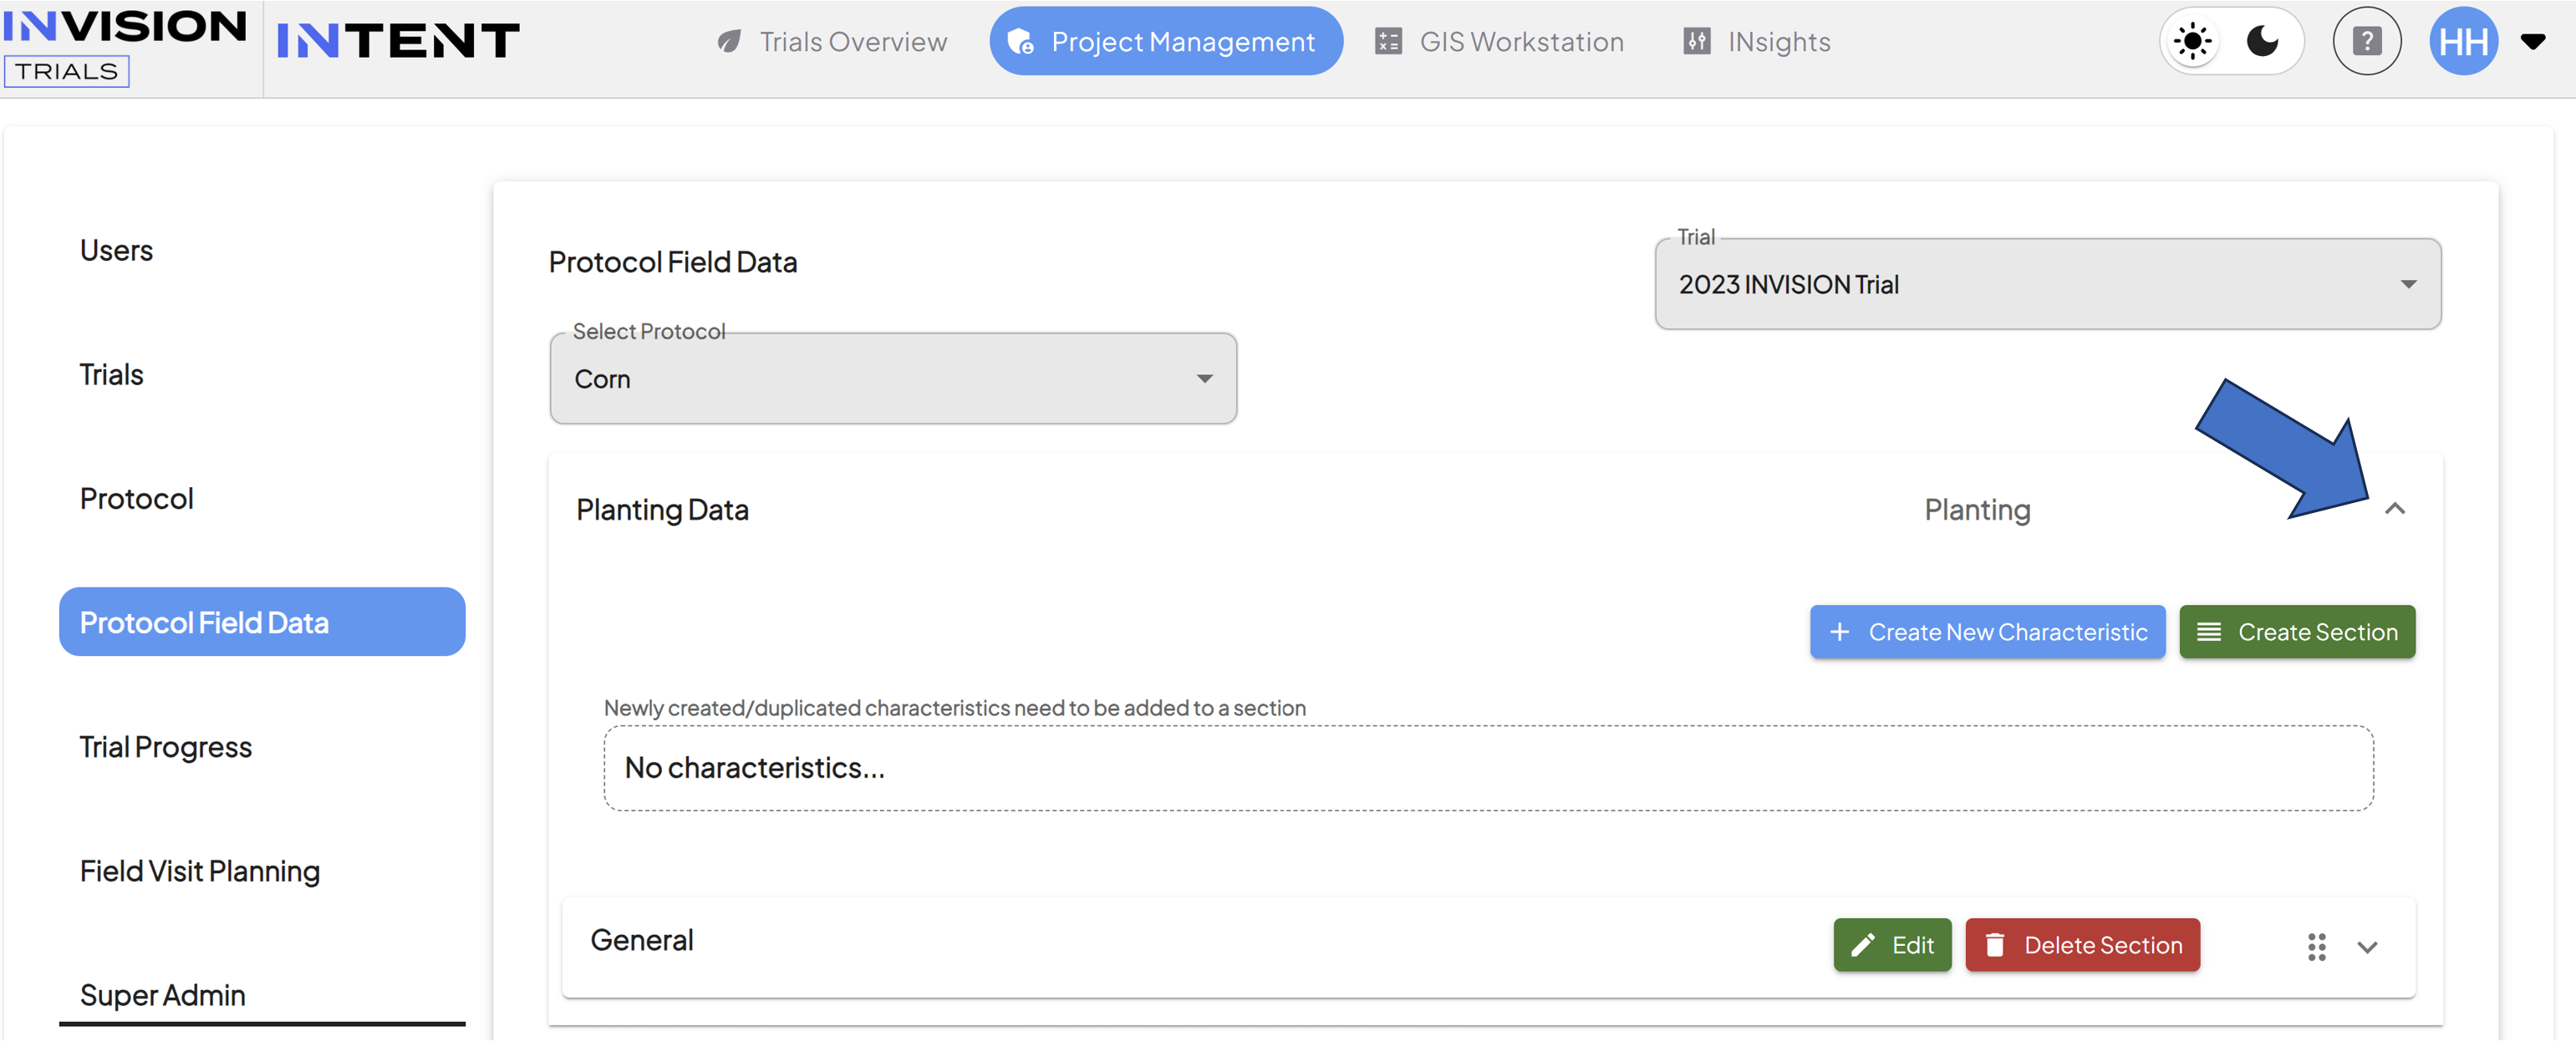
- Expand the Protocol Step
-
Click on the Protocol Step where you would like to add additional questions.

-
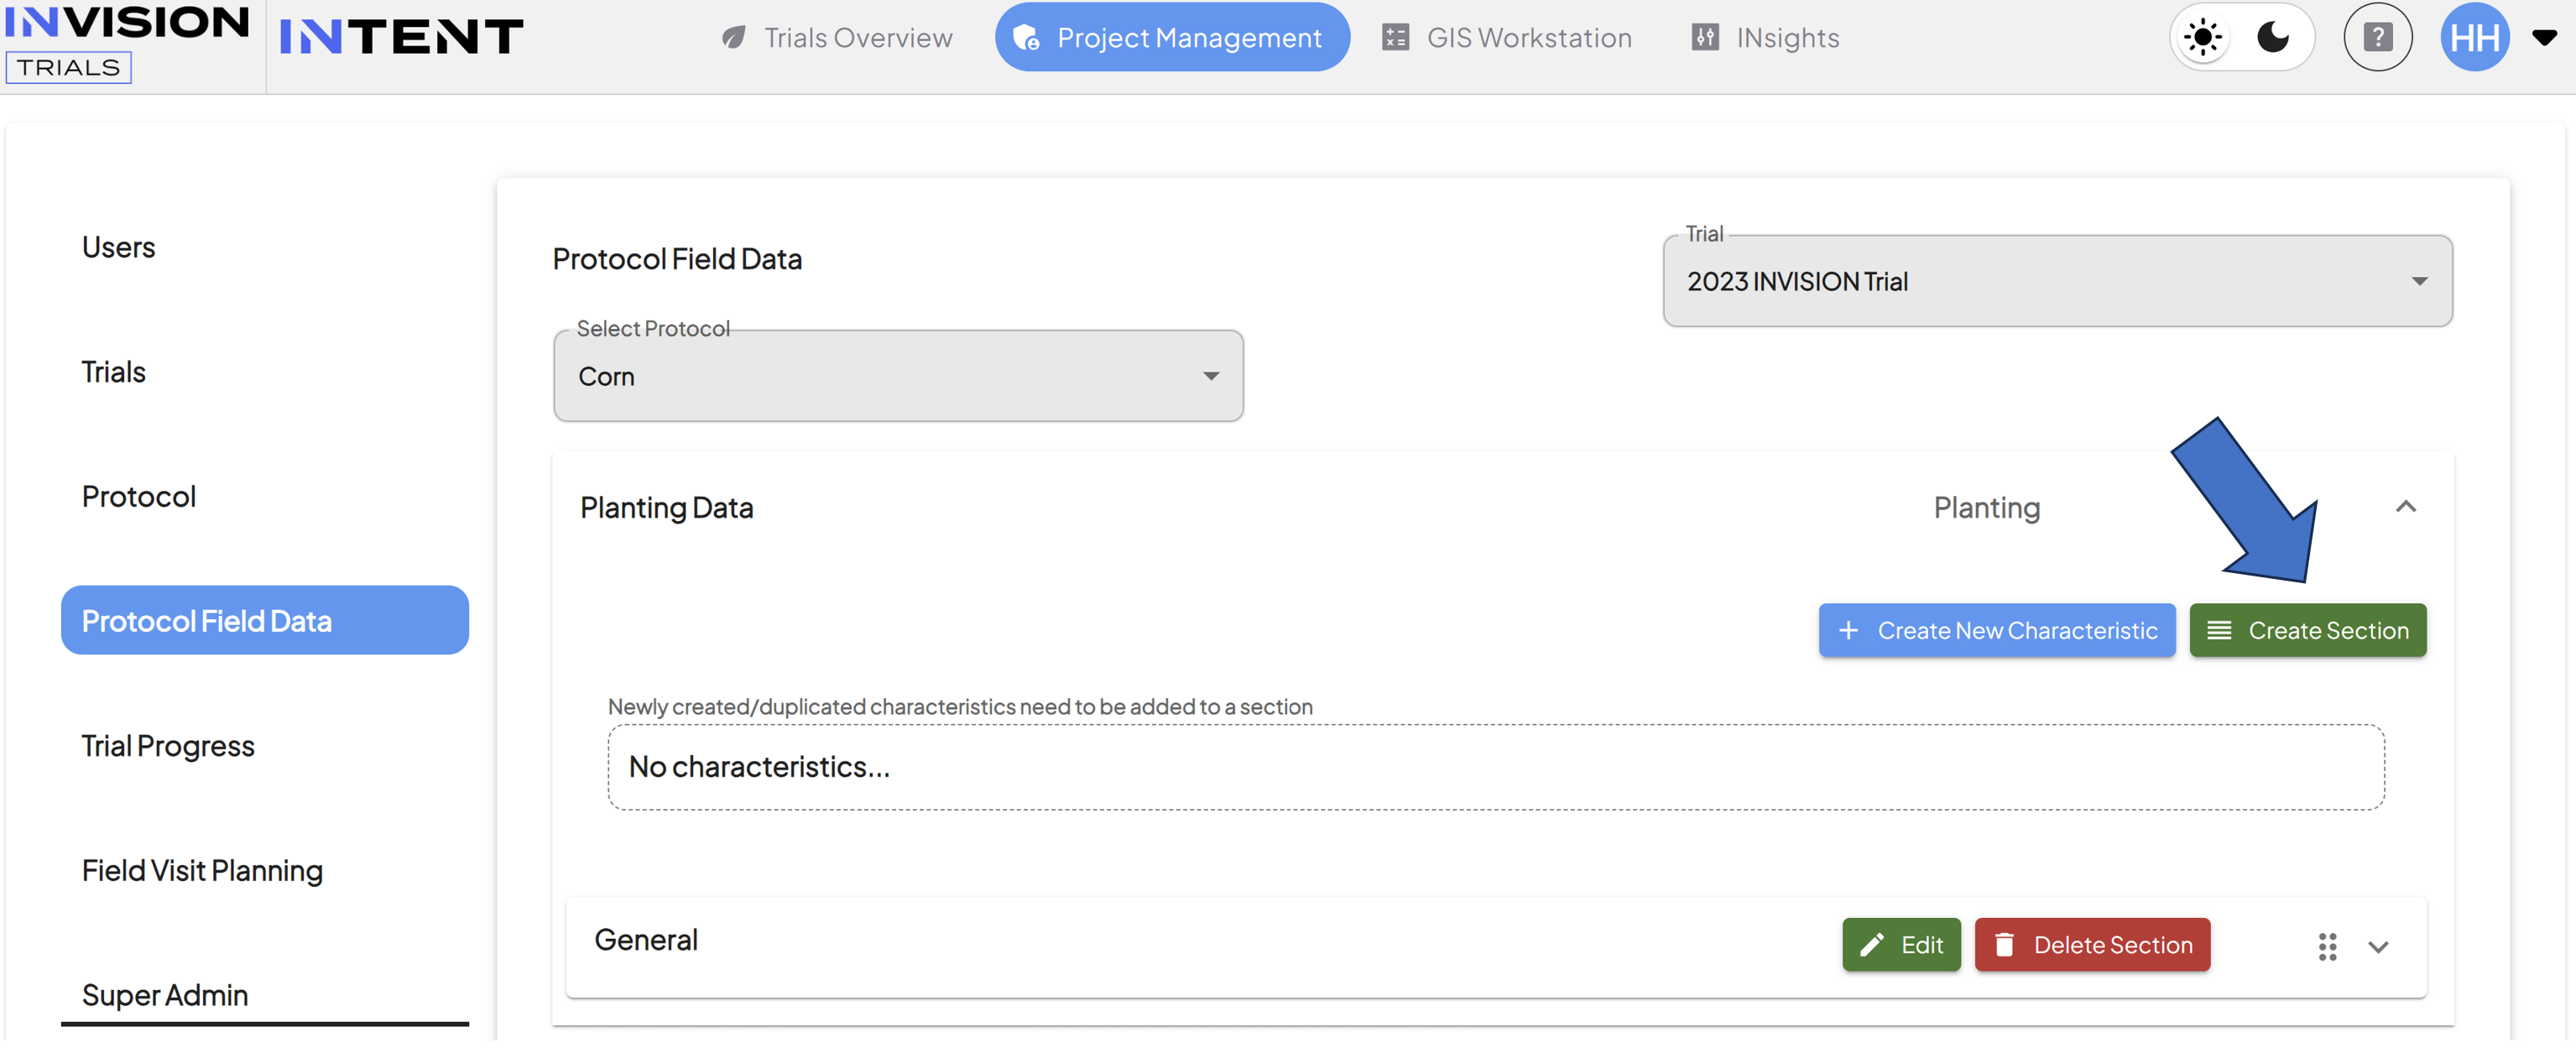
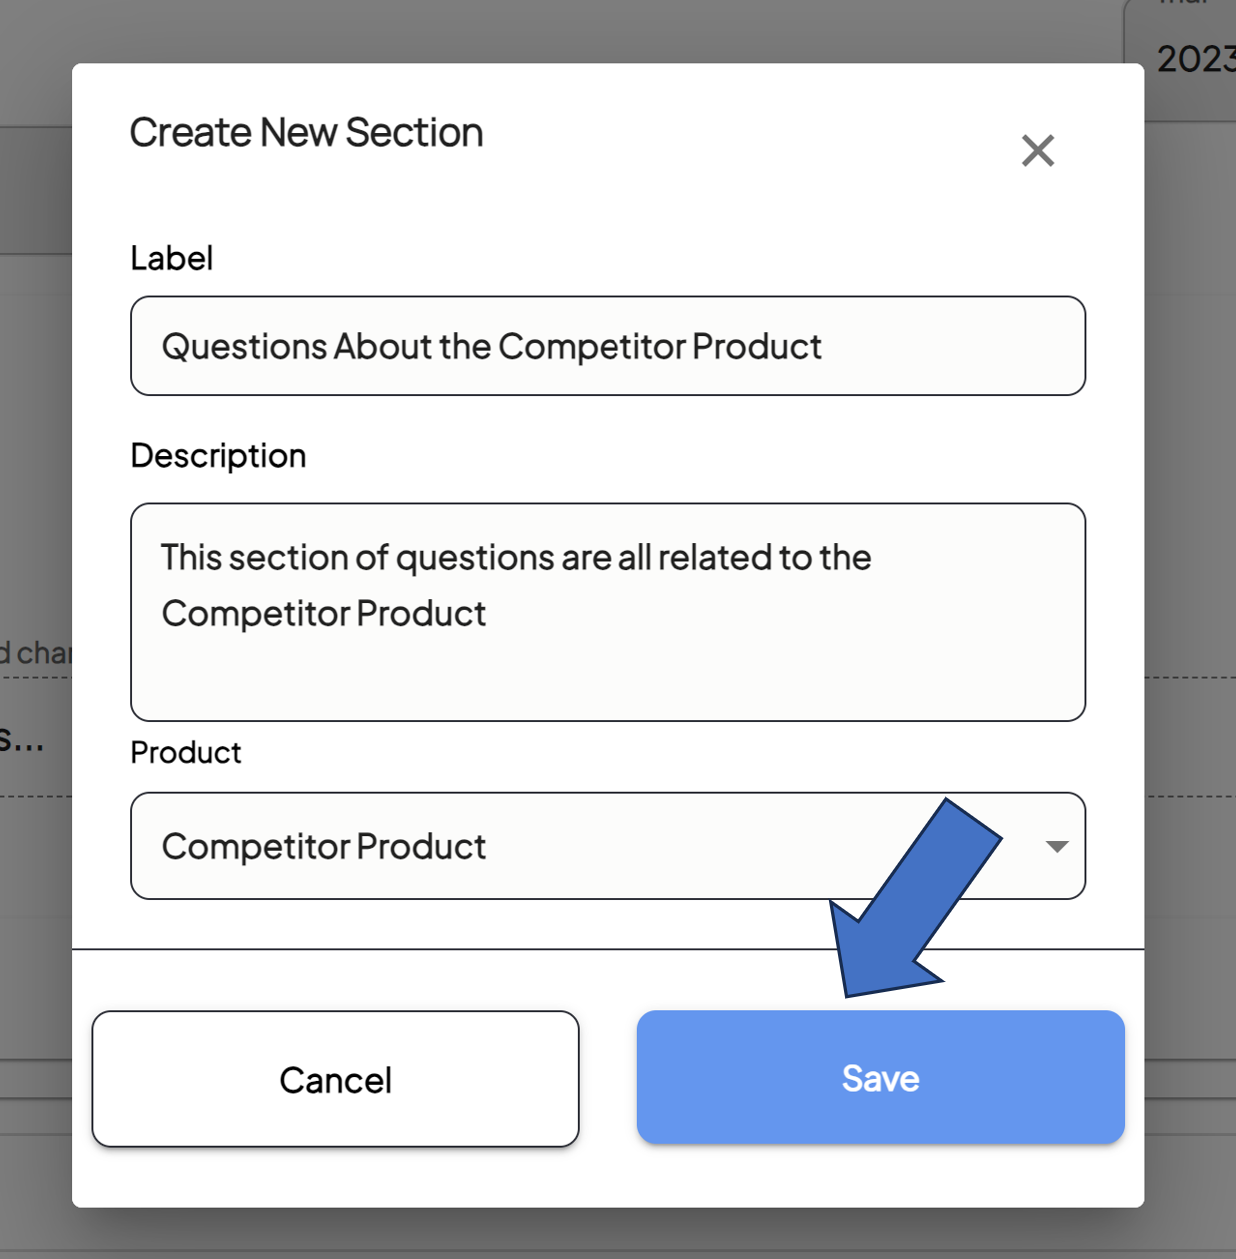
- Create a Section
- If you have several questions that are related, you can group them in a section. If you do not need your questions organized in groups, they will automatically be placed in the General section.
-
Click the Create Section button to build a section for your questions to be grouped under.

-
Enter a Label for the Section and a Description.
-
Choose the Products the Section applies to. If you choose only one Product, the questions in this section will only apply to that Product on the Protocol.

-
Click the Save button.
-
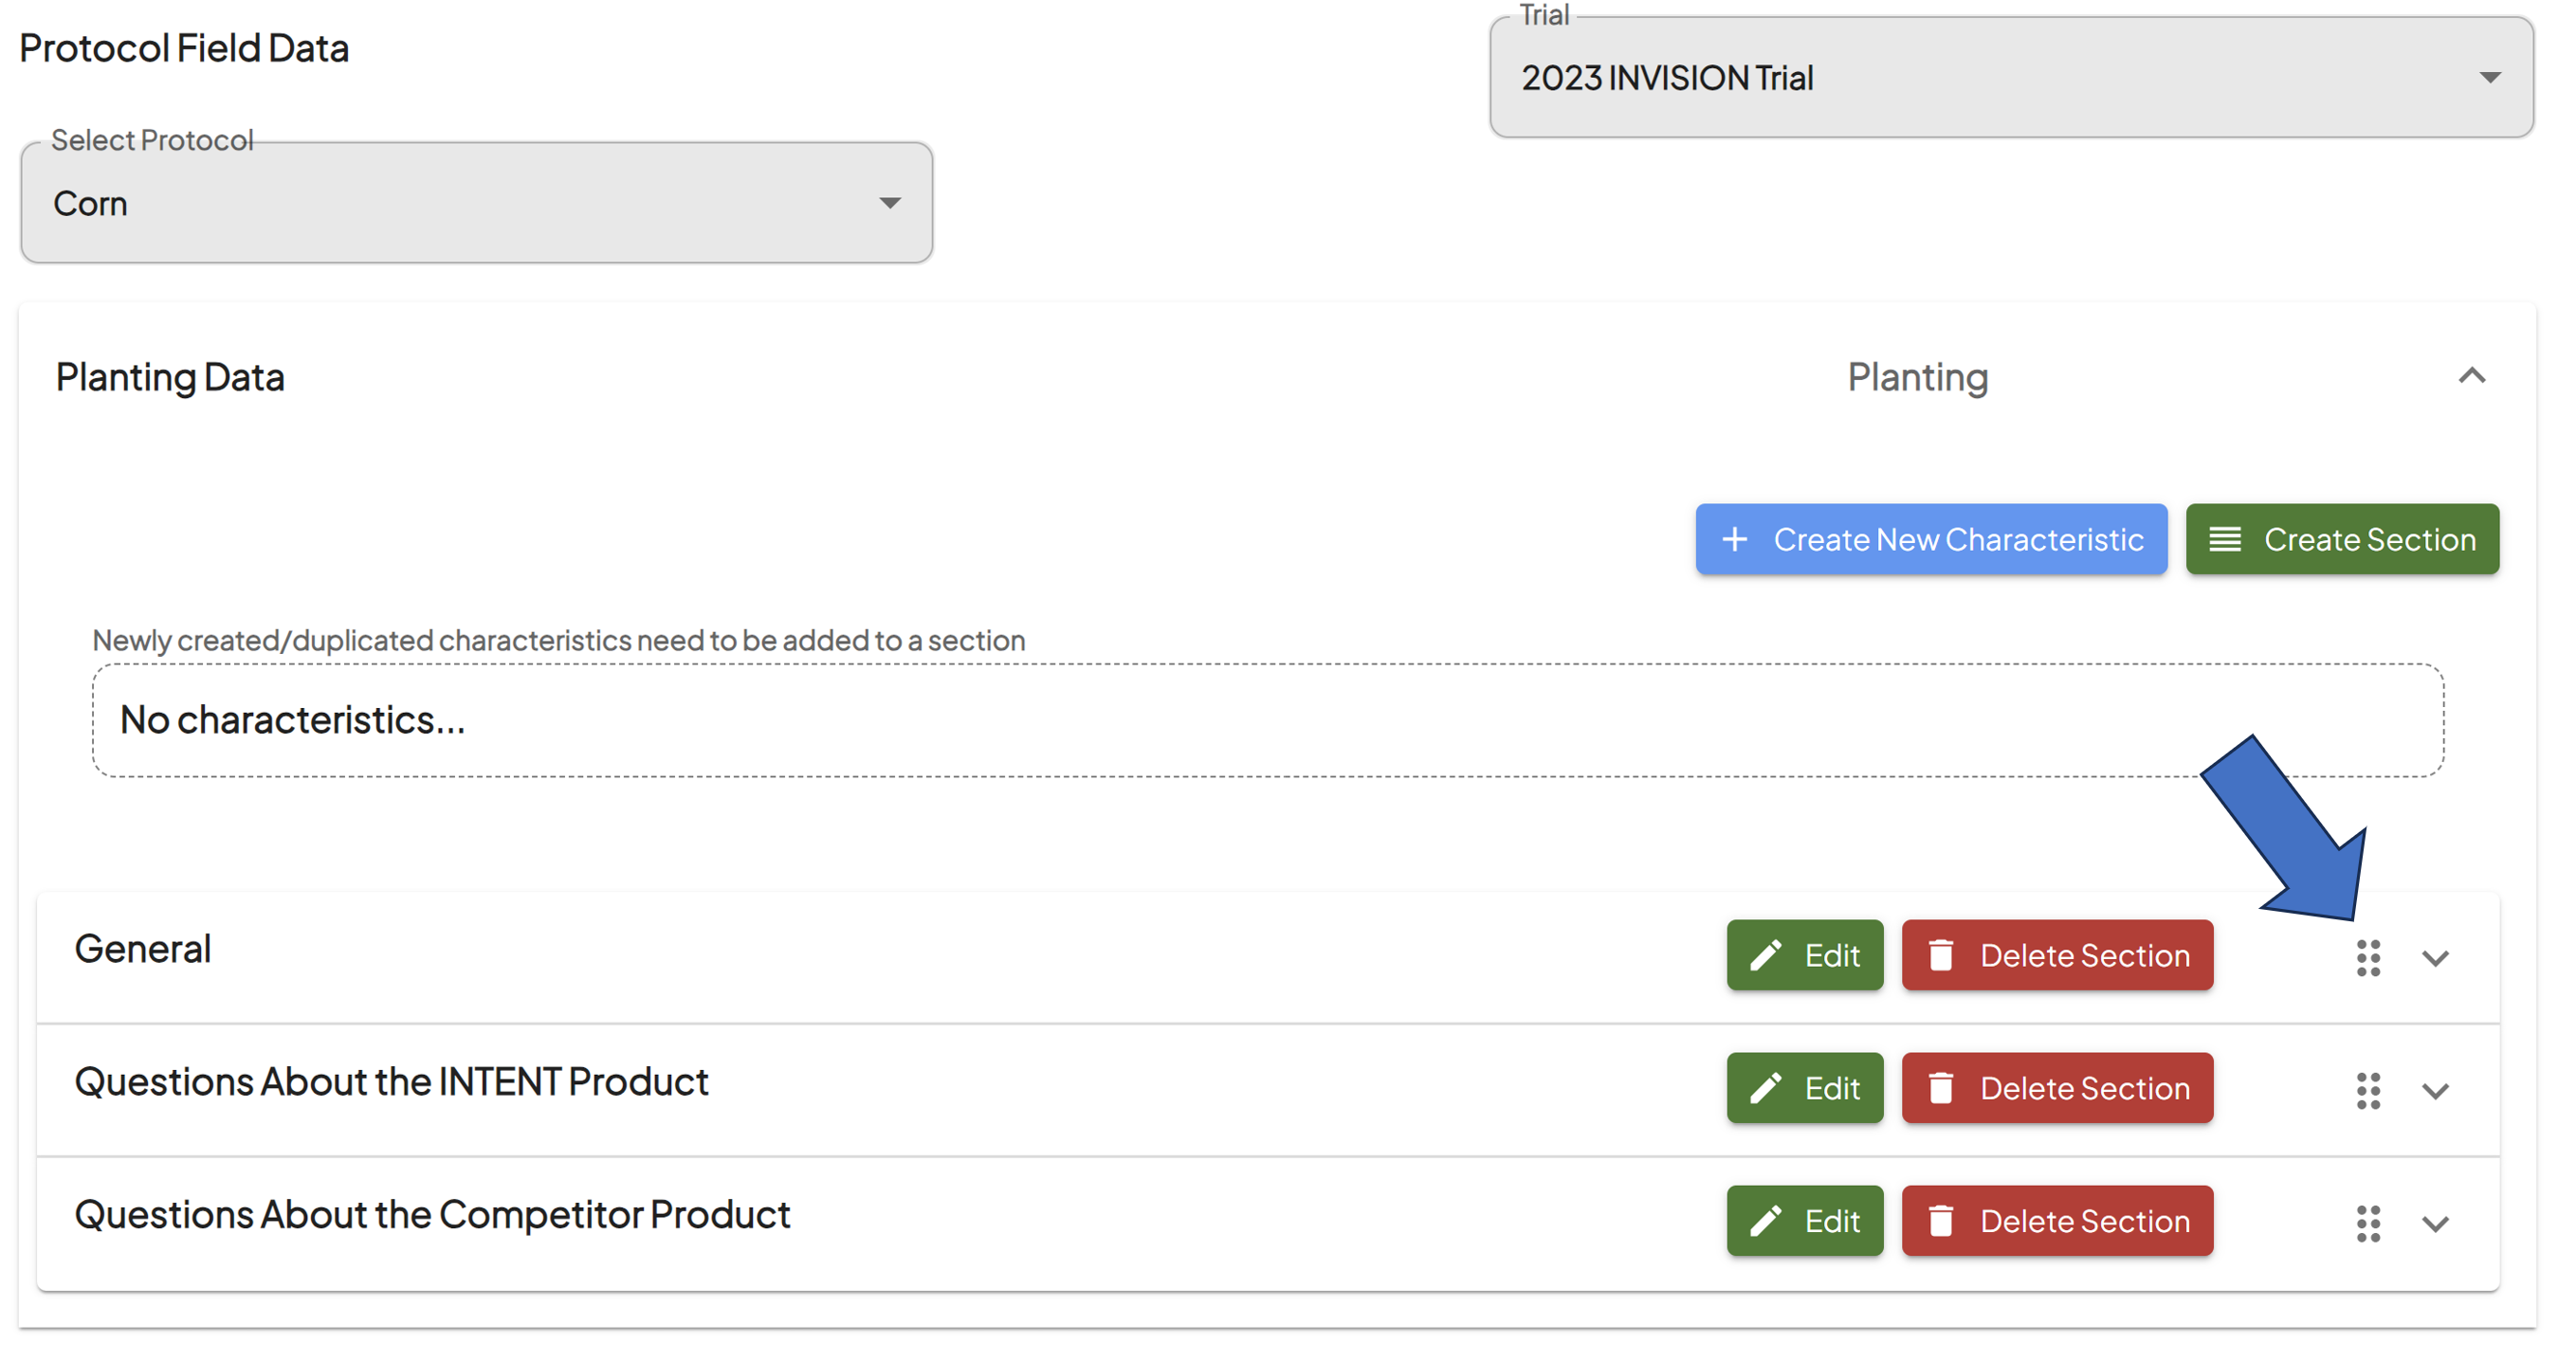
Organize the Order of Your Sections
-
If you have multiple sections, you can edit the order of them by holding down and dragging the dots menu icon.

-
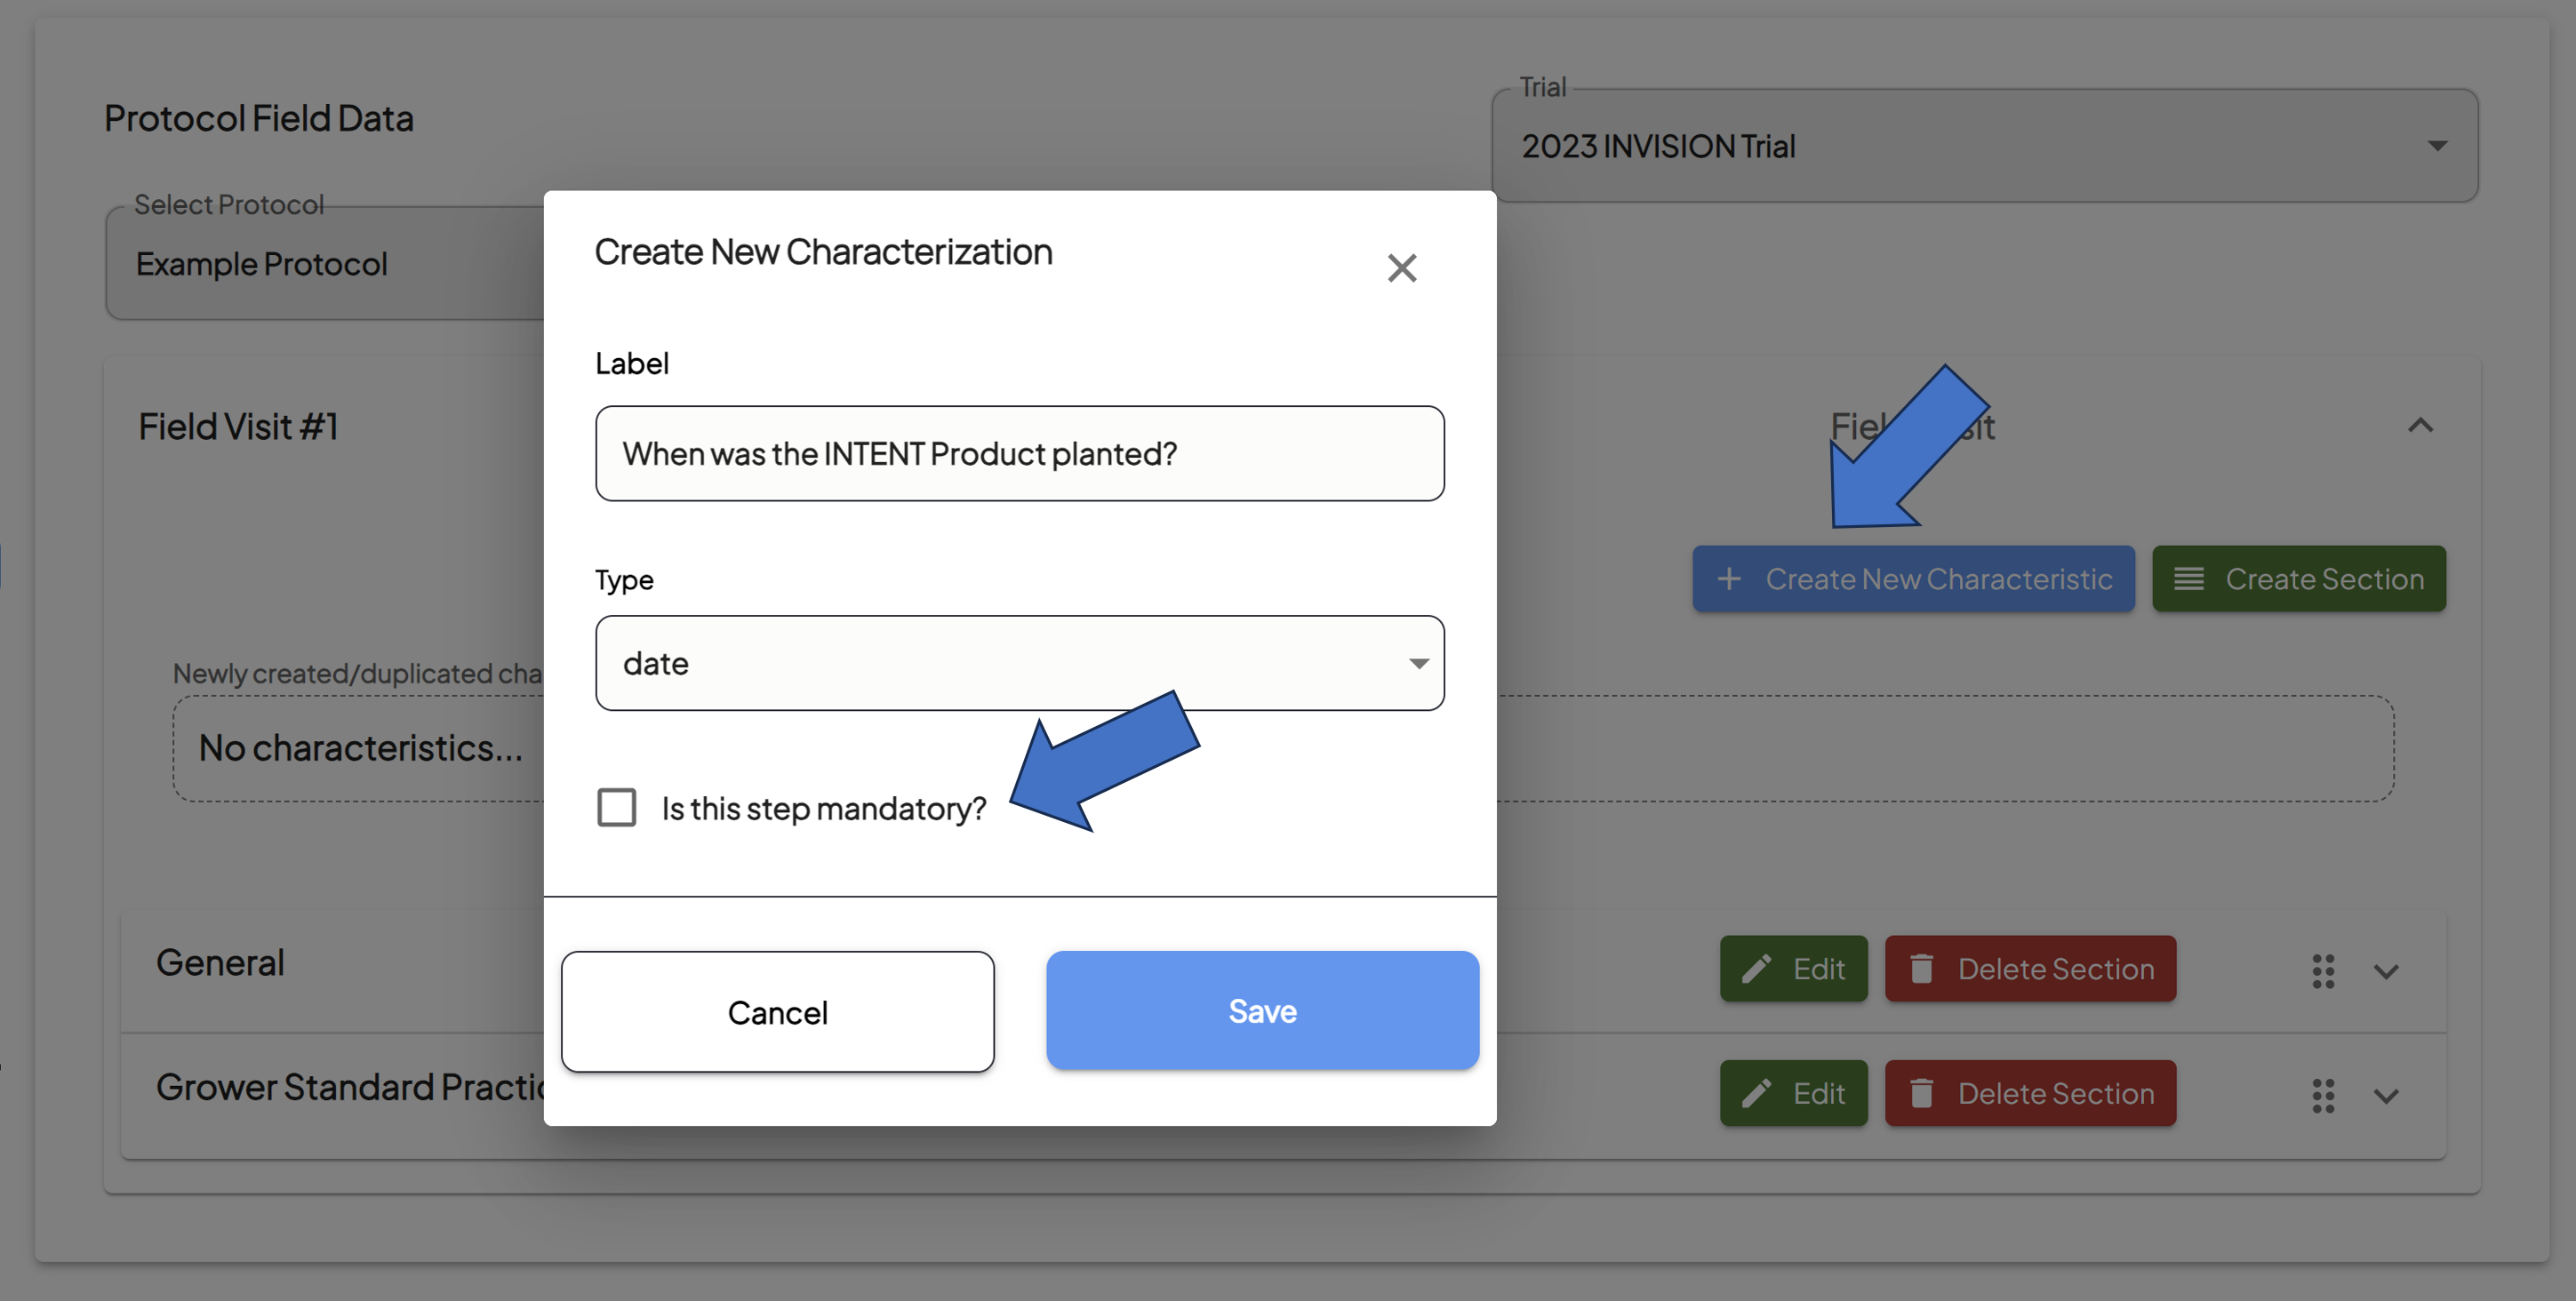
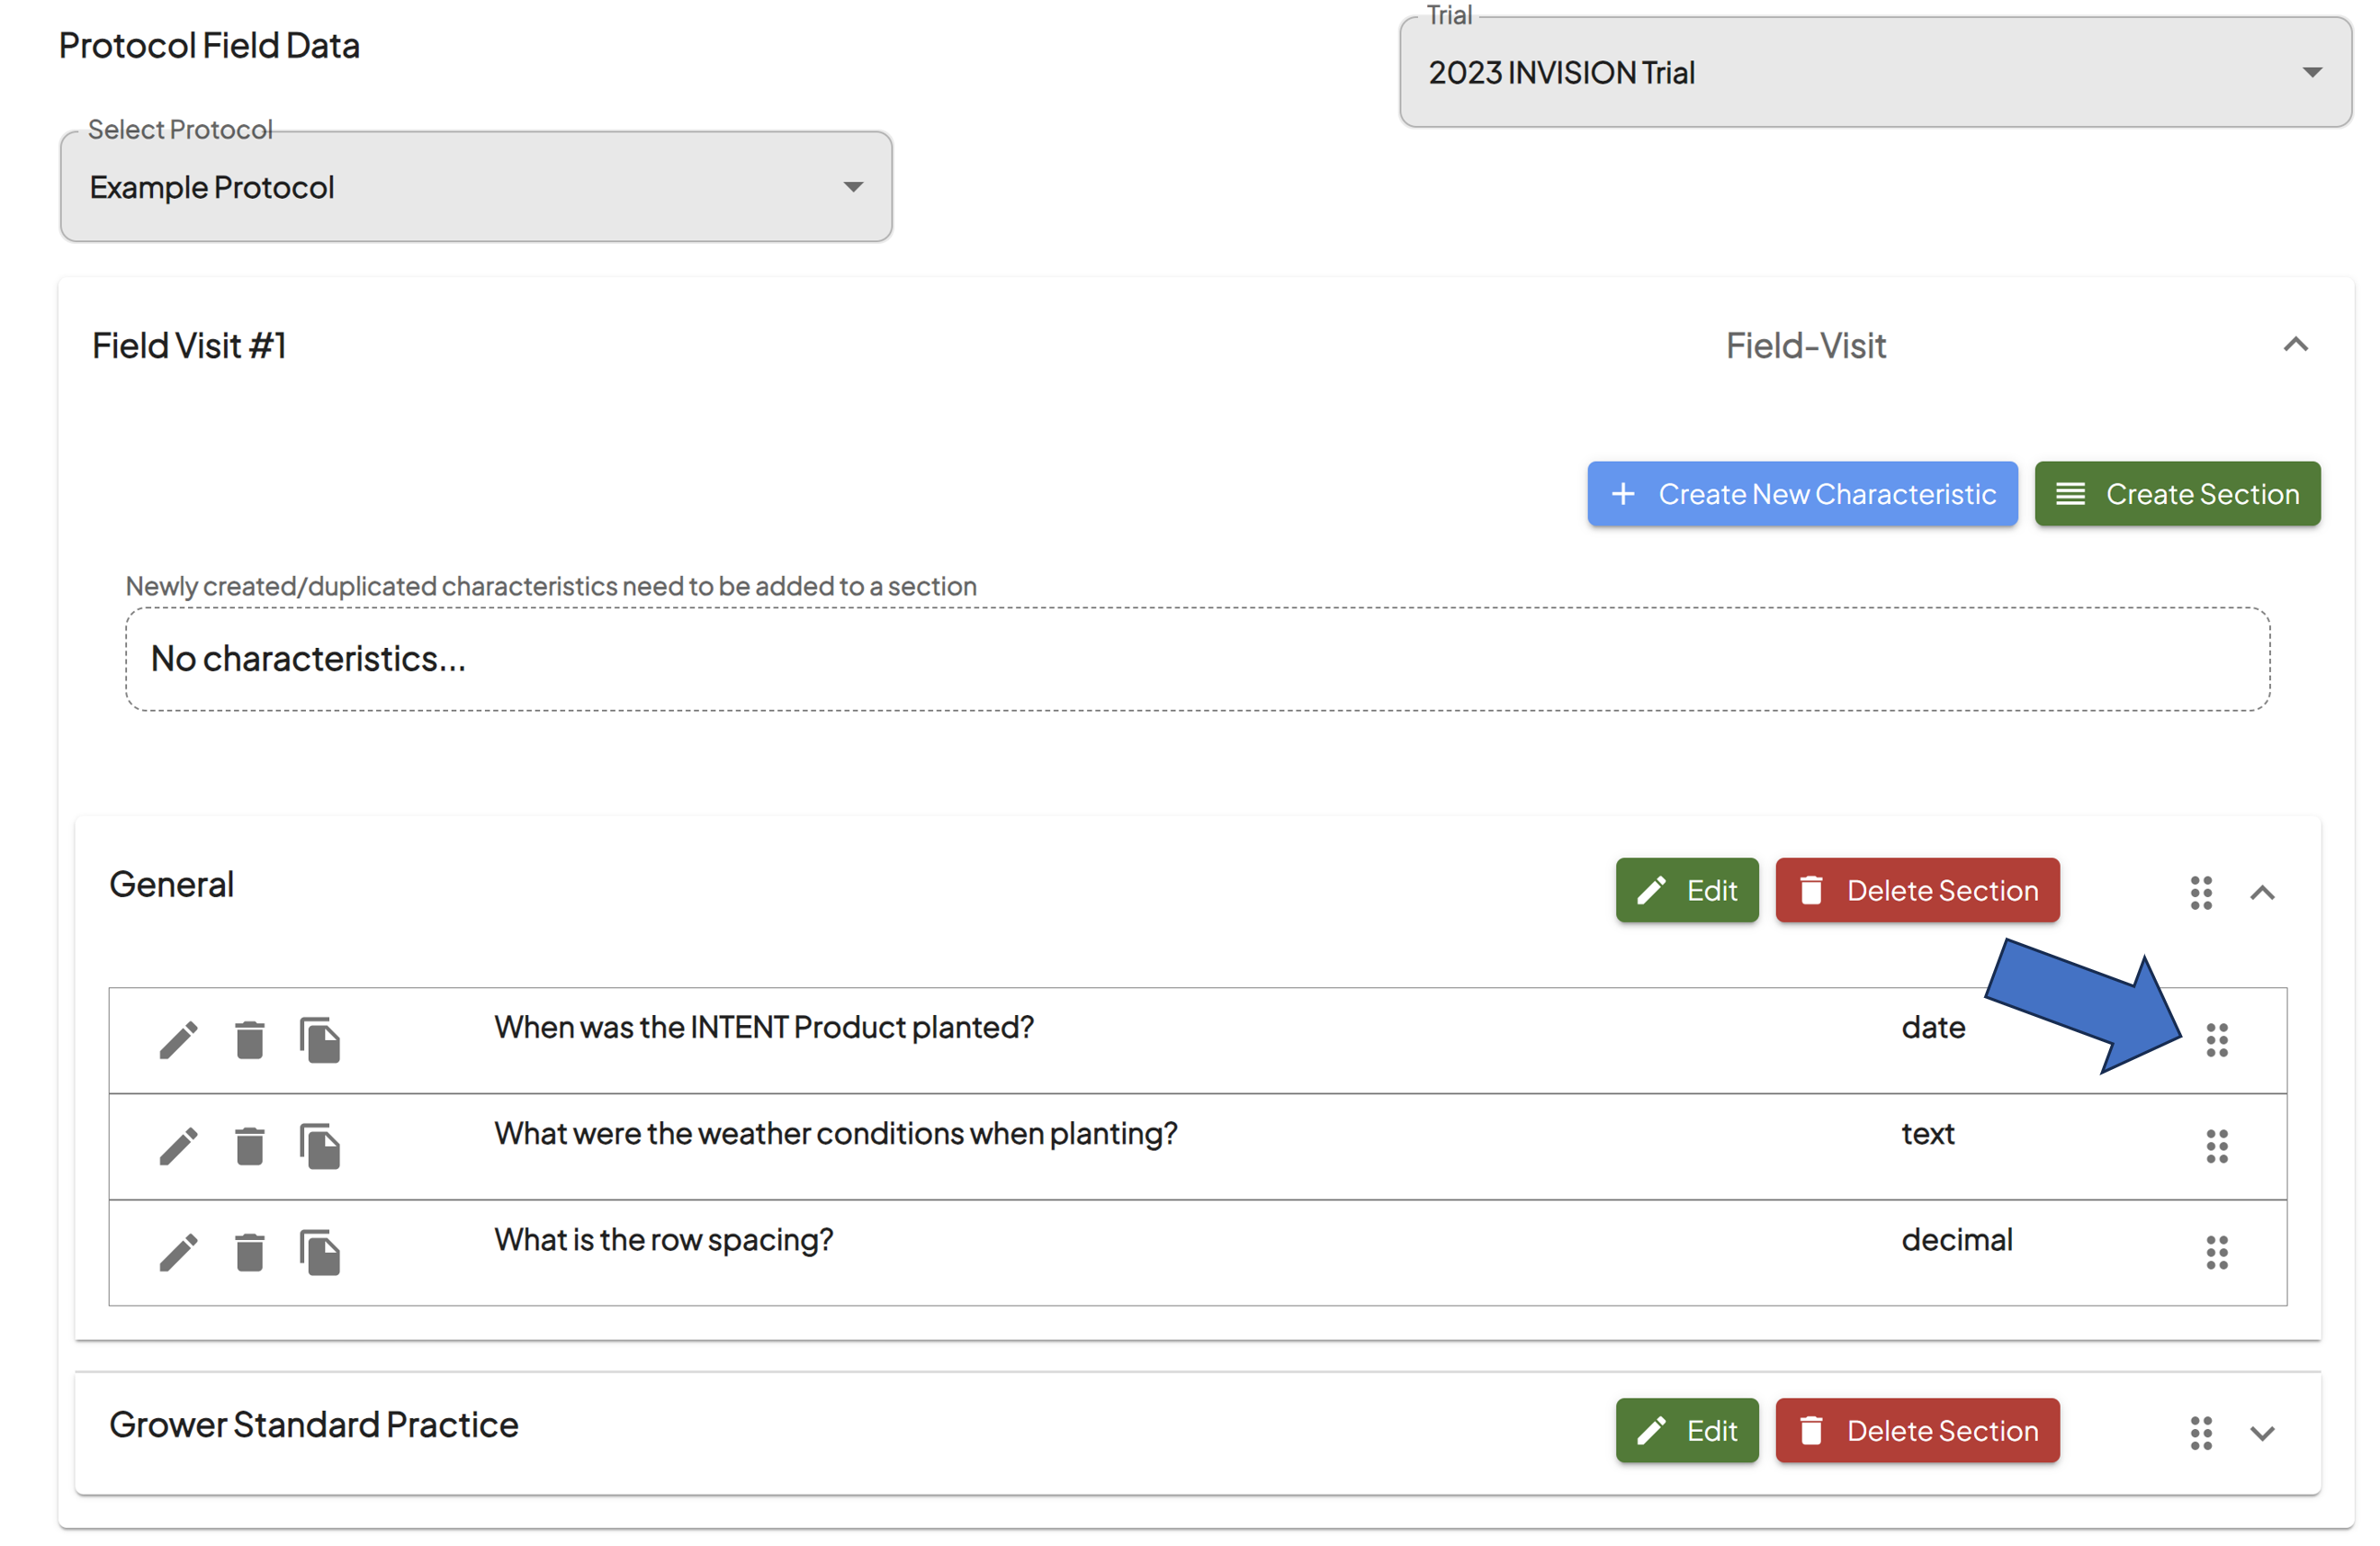
- Add Characteristics to Your Sections
-
Click the Create New Characteristic button to add a question directly.
-
Enter the question in the Label field, and choose the type of question from the drop-down.
- Select whether this question will be mandatory or now.
-
Click the Save button.

-
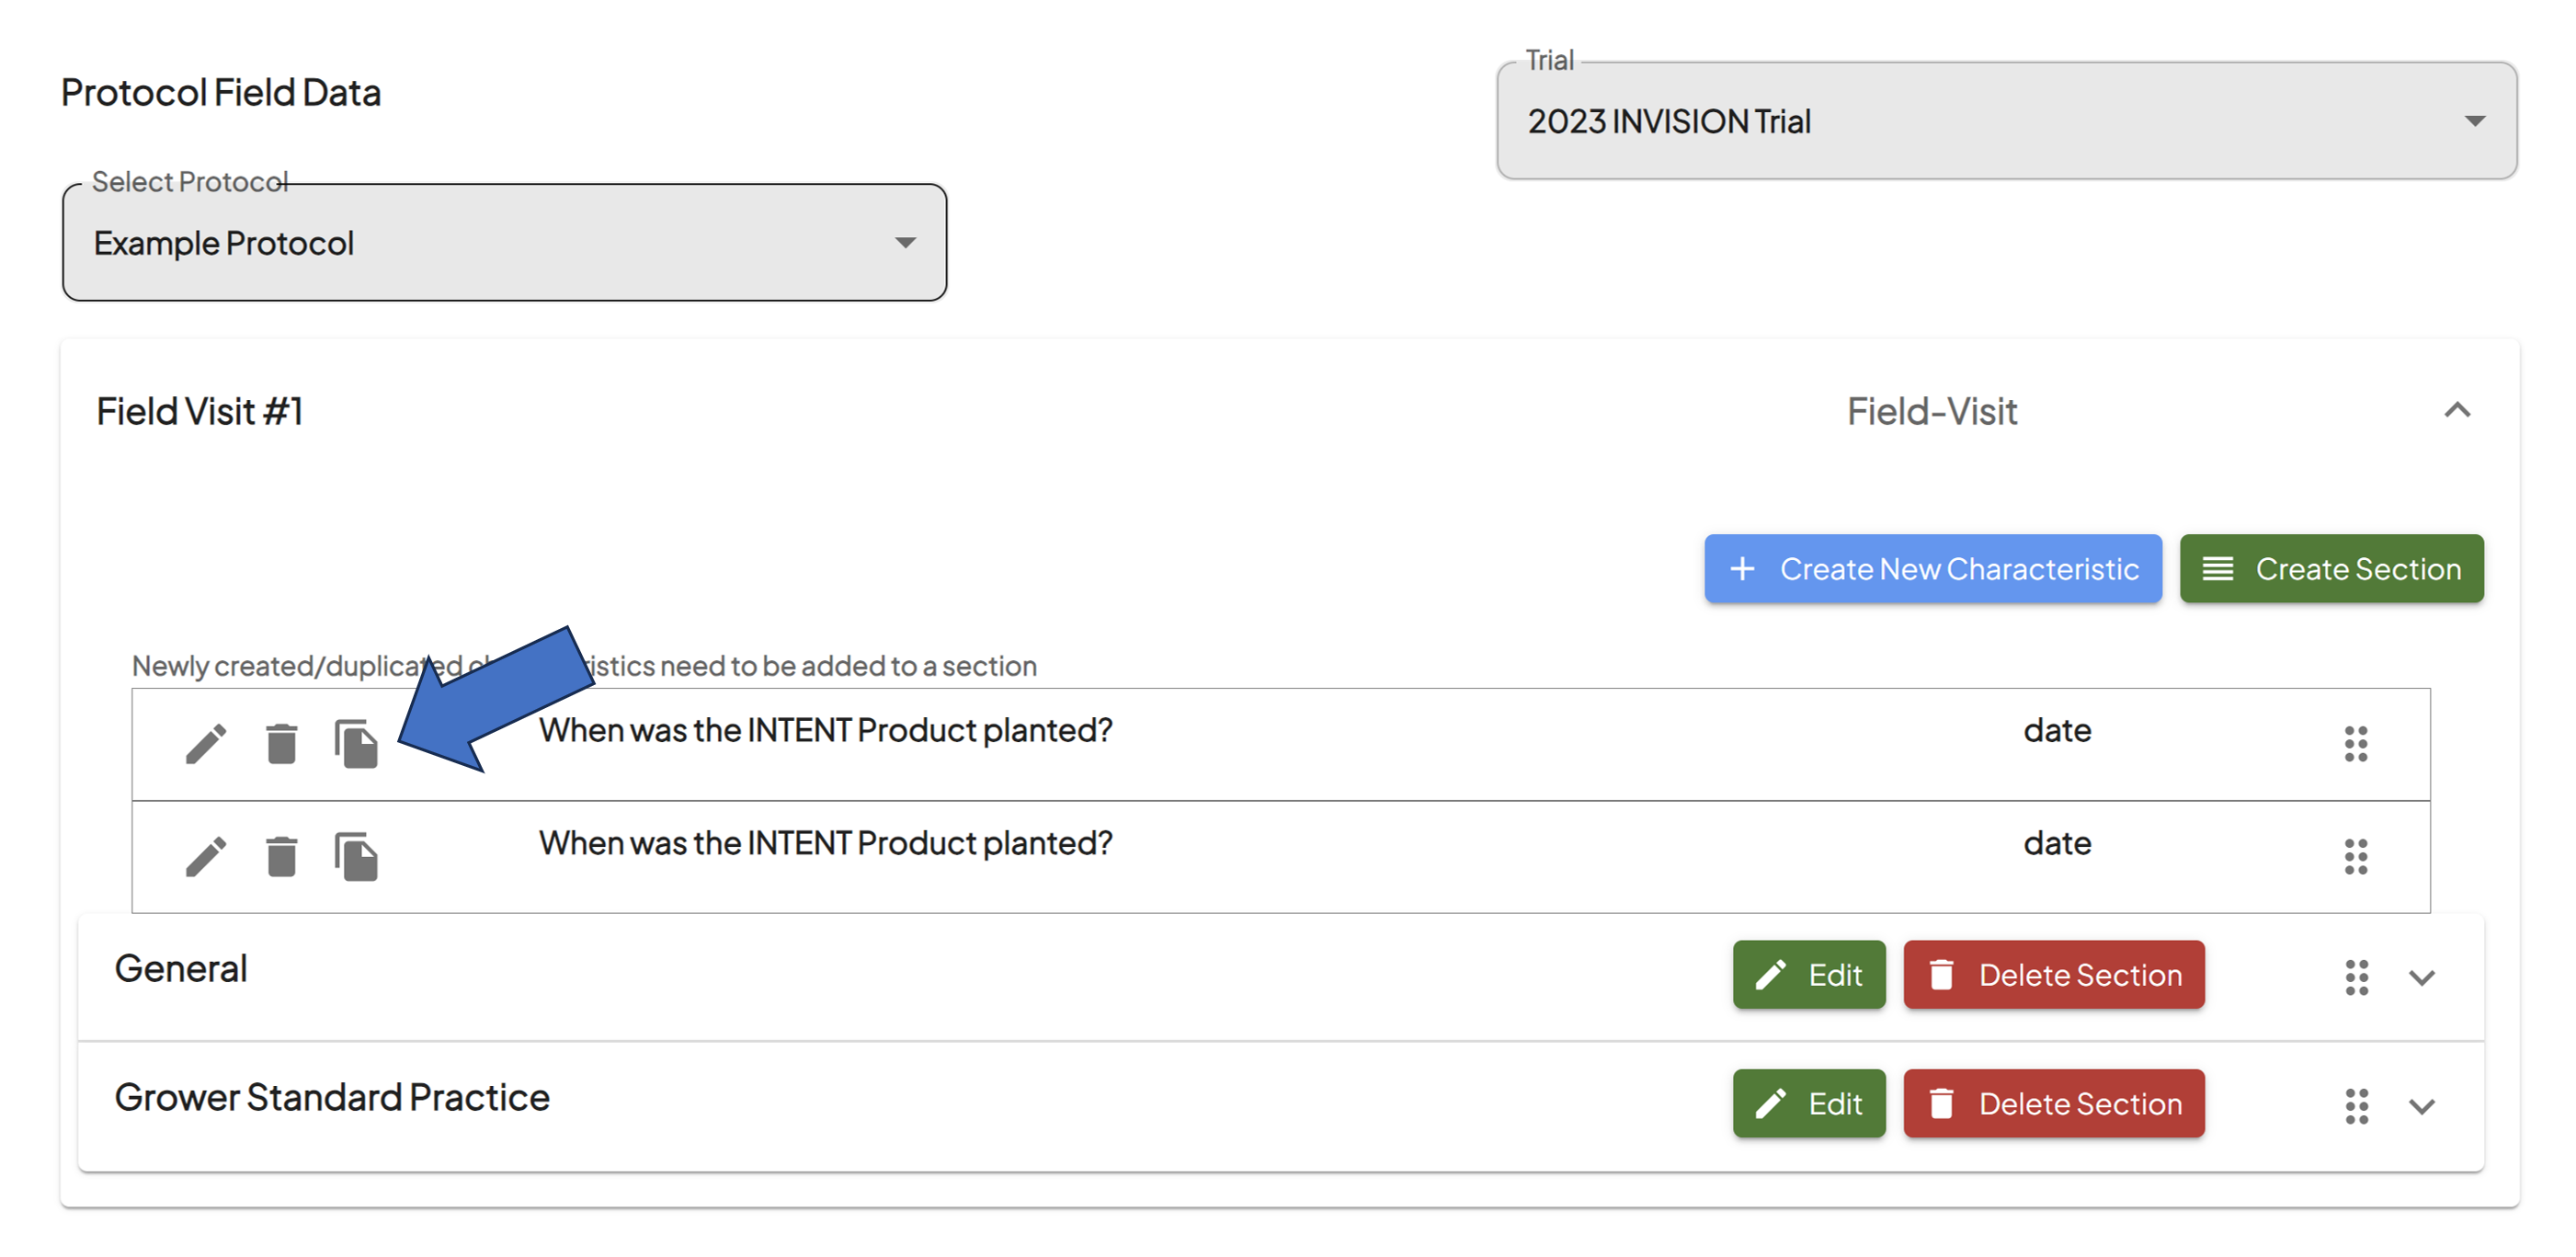
- Edit Your Characteristics
- Click the pencil icon to edit the label or type of question.
- Click the trash can icon to delete a characteristic.
- Click the copy icon to duplicate the questions.
- Questions that are duplicated need to be placed within a section.

- Questions that are duplicated need to be placed within a section.
- Edit the Order of Your Characteristics
- You can order the questions in each section by holding down and dragging the dots menu icon.
- The way they're ordered, from top to bottom in Project Management, is how they will appear for the user when they're answering the questions.

- The way they're ordered, from top to bottom in Project Management, is how they will appear for the user when they're answering the questions.
- You can order the questions in each section by holding down and dragging the dots menu icon.
For additional help, follow along with this video demonstrating how to add field data questions to a protocol step:
Project Management - Introducing Protocol Season Start Dates
In agriculture, timing drives everything from seed selection and planting to harvest and performance review. Whether you're monitoring a cover crop trial or managing a network of plots across regions, understanding when a season truly starts is key to planning, consistency, and insight accuracy.
But here’s the catch: not every crop or protocol follows the same seasonal rhythm.
The Problem with a One-Size-Fits-All Start Date
Most platforms default to the planting date as the start of the season. While convenient, this can create misalignments for:
-
Crops that have growth cycles that being prior to spring (e.g., winter wheat, camelina, covercress).
-
Trials that need to track weather, GDD, or pre-season field activities.
-
Protocols that vary by region or product.
In short: relying only on planting dates limits visibility and planning precision.
The INVISION Solution – Season Start at the Protocol Level
INVISION introduces Season Start Settings right where they matter most — in Protocol configuration, the heart of project planning.
Here’s how it works:
🔐 Admin-Only Access
Only users with Admin privileges can configure season start settings at the protocol level. This ensures consistency across trials and prevents misconfigurations.
Crop-Specific Settings
Admins select the crop (e.g., CoverCress, Winter Wheat) when setting up the protocol. Each crop can have its own season logic.
Season Start Type – Two Flexible Options
A new dropdown lets you choose how a season begins:
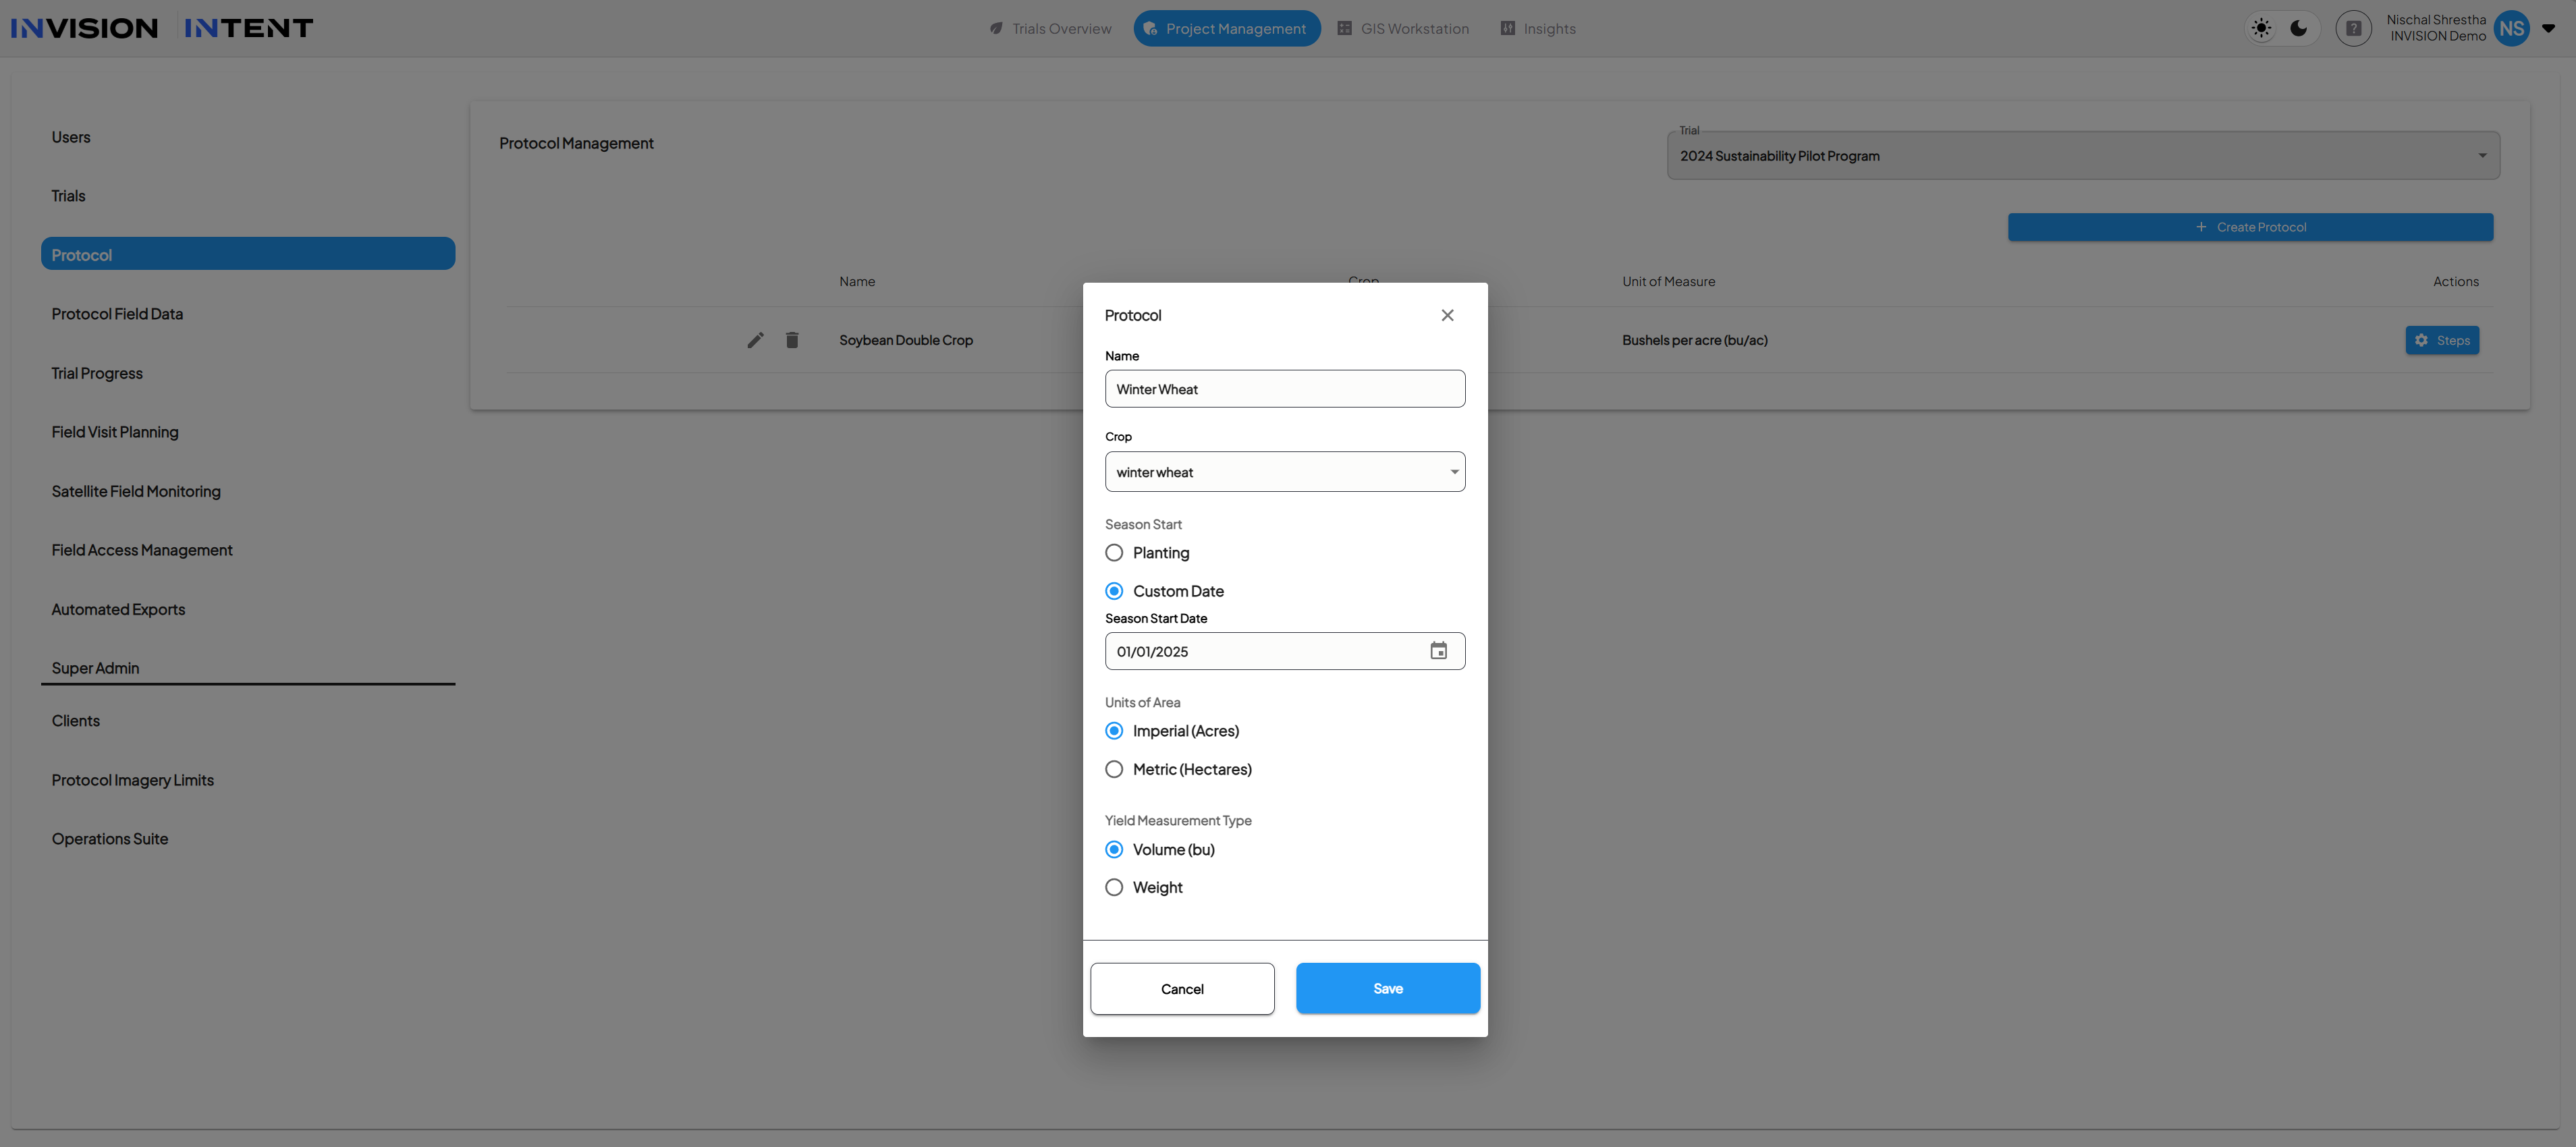
-
Planting Date (Default)
-
Season starts on the actual planting date of each field.
-
-
Custom Date
-
Admin can pick a fixed calendar date via date picker.
-
This becomes the start point for the entire season across all enrolled fields.
-
What Changes When You Set a Custom Date?
If a custom season start is selected, INVISION uses this date to:
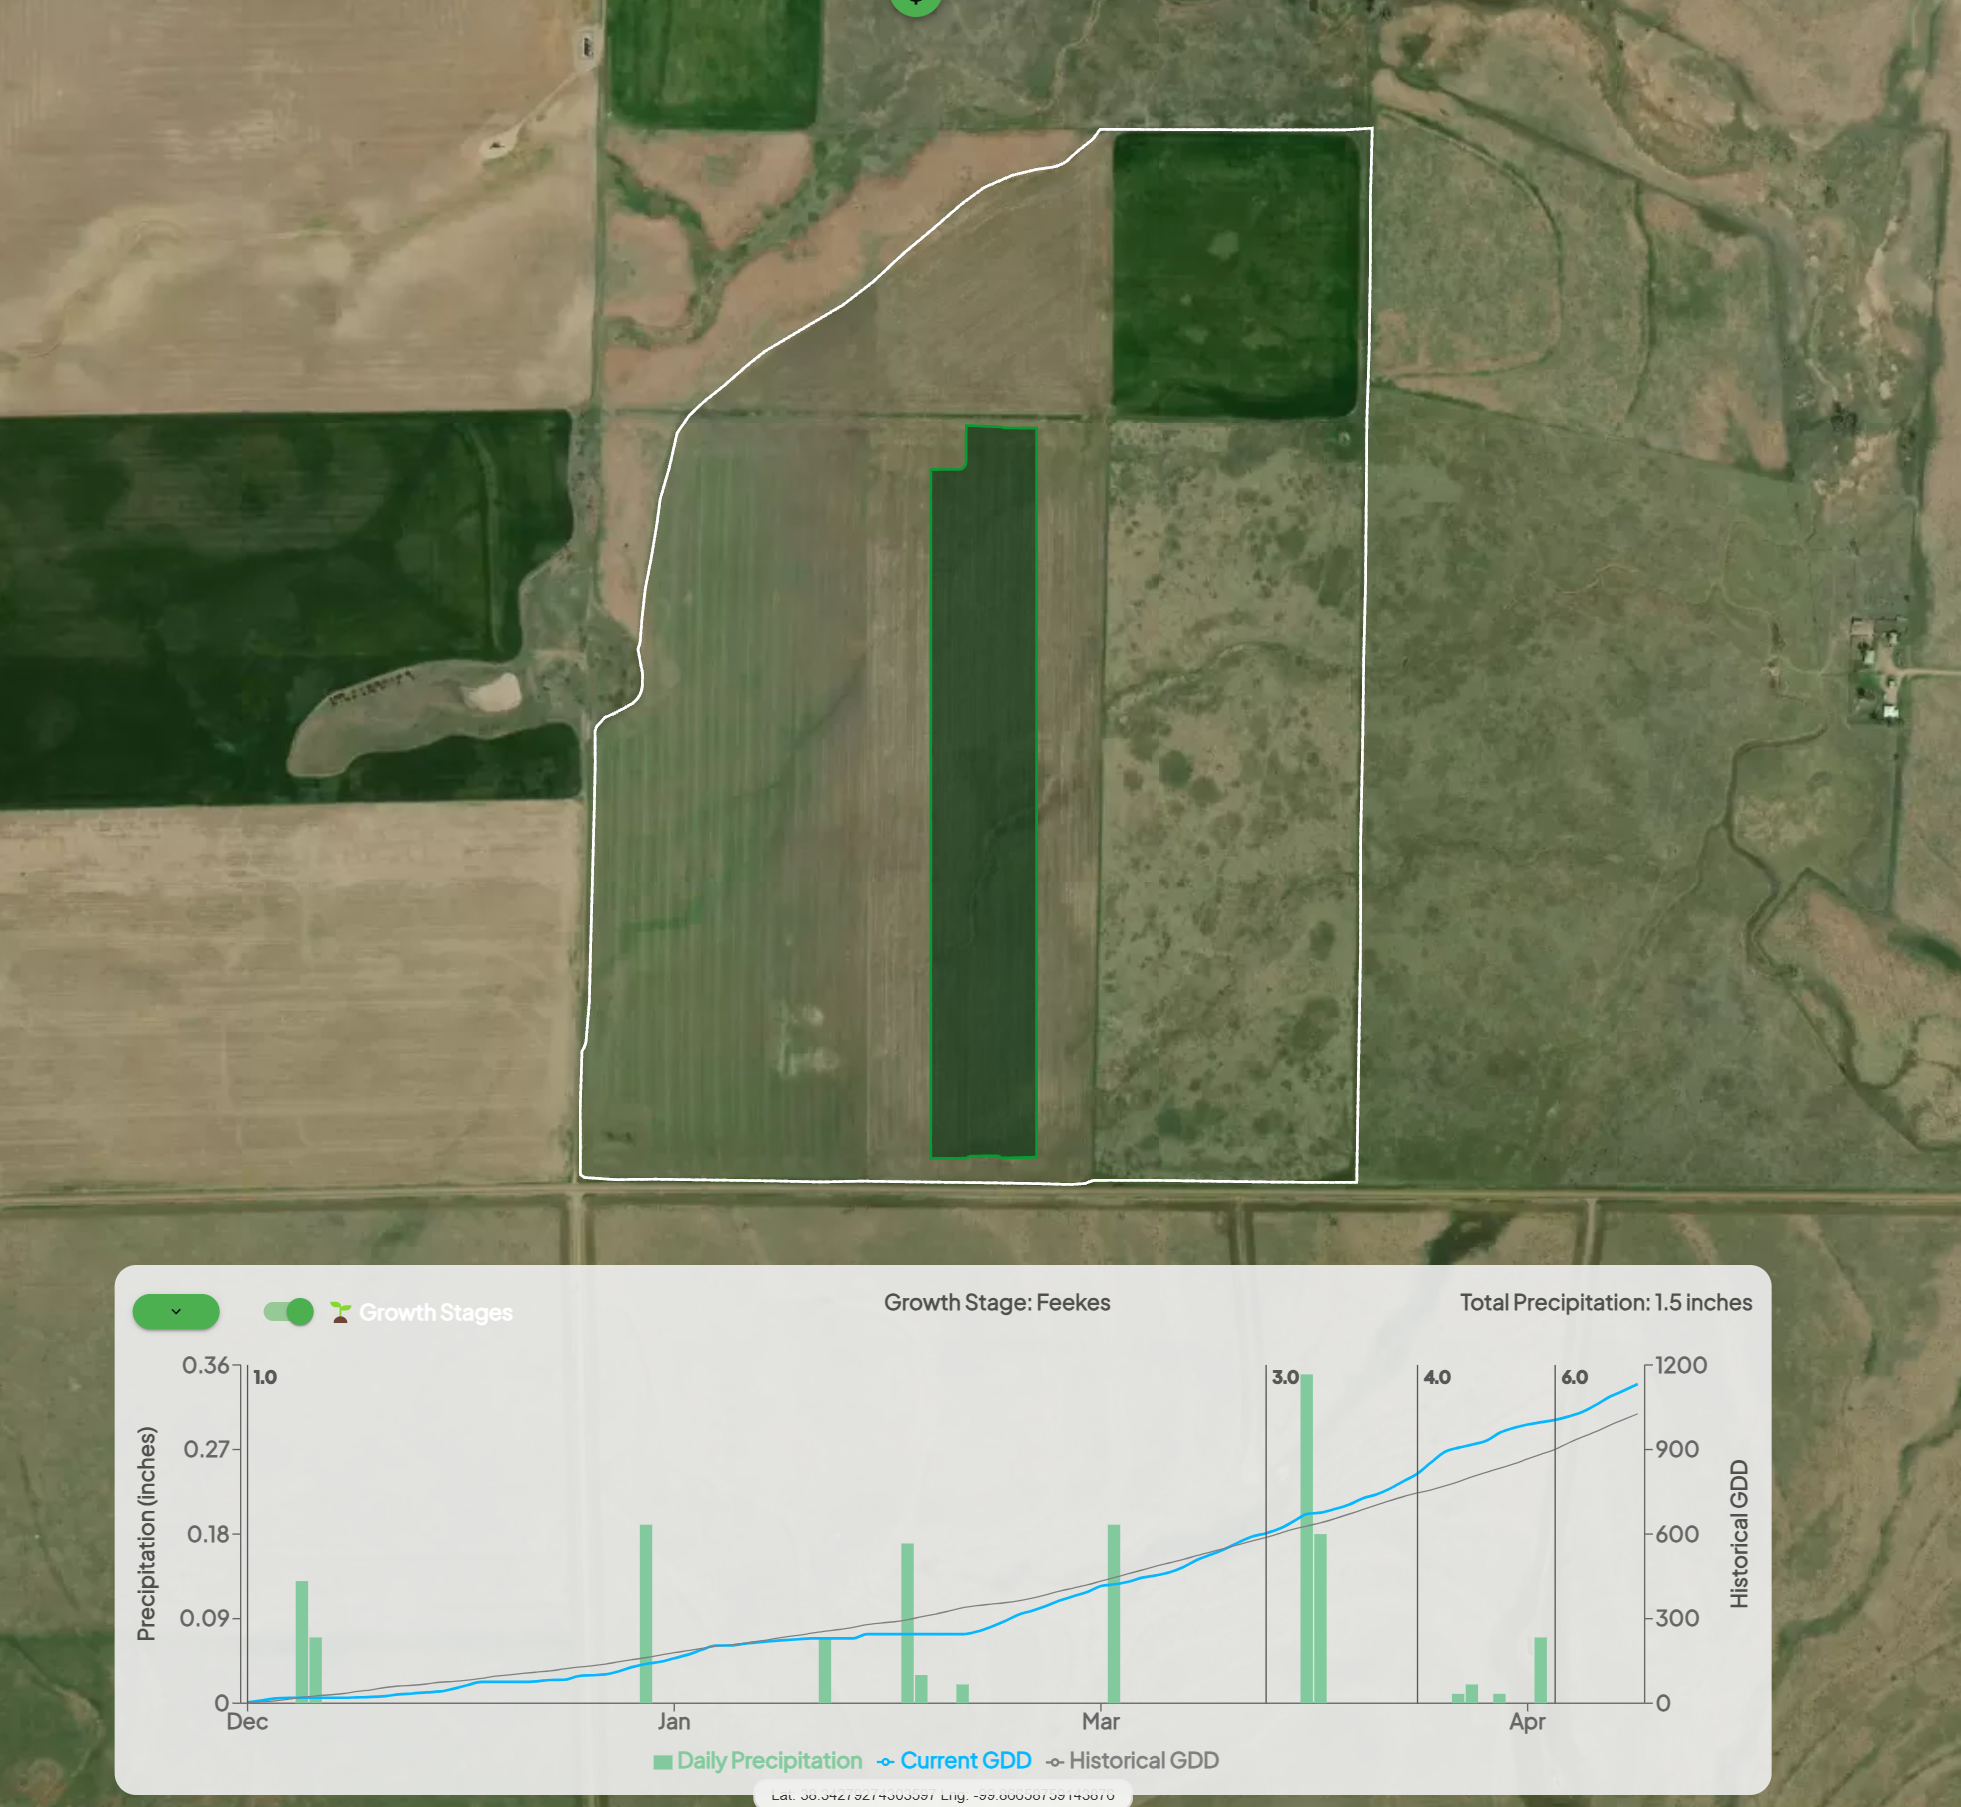
-
Anchor Season-at-a-Glance weather summaries.
-
Drive Growing Degree Days (GDD) calculations.
-
Set clearer expectations for growth stages, field visits, and data collection windows.
-
Align remote sensing overlays and alerts with the actual seasonal timeline.
Why It Matters for Project Management
In large-scale field trials, small timing differences can cause major gaps in data consistency. INVISION’s protocol-level season start configuration solves that by giving project leads the ability to:
-
Standardize planning windows across trials.
-
Schedule field visits, sampling, and scouting more accurately.
-
Align analytics across geographies and crop types.
-
Avoid guesswork when interpreting weather or phenology charts.
Whether you're launching a national hybrid trial or managing 20 small plots, this feature helps turn season-based variability into structured, actionable timelines.
Protocol Season Start Dates
In INVISION, the availability of imagery, weather data, and GDD calculations for a trial is controlled by the Season Start logic configured at the protocol level. This logic determines the earliest date from which the system will display and analyze seasonal data for fields enrolled in the protocol.
To determine the effective season start date, INVISION evaluates the following three dates and selects the earliest available value:
-
Field Planting Date – If a planting date has been recorded for the field.
-
Protocol Season Start Date – A custom date configured in the protocol settings.
-
January 1 of the Trial Year – Used as a default fallback if no other date is available.
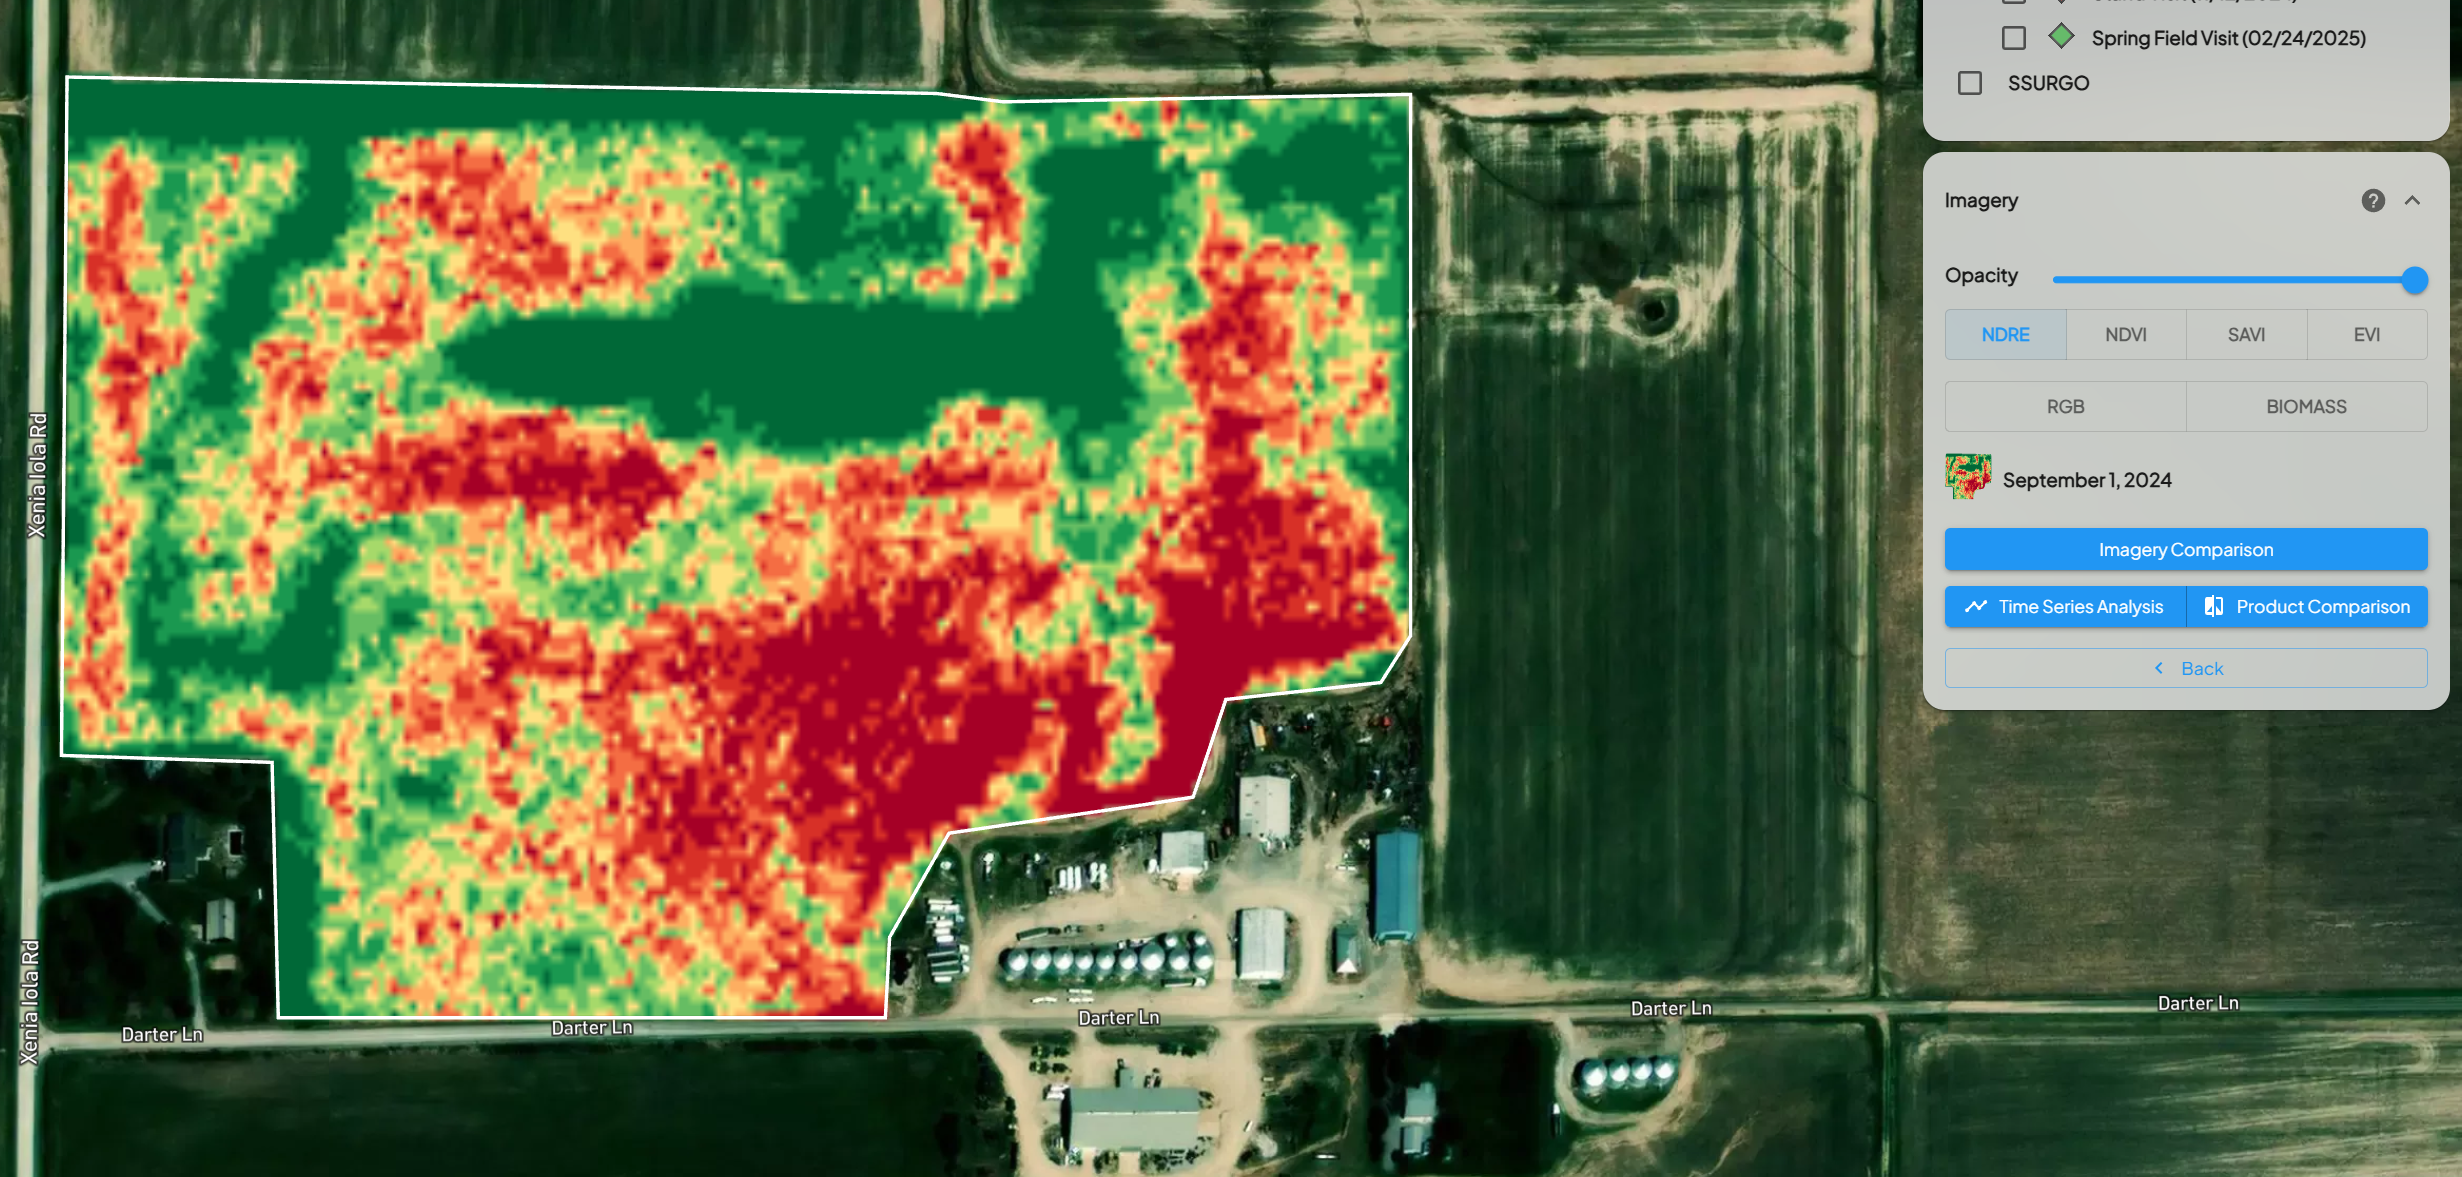
This calculated date becomes the starting point for seasonal data, including:
-
Satellite imagery availability in the field view
-
Weather data timelines
-
Growing Degree Day (GDD) accumulation
-
Imagery ordering windows
If no planting date has been entered and no protocol season start date is configured, the system will default to January 1 of the trial year. In this case, imagery from the previous fall will not appear in the interface, even if that imagery exists in the dataset.
For crops that span across calendar years—such as winter crops or trials where imagery from the previous fall is important—users can configure a custom Protocol Season Start Date. For example, a 2026 trial could set a protocol season start date of September 1, 2025 to ensure imagery and weather data from Fall 2025 are included.
When adjusting the protocol season start date, it is important to note that this date also becomes the starting point for weather and GDD calculations. Field-level weather and GDD values are calculated dynamically in most views, so updates to the season start date will apply automatically when the data is recalculated.
Using the protocol season start date allows teams to accurately define the agronomic season for each protocol and ensures that relevant imagery and environmental data are included in the analysis.
How to Import Protocol Steps for Faster Trial Setup in INVISION
INVISION allows teams to reuse existing protocol steps when setting up new or recurring trials. Importing protocol steps helps reduce repetitive configuration work, maintain consistency year over year, and speed up trial setup.
This guide explains when to use protocol step imports and how the process works.
What Is a Protocol Step Import?
A Protocol Step Import allows you to copy an existing protocol step within the same client and reuse it in another protocol.
When a step is imported, INVISION brings forward:
-
The protocol step itself
-
All associated sections
-
All configured characteristics
-
Default settings and structure
This makes it easy to start from a proven setup instead of rebuilding field data forms from scratch.
When to Use Protocol Step Import
Protocol step imports are especially useful when:
-
Running similar trials year over year
-
Repeating standard data collection steps (e.g., planting, harvest, stewardship calls)
-
Maintaining consistency across multiple trials or programs
-
Reducing setup time at the start of a new trial season
Rather than recreating steps manually, teams can focus on updating only what has changed.
Step 1: Navigate to Protocol Management
-
Open the Trial you are setting up.
-
Navigate to Project Management.
-
Open the Protocol you want to edit.
-
Locate the Steps section within the protocol.
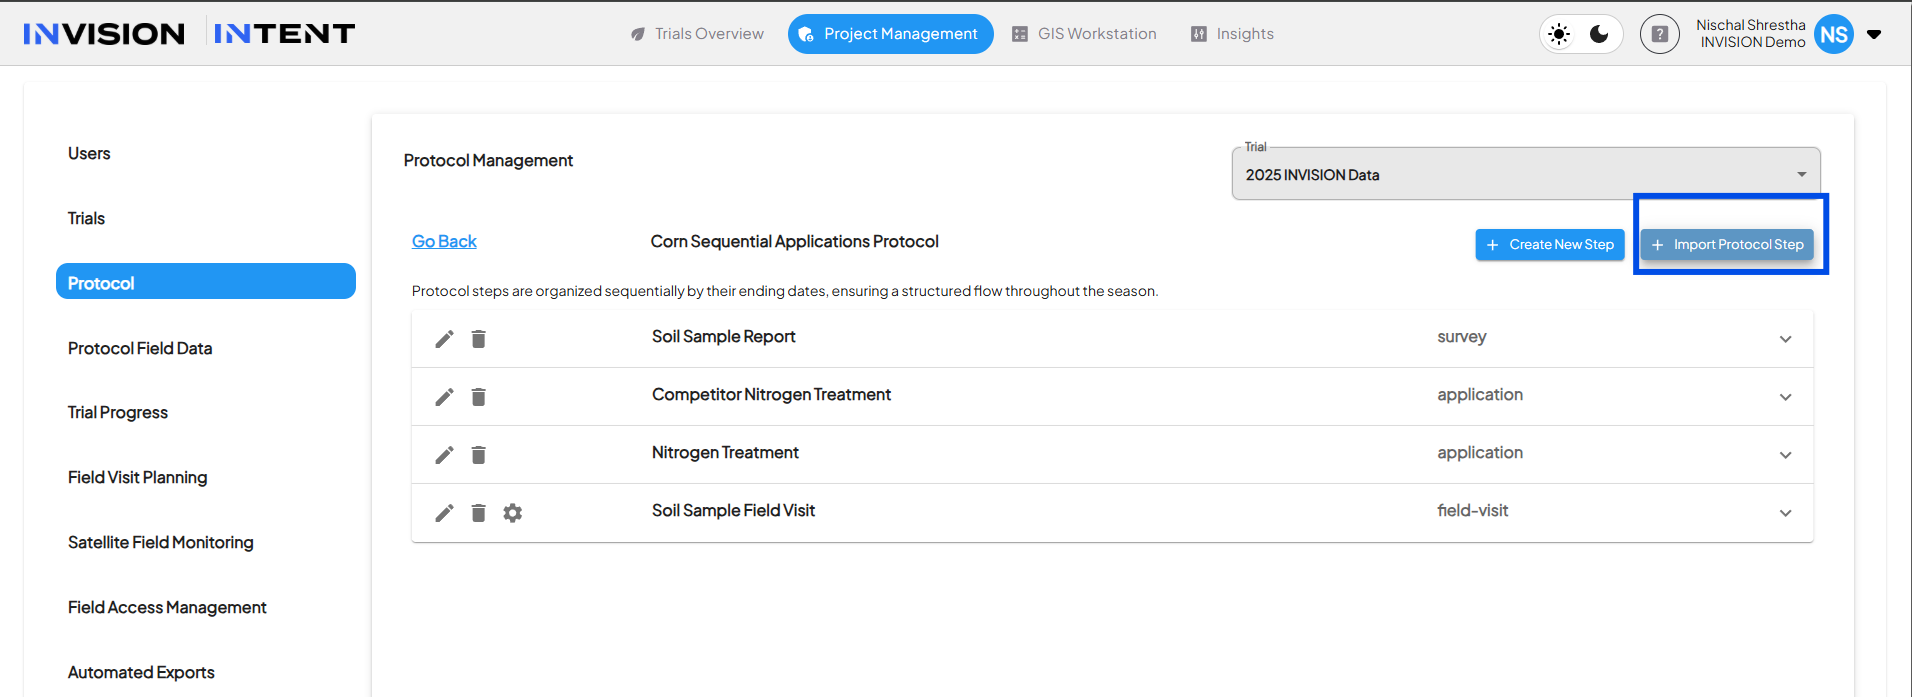
Step 2: Import an Existing Protocol Step
-
In the protocol’s Steps list, select Import Protocol Step.
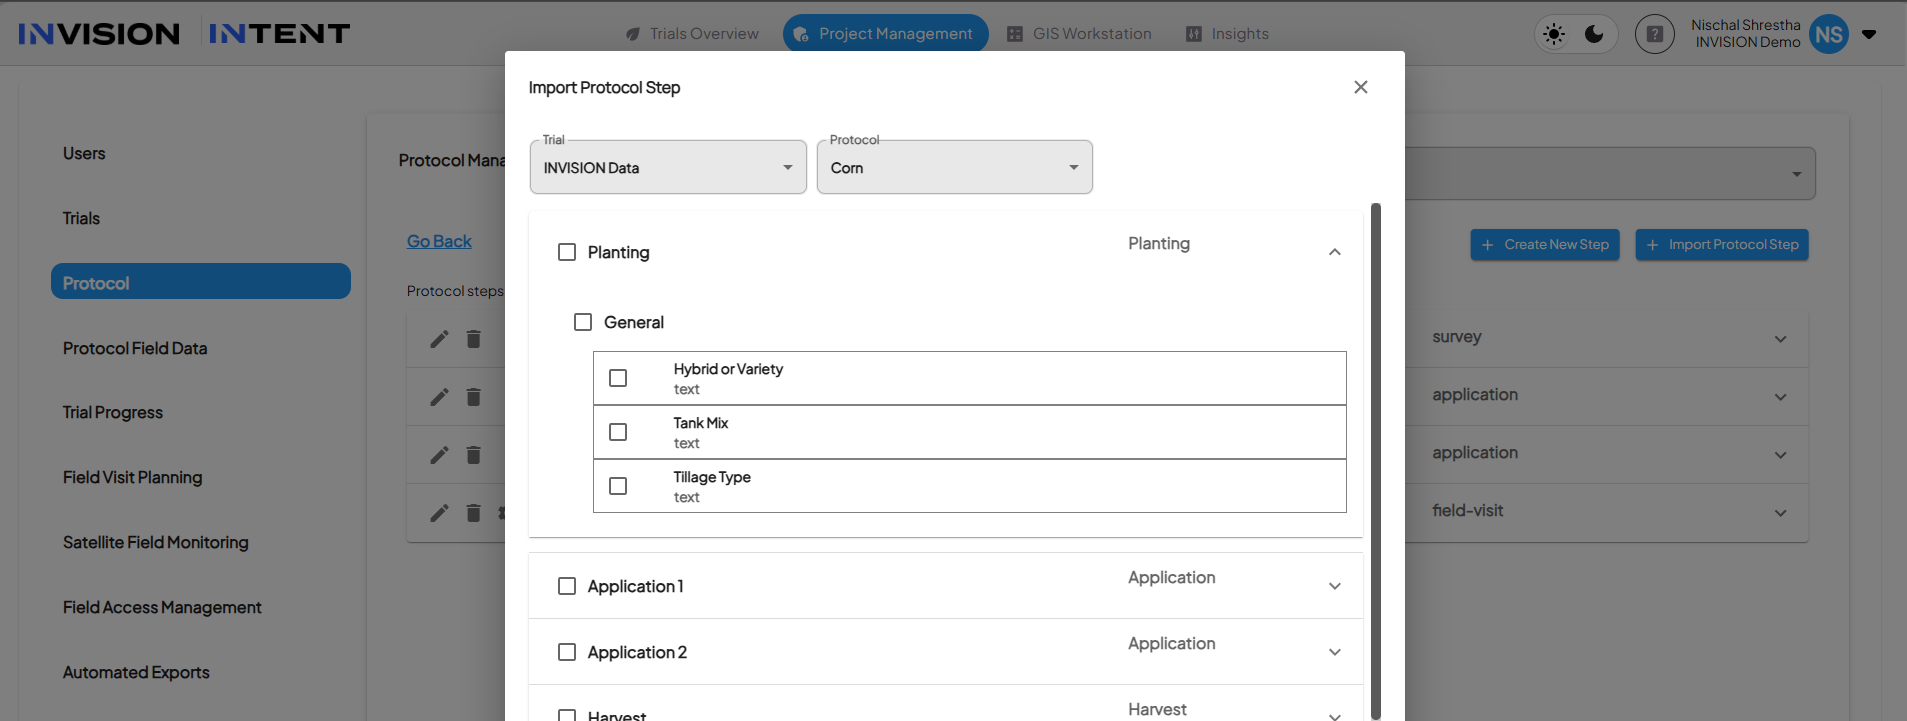
-
Choose a source protocol from the same client.
-
Select the protocol step you want to import.
-
Confirm the import.
The selected step will be added to your protocol with its sections and characteristics intact.
Step 3: Review and Update Step Dates
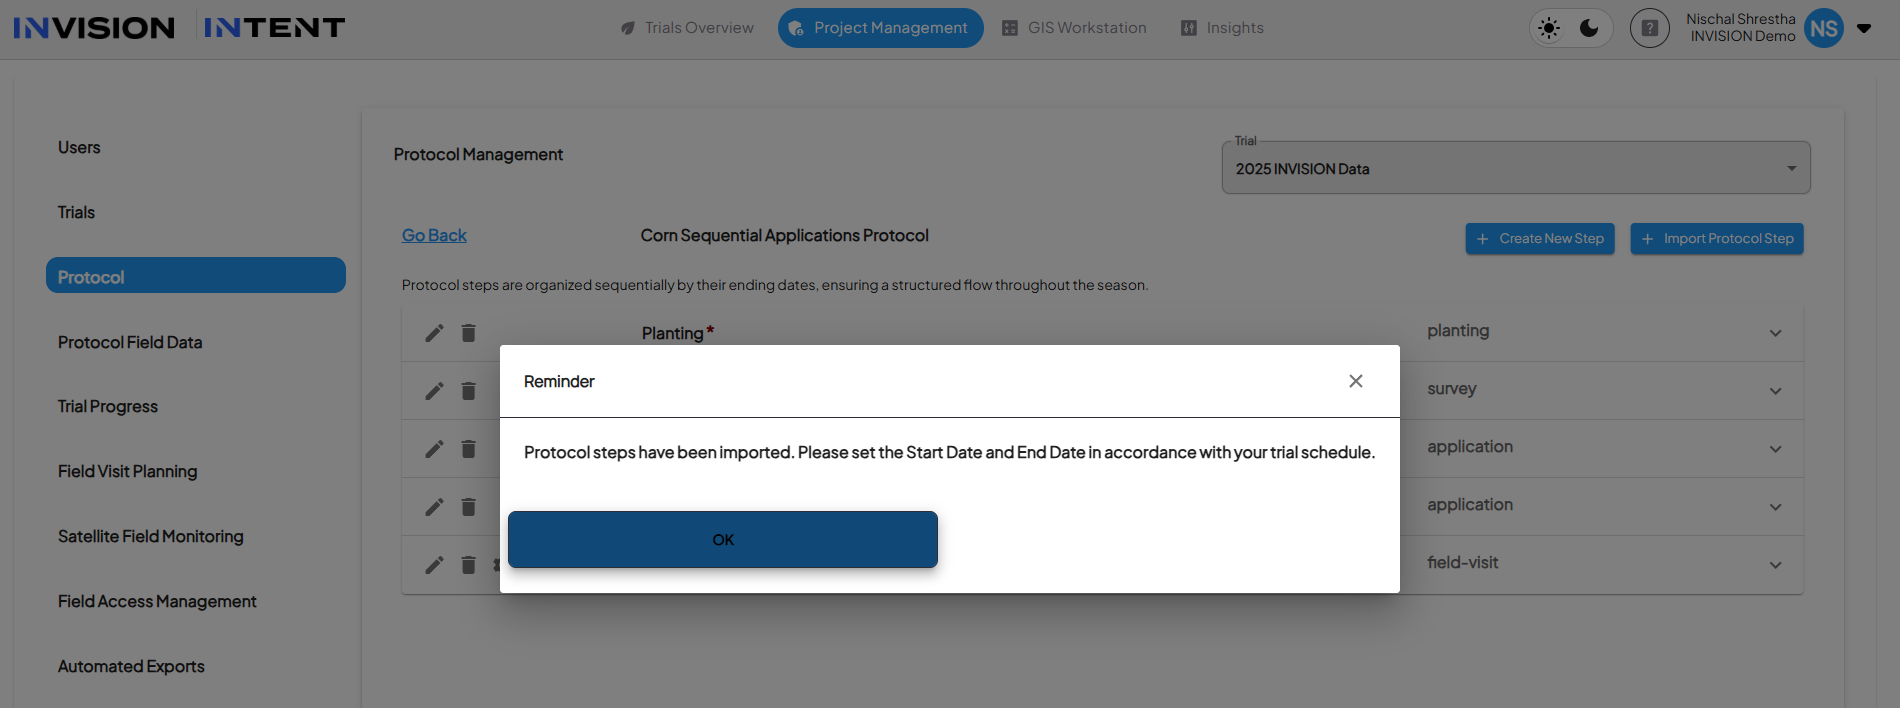
After importing a step:
-
INVISION prompts you to review the start and end dates.
-
Imported dates reflect the source protocol and must be updated to match the current trial year.
This ensures timelines remain accurate and prevents accidental reuse of outdated dates.
What Happens After Import
Once imported and updated:
-
The step behaves like any other protocol step.
-
Characteristics can be edited, added, or removed as needed.
-
The imported structure does not modify the original source protocol.
Each trial remains independent, preserving historical accuracy.
Best Practices
-
Use imports to establish a baseline, then adjust as needed for the current year.
-
Review imported characteristics to ensure they still apply to the trial objectives.
-
Always update dates immediately after import.
-
Use consistent naming for steps to improve clarity across trials.